Streamline Your .NET 8 Projects with the Power of MediatR and Blazor

In this article, I want to revisit how the Vertical Slice Architecture can be used. This article takes an in-depth look at feature slicing and its application to server-side rendered (SSR) .NET 8 Blazor pages without the need for a controller class. You’ll find clear explanations and practical advice on several key points:
- An understanding of what Vertical Slice Architecture is and how it works within the .NET ecosystem using the power of the MediatR library.
- Insight into the distinctions between vertical slices and microservices, and when each is appropriate.
- The reasons why the traditional controller-based model may not be necessary in modern web app design.
- A practical, hands-on walkthrough for crafting a Razor page that leverages the vertical slice approach, offering a concise and independent feature slice for better maintainability and scalability.
By the end of this article, you should have a thorough understanding of vertical slice architecture and be well equipped to use it in your .NET 8 Blazor projects to increase their robustness and modularity.
What is Vertical Slice Architecture?
First, I want to clarify what exactly Vertical Slice Architecture means and why it is a good way to build your application. There are many patterns, but most of them sooner or later lead to a codebase with many dependencies. Good developers should always strive to improve their code and create something sustainable. I like to say that good code should not be complex, but easy to read and understand.
Let’s talk about why breaking a software system into small pieces is such a good approach. Well, I think the big advantage is that you focus on interactions rather than layers or technical affiliations. What I mean by that: Thinking in slices means focusing on exactly one input-output pair, i.e. one interaction. And every system is made up of interactions. Each slice must ensure that it receives the input from the user (or another system) and delivers the output.

How to interact with a system in general.
It is important to differentiate between input/output as it is exchanged with the environment (e.g. form fields or JSON) and what a portal makes of it for internal processing. Input can be given manually through a standard user interface, such as a GUI, or as an HTTP request. The output can be visual, such as text or images, or an HTTP response.
The slice should be isolated. It represent a module and contains everything what is needed to process the request. Within the slice, we have a high level of cohesion. This is also a significant difference from traditional layer-oriented architectural approaches, where concerns are sliced horizontally, essentially making it difficult to see the coherence of an interaction. A layered architecture always leads to an overly technical view of the system. It leads to the creation of many abstractions around concepts that should not be abstracted. For example, a controller needs to talk to a service, which needs to use a repository, and so on.
In a nutshell, the idea of vertical slices is to localize code in accordance with business needs.
What is the difference between Vertical Slices and Microservices?
Somehow slicing a software system sounds like the microservices architecture approach, doesn’t it? After my recent articles on Vertical Slice Architecture, I was often asked how it differs from microservices. Both approaches aim to break down a software system into smaller pieces focused on one thing to achieve a clear and maintainable structure as well as modularity and separation of concerns.
Both approaches allow us to decide how best to design the implementation based on the use case or feature. What I mean by this is, for example, that we no longer have to use the domain model pattern application-wide, but only where it is really necessary. Sometimes a simple transaction script will do. We can add new features and use the appropriate pattern without having to worry about common code.
But what is the difference? First, let’s take a quick look at the microservices approach.

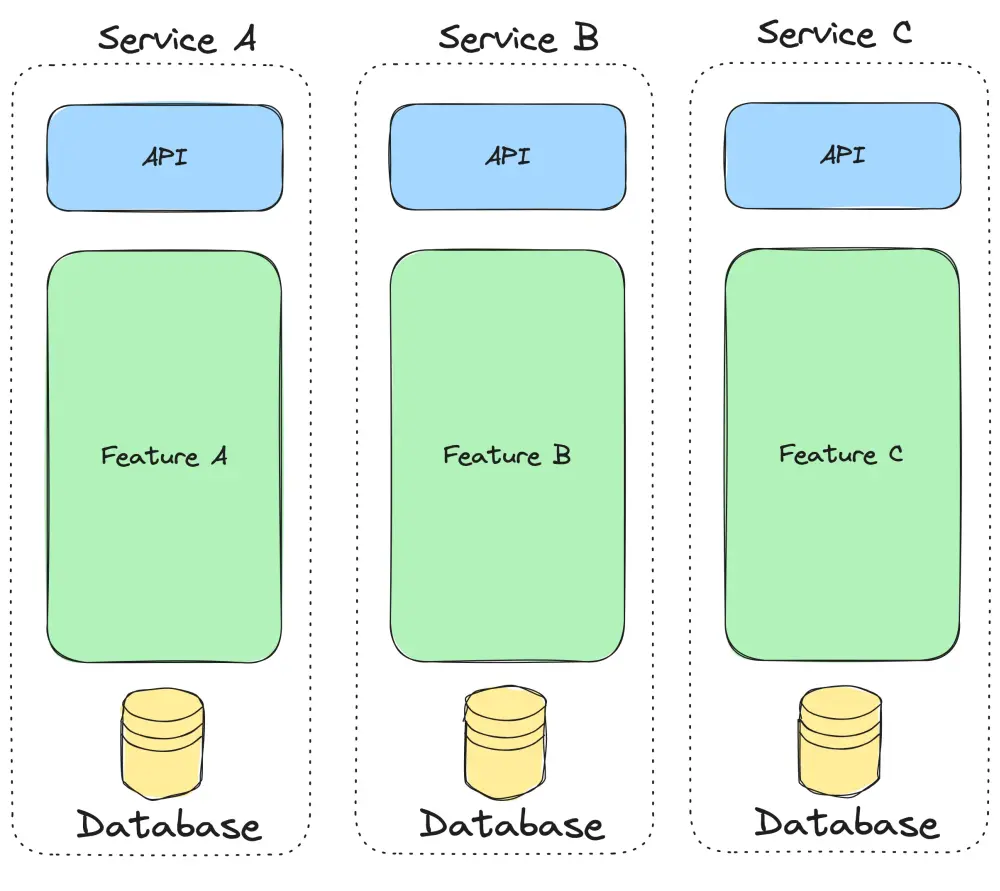
Physical separation of features with microservices.
Microservices are based on the idea of physical separation between features. This is essential for scaling or independently developing and deploying individual services. These benefits come with increased complexity in deploying, versioning, and sharing code.
(I’ve written an article about the potential pitfalls of implementing microservices. It’s based on my experiences over the past few years.)
Earlier in this discussion, we explored the concept of feature slices, which focus our code organization around a cohesive business domain. The essence of vertical slices is encapsulated in the request-response pair that represents the complete behavior of a feature.

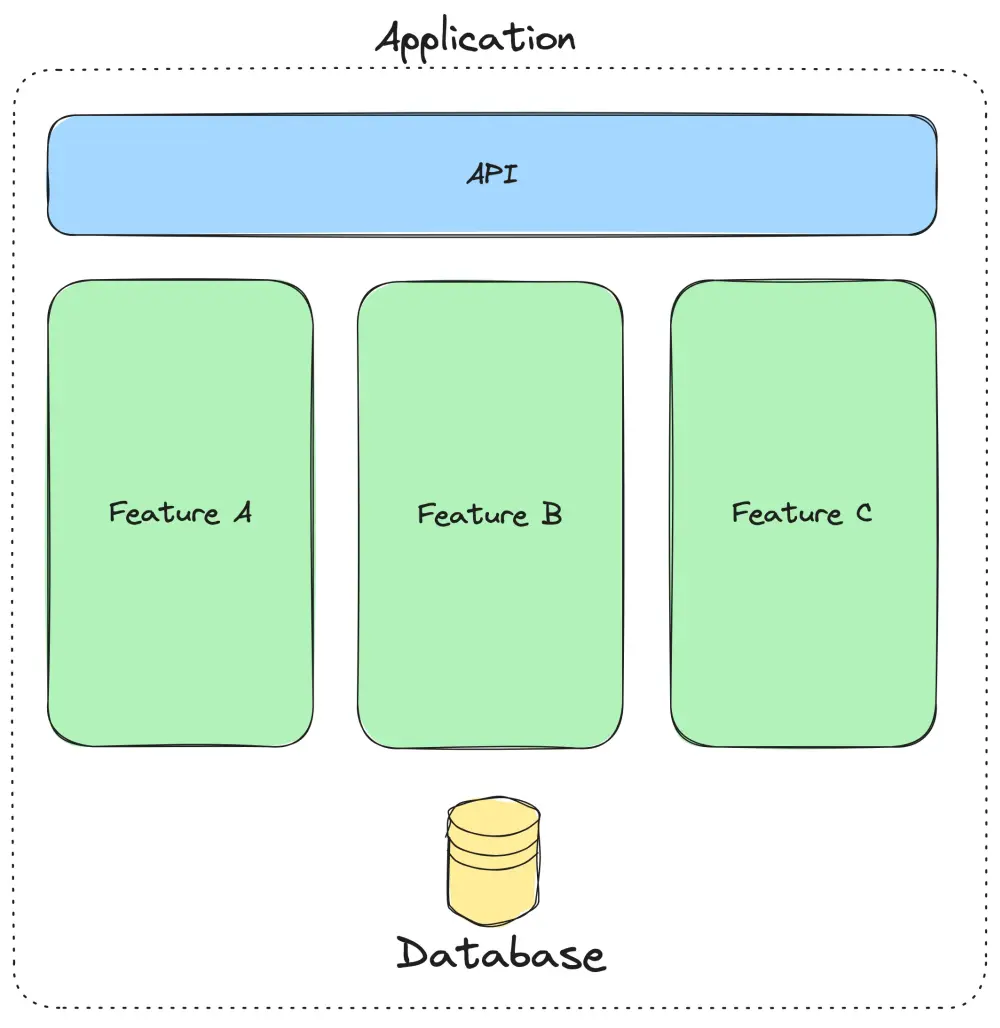
Vertical (Feature) Slices.
Adherence to the command and query separation (CQS) principle helps identify these slices with clarity and precision. Physical layers -those that form the basis of APIs or define the database schema- remain intact. Each slice is dedicated to a single business function or interaction. The key is to balance minimizing dependencies between slices with high cohesion within slices. This approach is similar to the microservice approach, in some ways, except that the application is a single deployment unit.
Why controllers are no longer required
I have a good news. With .NET 8 and Blazor we can say good bye to controllers. Finally.
I have already expressed my disgust with controllers in other articles, explaining that they ultimately lead to the creation of containers that know too much and usually have too many dependencies. In my ideal world of feature slices, we have a folder that contains everything needed to perform the task (interaction). The things in that folder describe the feature, and are therefore contained in one container (folder). In .NET, they are in the same namespace. This means, for example, that we will describe the representation of a user in the List Users feature differently than in the Show User Details view. There is no shared model, but complete independence.
In addition, if the interaction is via a user interface, this means that the view must also be contained in the container. In an implementation with .NET 8 as a Blazor Web App, this means that the Users.razor page, for example, is part of the feature slice and therefore cannot be organized elsewhere in the code.

Code Organization with Feature Slices.
In the following example I want to show how to organize the code by features. Stop thinking in layers. Every feature slice contains the things needed to process a request (input) and to produce the response (output).
Hands-On
For the example I want to implement the GetUserList feature as a feature slice. As the name indicates, this is a query. When viewed in the context of an application, a user requests a UserList and expects an output. Assuming this is a web application, the user requests the page and gets a list of users in the UI. So here we see the typical pattern of input, processing, and output.
I will use .NET 8 and create a Blazor Web App project based on the template to implement this simple example. For illustration purposes, I will use an Entity Framework InMemory database with some generated user data in my example. The DbContext will be located in the /Infrastructure/Database folder. I will not explain the initialization of the database context in detail in this article, but it is part of the corresponding GitHub repository.
The first thing we need to do is add the necessary packages. These are MediatR and the EntityFramework Core packages.
dotnet add package MediatR --version 12.1.1

dotnet add package Microsoft.EntityFrameworkCore

dotnet add package Microsoft.EntityFrameworkCore.InMemory
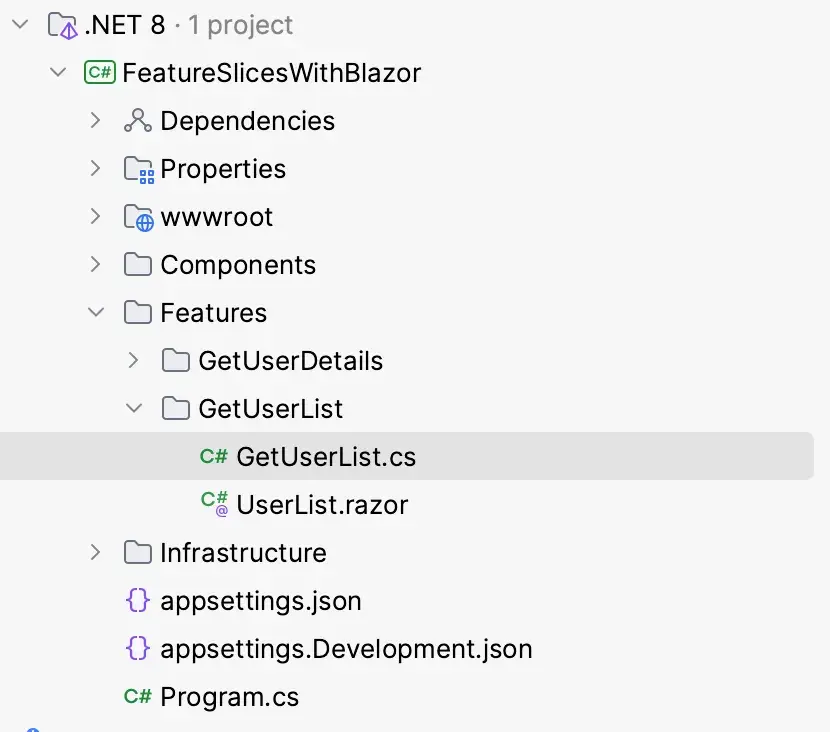
Let’s add a new Features folder to the project root. All the features of the application will be stored in this folder. Since we want to add our first feature, GetUserList, we will also add a folder called GetUserList.
As a first step, we will simply add a basic Razor page called UserList to the folder. This is just to verify that the routing works as expected.
@page "/users"

<h3>User List</h3>


@code {


}
This allows us to run the application and check in the browser to see if the page is displayed correctly.
In the following code, we’ll look at how a Blazor web app gets a list of users — but it’s done in a tidy and organized way, without the need for a controller class. Here’s what’s going on:
Prepare to ask for users: The GetUserListQuery is a kind of query. It says, “Hey, I want a list of users, but only a certain number at a time (that’s the PageSize), and I want to specify which page of users I’m looking at (that’s the Page). “ The code for that is very simple.
// Input (Request)

public record GetUserListQuery(int PageSize = 10, int Page = 1) : IRequest<GetUserListViewModel>;
By implementing the IRequest<T> interface, this request clearly communicates that it expects a GetUserListViewModel type response, ensuring a well-defined contract for the handler to fulfill.
Preparing the response: The GetUserListViewModel is the response we prepare for the GetUserListQuery. It’s a kind of summary sheet like this.
// Output (Response)

public record GetUserListViewModel(IEnumerable<UserViewModel> Users, int TotalRecords, int Page, int TotalPages);
As you can see I use a record instead of a class for the request/ response models because records in C# provide a concise way to define immutable objects, which means that once the request or response is created, the information it contains can’t be changed, ensuring consistency in data handling.
Describing each user: The UserViewModel is a simplified profile for each user. It’s like a name tag that gives us just enough information: a unique ID and the user’s display name.
// ViewModel

public record UserViewModel(Guid UserId, string DisplayName);
The request handler: The GetUserListRequestHandler is where the action happens. This is the part that actually takes the request and figures out what to do with it. It talks to the database where all the user information is stored and uses the GetUserListQuery to understand what you’re looking for.
// Handler, Domain Logic

public class GetUserListRequestHandler(AppDbContext dbContext) : IRequestHandler<GetUserListQuery, GetUserListViewModel>

{

    public async Task<GetUserListViewModel> Handle(GetUserListQuery request, CancellationToken cancellationToken)

    {

        var pageSize = request.PageSize; // The number of records per page

        var pageNumber = request.Page; // The current page number


        var skip = (pageNumber - 1) * pageSize;


        var totalRecords = await dbContext.Users.CountAsync(cancellationToken);


        var users = await dbContext.Users

            .OrderBy(c => c.DisplayName)

            .Skip(skip)

            .Take(pageSize)

            .ToListAsync(cancellationToken);


        // Projection: Map the result to the view model.

        var viewModels = users.Select(u => new UserViewModel(u.UserId, u.DisplayName)).ToList();


        // Create the view model for the current page

        var totalPages = (int)Math.Ceiling((double)totalRecords / pageSize);

        var viewModel = new GetUserListViewModel(viewModels,  totalRecords, pageNumber, totalPages);

        return viewModel;

    }

}
Inside this handler, we figure out where to start in the list of users (skip), count how many users there are in total (totalRecords), and then grab only the subset of users we need — based on page size and number (users).
Implementing the IRequestHandler interface in the GetUserListRequestHandler means that this class has a specific job to do: respond to a GetUserListQuery. It’s a promise that this handler knows exactly how to process this type of request and will return a GetUserListViewModel when it’s done. This design results in cleaner code because each handler is tailored to a specific task, making it easier to understand and maintain.
To make sure MediatR can do its job of handling requests and sending responses, we need to set it up in program.cs. It’s done with one line of code in the program.cs as follows:
builder.Services.AddMediatR(config => config.RegisterServicesFromAssembly(typeof(Program).Assembly));
So when a request comes in, MediatR checks its registration to find the right handler and then forwards the request to it. This registration process is crucial for MediatR to work smoothly with our application.
This leaves us wondering where to send the request to MediatR. Let’s go to the UserList.razor file and add the needed code as follows.
@page "/users"


@attribute [StreamRendering(true)]

@attribute [RenderModeInteractiveServer]


@using MediatR

@using Microsoft.AspNetCore.Components.Web

@inject IMediator  Mediator


<h3>User List</h3>


@if (_model == null)

{

    <p><em>Loading...</em></p>

}

else

{

    <p>User Count: @_model.TotalRecords</p>

    <div class="table-responsive">

        <table class="table mb-0 table-bordered  table-hover table-striped small">

            ...

        </table>

        <p role="status">Page: @_currentPage of @_model.TotalPages</p>

        <button disabled="@(_currentPage == 1)" class="btn btn-primary" @onclick="PreviousPage">Previous Page</button>

        <button disabled="@(_currentPage == _model.TotalPages)" class="btn btn-primary" @onclick="NextPage">Next Page</button>


    </div>

}


@code {

    private GetUserListViewModel? _model;

    private int _currentPage = 1;

        private const int PageSize = 10;


    protected override async Task OnInitializedAsync()

    {

        _model = await Mediator.Send(new GetUserListQuery());

    }


    private async Task PreviousPage()

    {

        _currentPage--;

        _model = await Mediator.Send(new GetUserListQuery(PageSize,_currentPage));

    }


    private async Task NextPage()

    {

        _currentPage++;

        _model = await Mediator.Send(new GetUserListQuery(PageSize,_currentPage));

    }

}
In the UserList.razor Blazor page, we have set up the interactive user interface for displaying a list of users. When this page is initialized, it makes a request to MediatR for the first set of user data. This is done by calling Mediator.Send with a GetUserListQuery. If the data isn’t ready yet, the page displays a loading message. As soon as the data arrives, the page displays the number of users, a paginated table of users, and buttons to navigate between pages. Clicking on ‘Previous Page’ or ‘Next Page’ triggers MediatR to fetch the data for that page, keeping the user list up to date. This is a seamless way to interact with the backend without writing a lot of complex data retrieval and pagination code.
By the way, this highlights the efficiency of Blazor’s Server Side Rendering (SSR). With SSR, Blazor handles the complexity of data retrieval and pagination on the server, reducing the need for detailed client-side code and enabling a smoother user experience.
• • •
The complete implementation, including the interaction with another feature slice viewing the User Details and the generation of the test data, can be found on GitHub.
Cheers!