The file upload feature requires essential validations to clean and maintain user data. Improper execution of a file upload input increases security vulnerability. So we must approve the uploaded files before sparing them on the server to reduce the vulnerability.
Uploading files from clients to servers is among the essential features of any PHP application. However, implementing features with proper security and hassle-free configuration could be tricky. That said, developers may use several PHP file upload scripts to ensure that the application offers the features without any security issues.
Table Of Content
- What Is File Upload Control in PHP?
- Prerequisites
- The Process of File Uploading in PHP
- Create the HTML Form
- Using jQuery & AJAX for File Upload Form
- Configure and Connect MySQL Database With PHP
- Create a PHP Script for File Uploading
- Check if there are any errors in the upload
- Check that the file is under the set file size limit
- How to Use reCAPTCHA in PHP Contact Form?
- Resolving Common Errors
- File Size Is Too Large
- Temporary Folder Is Missing
- Partial Upload or Can’t Write to Disk
- A PHP Extension Stopped the File Upload
- Wrapping Up
This article discusses a popular strategy that developers may integrate within their projects. Furthermore, you will learn how to add PHP file upload functionality to your website using jQuery, AJAX, and MySQL.
What Is File Upload Control in PHP?
PHP lets you upload files with a few lines of code, and its file upload feature allows you to upload binary and text content. So you get complete control over the file uploaded through PHP authentication and file operation functions.
Another way to control your file upload is via data validation. The user must validate the file type, size, and dimension before uploading. The uploaded file’s name, size, and temporary target are stored in the $_FILES[“image_file”] array. The PHP move_uploaded_file function uploads the file by accessing the data stored in $_Files superglobal.
Prerequisites
I assume you have a PHP application installed on a web server for this PHP file uploading example. My setup includes the following:
- PHP 7.1
- MySQL
- JQuery/Ajax file
Now, that the configurations are ready, I will next work on the File Uploading Script.<
Related Articles:
Multiple Images and Files Upload in Laravel with Validation
Upload Image and File in CodeIgniter
The Process of File Uploading in PHP
The process of a complete PHP file-uploading script is as follows:
- Create a Bootstrap-powered HTML Upload form as the script’s “frontend”
- Using jQuery & AJAX for File Upload Form
- Apply security checks
- Create PHP scripts to handle/process data
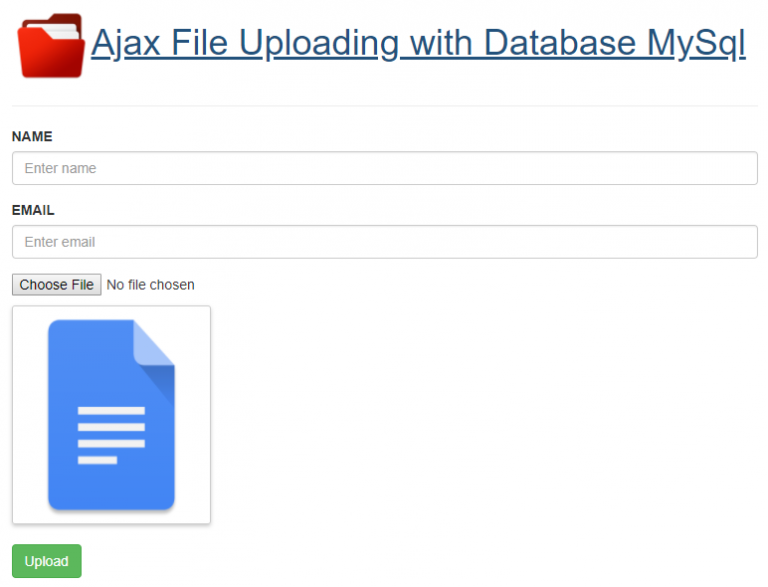
Create the HTML Form
The HTML form is the interface through which the user interacts and submits their data. But to make it work with the file, the <form> element must have its method set to POST because you can’t send the files to the servers using the GET method.
Another important attribute is enctype which should be set to multipart/form-data. Last, set the file <input> type attribute to file.
Create a file index.php in your PHP project and type in the following code.
<!doctype html>

<html>

<head lang="en">

<meta charset="utf-8">

<title>Ajax File Upload with jQuery and PHP</title>

<link rel="stylesheet" href="style.css" type="text/css" />

<script type="text/javascript" src="js/jquery-1.11.3-jquery.min.js"></script>

<script type="text/javascript" src="js/script.js"></script>


<link rel="stylesheet" href="https://maxcdn.bootstrapcdn.com/bootstrap/3.3.7/css/bootstrap.min.css" integrity="sha384-BVYiiSIFeK1dGmJRAkycuHAHRg32OmUcww7on3RYdg4Va+PmSTsz/K68vbdEjh4u" crossorigin="anonymous">

</head>

<body>

<div class="container">

<div class="row">


<div class="col-md-8">


<h1><a href="#" target="_blank"><img src="logo.png" width="80px"/>Ajax File Uploading with Database MySql</a></h1>

<hr>


<form id="form" action="ajaxupload.php" method="post" enctype="multipart/form-data">

<div class="form-group">

<label for="name">NAME</label>

<input type="text" class="form-control" id="name" name="name" placeholder="Enter name" required />

</div>

<div class="form-group">

<label for="email">EMAIL</label>

<input type="email" class="form-control" id="email" name="email" placeholder="Enter email" required />

</div>


<input id="uploadImage" type="file" accept="image/*" name="image" />

<div id="preview"><img src="filed.png" /></div><br>

<input class="btn btn-success" type="submit" value="Upload">

</form>


<div id="err"></div>

<hr>

<p><a href="https://www.cloudways.com" target="_blank">www.Cloudways.com</a></p>

</div>

</div>

</div></body></html>
In this form, I have used Bootstrap Classes to apply a little bit of styling on the form. In this form, I have mentioned ajaxupload.php in the action attribute of the form.
Using jQuery & AJAX for File Upload Form
Since I will use jQuery & AJAX for submitting data and uploading the files, I will start by including the jQuery library first.
<script src="https://ajax.googleapis.com/ajax/libs/jquery/3.2.1/jquery.min.js"></script>
$(document).ready(function (e) {

 $("#form").on('submit',(function(e) {

  e.preventDefault();

  $.ajax({

         url: "ajaxupload.php",

   type: "POST",

   data:  new FormData(this),

   contentType: false,

         cache: false,

   processData:false,

   beforeSend : function()

   {

    //$("#preview").fadeOut();

    $("#err").fadeOut();

   },

   success: function(data)

      {

    if(data=='invalid')

    {

     // invalid file format.

     $("#err").html("Invalid File !").fadeIn();

    }

    else

    {

     // view uploaded file.

     $("#preview").html(data).fadeIn();

     $("#form")[0].reset();

    }

      },

     error: function(e)

      {

    $("#err").html(e).fadeIn();

      }

    });

 }));

});
In the above code using the $ajax() method for sending data to php also check the success data or error in data sending.
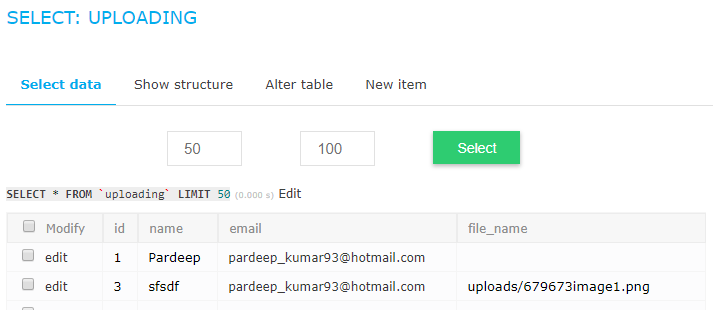
Configure and Connect MySQL Database With PHP
The next step is setting up and configuring the MySQL database.
The fields of this table are name, email, and file_name. Alternatively, you may use the following SQL query:
CREATE TABLE `uploading` (


`id` int(11) NOT NULL AUTO_INCREMENT,


`name` varchar(100) COLLATE utf8_unicode_ci NOT NULL,


`email` varchar(100) COLLATE utf8_unicode_ci NOT NULL,


`file_name` varchar(100) COLLATE utf8_unicode_ci NOT NULL,


PRIMARY KEY (`id`)


) ENGINE=InnoDB DEFAULT CHARSET=utf8 COLLATE=utf8_unicode_ci;
Next, create db.php to connect the database with the PHP application. Paste the following code snippet in the file:
<?php

// DB details

$dbHost = 'localhost';

$dbUsername = 'fkmc';

$dbPassword = '';

$dbName = 'fkc';


// Create connection and select DB

$db = new mysqli($dbHost, $dbUsername, $dbPassword, $dbName);

if($db->connect_error)

{

   die("Unable to connect database: " . $db->connect_error);

}
Create a PHP Script for File Uploading
The file is uploaded to the temporary folder when a user interacts with this form. All the information about the file is stored in the multidimensional array known as $_FILES.
This array’s key index is the name attribute on the <input type=”file” name=”image”> field.
In this case, $_FILES[“image”] is the index name. More information about the file is stored in the following indexes.
<?php

$img = $_FILES["image"]["name"] stores the original filename from the client

$tmp = $_FILES["image"]["tmp_name"] stores the name of the designated temporary file

$errorimg = $_FILES["image"][“error”] stores any error code resulting from the transfer

?>
Once the file has been uploaded to the temporary folder and all its information saved in the array, the move_uploaded_file() function is used to move the file from its present temporary location to a permanent location. The process of uploading the file is as follows:
- Check if there are any errors in the upload.
- Check if the file type is allowed
- Check that the file is under the set file size limit
- Check if the filename is valid (if the filename has a/, it will affect the destination path).
- Check that the file doesn’t already exist at the target location (based on the name).
- Finally, upload the file.
Let’s create the PHP script to deal with the functionality of file uploading. Create ajaxupload.php and type the following code in it.
<?php

$valid_extensions = array('jpeg', 'jpg', 'png', 'gif', 'bmp' , 'pdf' , 'doc' , 'ppt'); // valid extensions

$path = 'uploads/'; // upload directory


if(!empty($_POST['name']) || !empty($_POST['email']) || $_FILES['image'])

{

    $img = $_FILES['image']['name'];

    $tmp = $_FILES['image']['tmp_name'];


    // get uploaded file's extension

    $ext = strtolower(pathinfo($img, PATHINFO_EXTENSION));


    // can upload same image using rand function

    $final_image = rand(1000,1000000).$img;


    // check's valid format

    if(in_array($ext, $valid_extensions))

    {

        $path = $path.strtolower($final_image);


        if(move_uploaded_file($tmp,$path))

        {

            echo "<img src='$path' />";

            $name = $_POST['name'];

            $email = $_POST['email'];


            //include database configuration file

            include_once 'db.php';


            // insert form data in the database

            $insert = $db->query("INSERT uploading (name,email,file_name) VALUES ('".$name."','".$email."','".$path."')");


            //echo $insert?'ok':'err';

        }

    }

    else

    {

        echo 'invalid';

    }

}

?>
Now that all the checks are done, I will move the uploaded file from the tmp folder to the upload folder. For this, first, create an upload folder in the project directory. This is where the uploaded pictures will be saved, where pathinfo() is the built-in function that returns the filename and extension in separate indexes.
Check if there are any errors in the upload
Type the following code to check for any errors in the uploaded file. If the error is greater than zero, something must have gone wrong in the process.
if ($errorimg > 0)

{

   die('<div class="alert alert-danger" role="alert"> An error occurred while uploading the file </div>');

}
Check that the file is under the set file size limit
The file size is measured in bytes. So, if the file size is set at 500kb, then the file size should be less than 500000.
if ($myFile['size'] > 500000)

{

   die('<div class="alert alert-danger" role="alert"> File is too big </div>');

}
In PHP Script for File Uploading, move_uploaded_file is the function that moves the file from $myFile[“tmp_name”] (temporary location) to “upload/”.
$name (permanent location) also checks the database table record that will be inserted.
How to Use reCAPTCHA in PHP Contact Form?
Recaptcha is a free service that protects forms from spamming and abusive submissions. It’s an additional layer that works behind the scenes to prevent spamming by differentiating whether the end-user is a human or a bot and giving them the challenge to solve.
To place a reCAPTCHA on your PHP website, you must use a simple library that wraps around a reCHAPTCHA API. You can download the “reCAPTCHA PHP Library” and then use the file “recaptchalib.php.”
Add the following code in the <form> tag where you want your reCAPTCHA to be placed:
require_once('recaptchalib.php');

$publickey = "your_public_key"; //you got this from the signup page

echo recaptcha_get_html($publickey);
To check whether the users have submitted the right answers or not, a “verify.php” file needs to be created and should be set as an ‘action’ parameter in the <form> tag. Here is the code below:
<?php

  require_once('recaptchalib.php');

  $privatekey = "your_private_key";

  $resp = recaptcha_check_answer ($privatekey, $_SERVER["REMOTE_ADDR"], $_POST["recaptcha_challenge_field"], $_POST["recaptcha_response_field"]);

  if (!$resp->is_valid) {

    die ("The reCAPTCHA wasn't entered correctly. Go back and try it again." .

         "(reCAPTCHA said: " . $resp->error . ")");

  }

  else {

    // Your code here to handle a successful verification

  }

?>
Resolving Common Errors
A lot can go wrong during a file upload which might result in errors. You need to check the exact error that happened during the upload using $_FILES[‘uploadedFile’][‘error’].
Here are the errors you can expect while uploading a file:
File Size Is Too Large
The UPLOAD_ERR_FORM_SIZE and UPLOAD_ERR_INI_SIZE errors occur when the file size is more than the indicated value in php.ini or the HTML form separately. You can eliminate this error by increasing the upload size limits or warning the users about the maximum file size they can upload.
Temporary Folder Is Missing
The UPLOAD_ERR_NO_TMP_DIR error appears when the file to transfer is lost. And UPLOAD_ERR_NO_FILE is reported when there’s no file to transfer.
Partial Upload or Can’t Write to Disk
You will get the UPLOAD_ERR_PARTIAL error when the file can only be partially uploaded and UPLOAD_ERR_CANT_WRITE in case the file seems not to be written to the disk.
A PHP Extension Stopped the File Upload
Sometimes, you may get the error UPLOAD_ERR_EXTENSION since some extensions stopped the file upload. This one will require more examination by the developer to determine which extension caused the issue.
Wrapping Up
Developers need to configure specific settings to enable the file upload in PHP. These settings are necessary for the transfer to succeed. To arrange these settings, we have to find the php.ini file.
Frequently Asked Questions
Q: Where do uploaded files go PHP?
PHP stores all temporary files, including uploaded files, in the temporary files directory as specified in php.ini. Note that for uploads, these files may be removed as soon as the script the file was uploaded to is terminated (so unless you delay that script, you probably won’t see the uploaded file).
Q: Which is the best PHP library for file uploading?
A: Though several file-uploading PHP libraries are available, the HTML5 File Upload library is counted among the best ones. It is quite easy to use and the most popular library among developers, as it simplifies file uploading and validation in a few quick steps.
Q: Where can I download the PHP file upload script?
A: You can easily download the file-uploading script from phpfileuploader.com; it provides an easy-to-use and highly advanced file-uploading script that precisely uploads files to the server without refreshing the page. Using the script, you can easily upload multiple and new additional files during the upload process.
Q: How to move uploaded files in PHP?
A: You can use the move_uploaded_file() function to move the uploaded file to a new path/directory. It allows us to easily move the files to a new location, even if they are newly uploaded. Upon successful transfer, it returns TRUE and, if caught any exception, returns FALSE.