.NET Aspire is an orchestration technology introduced in November 2022 alongside the .NET 8 release. And since it was released, it took the .NET community by storm. This technology allows developers to easily build and debug distributed applications locally, which was traditionally hard to do.
With .NET Aspire, you don’t have to install many external dependencies and configure your development machine in any other way. There aren’t any special commands to run either. All you have to do is create a .NET project by using the Aspire template and start adding distributed components to it.
Adding components is easy, as Aspire comes with fully fledge orchestrator functionality, such as service discovery. Launching and debugging your application is easy too. All you have to do is launch your Aspire host application in the same way you would launch and debug any standard .NET project. Clicking the Run button from the IDE or executing the dotnet run command from the CLI will launch both the .NET Aspire host and all the applications it orchestrates. You can put breakpoints in any of them and they will be hit.
Today we will examine a basic .NET Aspire application based on the .NET Aspire started project template.
Getting started with Aspire
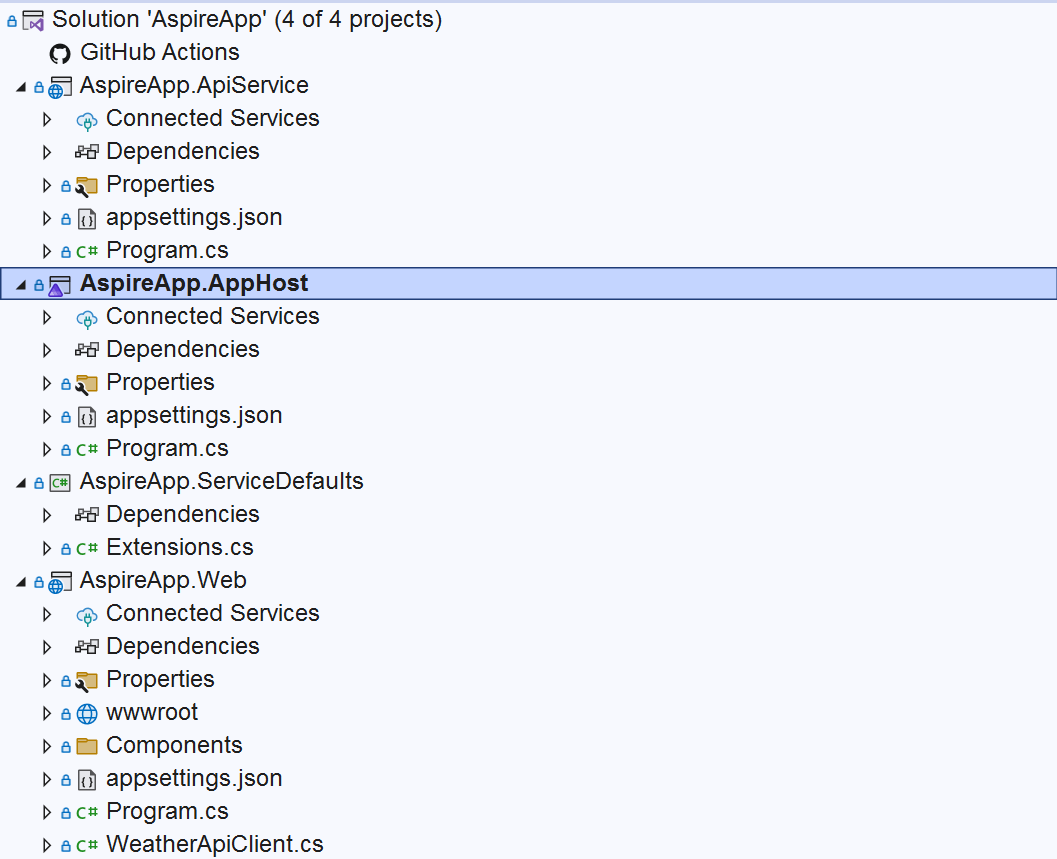
If you haven’t used .NET Aspire before, you can create your first application by following the instructions from the official documentation provided by Microsoft. Let’s assume we created a new project based on the Aspire Starter Project template and called it AspireApp. This is what we would end up with:
A complete example of the project we’ll walk through can be found here.
This setup consists of the following applications:
- AspireApp.Web, which is a Blazor web application with a user interface that pulls data from an external REST API endpoint.
- AspireApp.ApiService, which is the REST API application from which the Blazor application pulls data.
- AspireApp.AppHost, which is the Aspire orchestrator that coordinates the other two applications.
There is also a class library called AspireApp.ServiceDefaults which provides some shared functionality to the applications that .NET Aspire orchestrates.
Next, let’s have a look at how orchestration happens.
Orchestrating with .NET Aspire
If we launch the playground and wait for the application to build, we will be able to see a dashboard that looks like this:
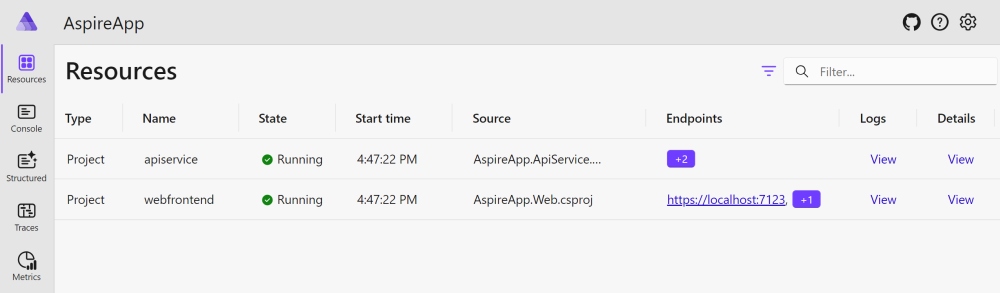
This dashboard shows us what services we are running as a part of an orchestrated distributed application. The dashboard contains the following information for each of the services:
- Service type
- Unique name used in the context of the Aspire environment
- State which tells us whether the service is running or not
- Source, which points us to the project that represents the service
- The service endpoint (if the service has one)
- Service logs
- Details of the service
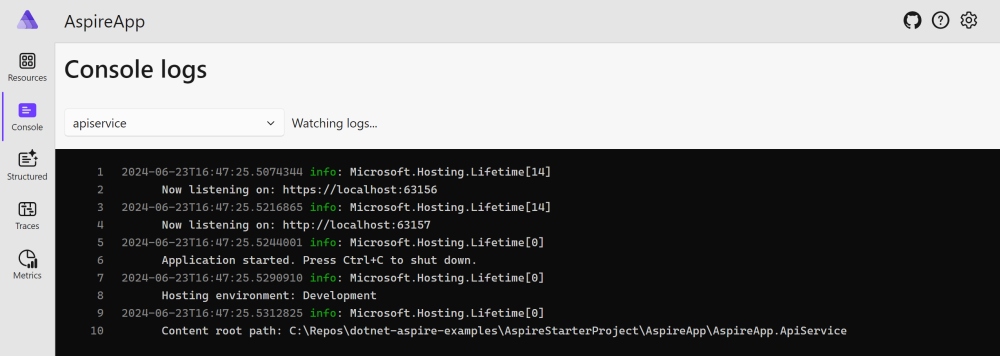
We know that the above applications are running. Firstly, this is what the value under the State column on the dashboard tells us. Secondly, if we open the logs for either application by clicking on the Console tab, we should expect it to look similar to this:
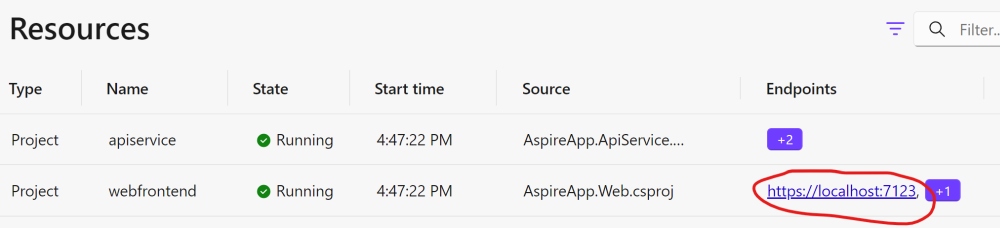
If we go back to the Resources tab, we will be able to click on the endpoint URLs of any of the applications and it will take us to the address associated with the endpoint. So, let’s click on the endpoint of the webfrontend one:
This should open a Blazor UI application, where we can navigate to the Weather tab. This tab contains data that the Blazor application retrieved from the API. It should look similar to this (although the exact values might vary):
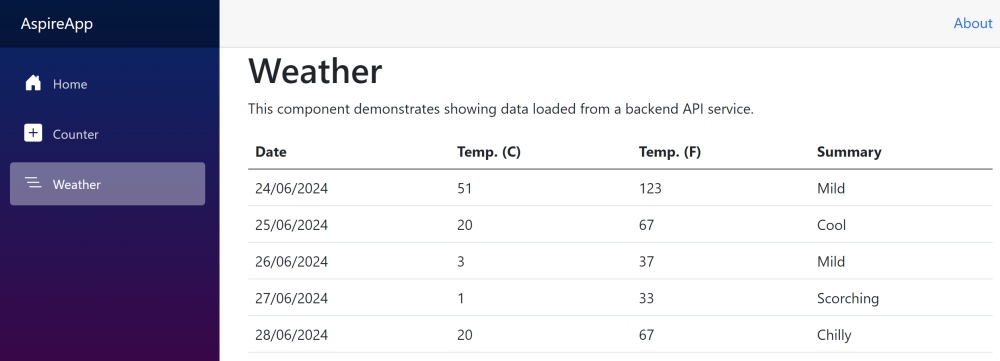
So, this is how we can get UI and API work together. Aspire allows us to see both of these applications and navigate to their corresponding addresses. But it’s more than that. Let’s quickly summarize the benefits of Aspire before having a deep dive into its project structure.
Benefits of .NET Aspire
There is nothing that is stopping us from getting the UI application to communicate with the API application without any orchestrator. However, an orchestrator, such as NET Aspire, makes this process much easier. Here are some of its benefits:
Service discovery
If we want to get the UI application to communicate with an API, we need to know the address of the API. But what if we are running the API behind a load balancer or a reverse proxy? What if the API app gets deployed to a completely different server?
In these cases, the address of the application will change. Without an orchestrator, it would be hard to keep track of it. .NET Aspire solves this problem, as we shall see shortly.
The .NET Aspire orchestrator keeps hold of the actual addresses of the applications. The applications themselves don't need to know this information. They can simply refer to other applications via the unique service names. Aspire host will do the address resolution and will provide the correct network address based on the service name.
So, in this situation, it wouldn't matter if the address of the API application would have changed. The Blazor UI application would still be able to connect to the right endpoint.
Automatic health check
As we saw on the dashboard, the status of both services was shown as Running. This status is available because .NET Aspire has an automated way of assessing the health of the services. This feature allows us to see if anything is wrong with our services and take the appropriate measures right away.
Moreover, automatic health checks allow the orchestrator to attempt to heal the failed applications without any external involvement. This is what usually happens first.
Monitoring all components together
But perhaps the biggest benefit of Aspire is the ability to monitor our entire distributed application all in one place in a convenient and user-friendly manner.
We can view the live status of each service. We can view all the logs. We can view traces and metrics. All this is done by navigating via an intuitive menu and selecting the right services by human-readable names.
Running distributed apps on development machines
Distributed applications were traditionally notorious for being hard to run on local development machines. The developers either had to spend hours configuring their environment or only test some components of a distributed application while emulating or mocking all the others.
.NET Aspire makes it easy to build and debug whole distributed applications, even if they are very complex. All we need to do is register all the services with the Aspire host and the orchestrator will do the rest.
Next, let’s have a look under the hood of .NET Aspir to see how it’s doing the orchestration.
Setting up .NET Aspire orchestrator
.NET Aspire is a complex system with a lot to unpack. We will start with the basics. First, we will cover the fundamental dependencies that make .NET Aspire work. Then, we will move on to registering applications by the orchestrator.
Installing .NET Aspire dependencies
An Aspire application requires a host application, which acts as the orchestrator. In our playground above, the AspireApp.AppHost project plays this role.
The Aspire host project requires the Aspire.Hosting.AppHost NuGet package. If we open the AspireApp.AppHost.csproj file, we will find this package being referenced.
The host application also needs to reference all applications that it's going to orchestrate. In our case, there are two:
- AspireApp.Web, which is a Blazor web application with a user interface that pulls data from an external REST API endpoint.
- AspireApp.ApiService, which is the REST API application from which the Blazor application pulls data.
Once we have all the dependencies, we can facilitate orchestration in the startup code of the host application.
Host application startup
As with any .NET application, the startup code of the AspireApp.AppHost application can be found in the Program.cs class. We start by executing the following code to create the host builder:
var builder = DistributedApplication.CreateBuilder(args);
As with a standard ASP.NET Core app, we start by instantiating the host builder. However, this is a special host builder used by .NET Aspire. It comes from the DistributedApplication class, which is used specifically for building host applications.
We then have the following code to do it:
var apiService = builder.AddProject<Projects.AspireApp_ApiService>("apiservice");
This is how we register the API application. The builder object the AddProject() method, which comes with a generic type specification in angle brackets, i.e. <Projects.AspireApp_ApiService>. This is an automatically generated type and this is how its name is inferred:
- The
Project part indicates that it's one of the projects from the solution.
- The
AspireApp_ApiService part is inferred from the AspireApp.ApiService project name. The dots are replaced with underscores to make sure it's represented by a single type.
So, this type doesn't exist anywhere in any of our projects. This type is auto-generated and inferred from the names of one of our projects. This type will have all the code necessary for registering the said project as an app the host can orchestrate.
The parameter is the name that we register the service under. In this case, the name we gave to it is apiservice.
Registering the UI application
After we registered the API, we can register the UI. This is how it’s done in our example project:
builder.AddProject<Projects.AspireApp_Web>("webfrontend")

    .WithExternalHttpEndpoints()

    .WithReference(apiService);
Initially, we are doing the same thing we did while registering the API service. We are invoking the AddProject method with a type reference that was inferred from the AspireApp.Web project. We gave this project the name of webfrontend.
However, there is also an additional thing we are doing here. We are invoking the WithReference() method and we are inserting the previously registered API service reference into it. This is done so the Blazor UI application can refer to the API application via service discovery.
If we look at the dashboard again, we will see that the services shown on it have the names webfrontend and apiservice. These names are arbitrary, but they are the names we used while registering the services inside the startup code of the Aspire orchestrator.
Introducing server defaults
Service defaults in the context of .NET Aspire is a collection of extension methods that allow the apps to be added to the Aspire orchestrator. These extension methods come as a class library included in the .NET Aspire project template.
These extension methods are needed for the following purposes:
- Enabling service discovery
- Enabling the orchestrator to assess the health status of the applications
- Collecting metrics from the application
- Other common functionalities shared by the orchestrated apps
The reason these extension methods come as a class library inside the solution is so that they can be modified to fit specific business scenarios. For example, developers may want to choose a metrics library different from the default one. Or they may want to add new functionality.
In our setup, the server defaults are represented by the AspireApp.ServiceDefaults project. Because this project is a class library and its purpose is to add extension methods for the startup code of ASP.NET Core applications, this project will need to reference the Microsoft.AspNetCore.App framework package.
This package gives the library access to types used by ASP.NET Core, such as IHostApplicationBuilder and WebApplication.
We will also need to add references to other packages that enable the specific functionality we are looking for, such as service discovery and telemetry.
Adding extension methods
The extension methods can be found in the Extensions.cs file in the AspireApp.ServiceDefaults project. This is what its content looks like:
using Microsoft.AspNetCore.Builder;

using Microsoft.AspNetCore.Diagnostics.HealthChecks;

using Microsoft.Extensions.DependencyInjection;

using Microsoft.Extensions.Diagnostics.HealthChecks;

using Microsoft.Extensions.Logging;

using OpenTelemetry;

using OpenTelemetry.Metrics;

using OpenTelemetry.Trace;


namespace Microsoft.Extensions.Hosting;


// Adds common .NET Aspire services: service discovery, resilience, health checks, and OpenTelemetry.

// This project should be referenced by each service project in your solution.

// To learn more about using this project, see https://aka.ms/dotnet/aspire/service-defaults

public static class Extensions

{

    public static IHostApplicationBuilder AddServiceDefaults(this IHostApplicationBuilder builder)

    {

        builder.ConfigureOpenTelemetry();


        builder.AddDefaultHealthChecks();


        builder.Services.AddServiceDiscovery();


        builder.Services.ConfigureHttpClientDefaults(http =>

        {

            // Turn on resilience by default

            http.AddStandardResilienceHandler();


            // Turn on service discovery by default

            http.AddServiceDiscovery();

        });


        return builder;

    }


    public static IHostApplicationBuilder ConfigureOpenTelemetry(this IHostApplicationBuilder builder)

    {

        builder.Logging.AddOpenTelemetry(logging =>

        {

            logging.IncludeFormattedMessage = true;

            logging.IncludeScopes = true;

        });


        builder.Services.AddOpenTelemetry()

            .WithMetrics(metrics =>

            {

                metrics.AddAspNetCoreInstrumentation()

                    .AddHttpClientInstrumentation()

                    .AddRuntimeInstrumentation();

            })

            .WithTracing(tracing =>

            {

                tracing.AddAspNetCoreInstrumentation()

                    // Uncomment the following line to enable gRPC instrumentation (requires the OpenTelemetry.Instrumentation.GrpcNetClient package)

                    //.AddGrpcClientInstrumentation()

                    .AddHttpClientInstrumentation();

            });


        builder.AddOpenTelemetryExporters();


        return builder;

    }


    private static IHostApplicationBuilder AddOpenTelemetryExporters(this IHostApplicationBuilder builder)

    {

        var useOtlpExporter = !string.IsNullOrWhiteSpace(builder.Configuration["OTEL_EXPORTER_OTLP_ENDPOINT"]);


        if (useOtlpExporter)

        {

            builder.Services.AddOpenTelemetry().UseOtlpExporter();

        }


        // Uncomment the following lines to enable the Azure Monitor exporter (requires the Azure.Monitor.OpenTelemetry.AspNetCore package)

        //if (!string.IsNullOrEmpty(builder.Configuration["APPLICATIONINSIGHTS_CONNECTION_STRING"]))

        //{

        //    builder.Services.AddOpenTelemetry()

        //       .UseAzureMonitor();

        //}


        return builder;

    }


    public static IHostApplicationBuilder AddDefaultHealthChecks(this IHostApplicationBuilder builder)

    {

        builder.Services.AddHealthChecks()

            // Add a default liveness check to ensure app is responsive

            .AddCheck("self", () => HealthCheckResult.Healthy(), ["live"]);


        return builder;

    }


    public static WebApplication MapDefaultEndpoints(this WebApplication app)

    {

        // Adding health checks endpoints to applications in non-development environments has security implications.

        // See https://aka.ms/dotnet/aspire/healthchecks for details before enabling these endpoints in non-development environments.

        if (app.Environment.IsDevelopment())

        {

            // All health checks must pass for app to be considered ready to accept traffic after starting

            app.MapHealthChecks("/health");


            // Only health checks tagged with the "live" tag must pass for app to be considered alive

            app.MapHealthChecks("/alive", new HealthCheckOptions

            {

                Predicate = r => r.Tags.Contains("live")

            });

        }


        return app;

    }

}
Inside this file, we have a combination of extension methods for both IHostApplicationBuilder and WebApplication types, both of which are used inside the startup code of ASP.NET Core applications.
The IHostApplicationBuilder is used for registering services that the application can use. The WebApplication type is used for adding HTTP endpoints to the application and adding steps to the request-processing pipeline.
We will cover each of these methods in detail in relevant lessons in this chapter. However, here is a quick summary of what each method is used for:
- The
ConfigureOpenTelemetry() method on line 34 is used for registering services that can collect metrics inside the application.
- The
AddOpenTelemetryExporters() method on line 68 configures the functionality that exports the metrics out of the application, so they can be used for monitoring the application.
- The
AddServiceDefaults() method on line 14 invokes these two methods and performs some additional dependency registration, such as adding services necessary for service discovery.
- The
MapDefaultEndpoints() method on line 102 adds the health check endpoints to the application.
Once we have these methods, we will need to invoke them from the startup code of relevant applications.
Using the extension methods
If we open the Program.cs file inside the AspireApp.Web project, we will be able to find the following line:
builder.AddServiceDefaults();
This invokes the extension method we looked at previously. This is how we register all dependencies associated with .NET Aspire. This allows this app to be manageable by the Aspire orchestrator.
We also have the following invocation further down the file:
app.MapDefaultEndpoints();
This is, once again, one of the extension methods we added in the service defaults.
If we open the Program.cs file inside the AspireApp.ApiService project, we will find the same extension methods being invoked.
Service discovery in .NET Aspire
Service discovery is a critical aspect of distributed systems and microservices architectures. It refers to the process of automatically detecting and registering available services within a network environment. In a microservices architecture, where applications are composed of numerous small, independent services that communicate with each other over a network, service discovery enables these services to locate and communicate with one another dynamically without manual configuration.
Service discovery involves several key components:
- Service registration: When a microservice starts up, it registers itself with a service registry or a discovery service. This registration typically includes information such as the service's network location (e.g., IP address and port), metadata, and possibly health status.
- Service querying: Other microservices or clients needing to interact with a particular service can query the service registry to discover its location and other relevant details. This querying can be performed dynamically at runtime, allowing services to adapt to changes in the network topology or the addition/removal of services.
- Dynamic updates: Service discovery systems support dynamic updates to the registry, allowing services to join or leave the network without causing disruptions. This ensures that the registry always reflects the current state of the system.
- Load balancing: Service discovery often integrates with load balancing mechanisms to distribute incoming requests among multiple instances of a service. This improves the scalability, fault tolerance, and performance of the system by evenly distributing the workload.
Registering service discovery components
Before we can enable service discovery with .NET Aspire, we need to install the Microsoft.Extensions.ServiceDiscovery NuGet package in the applications that we want to add to the orchestrator. We are doing so in the AspireApp.ServiceDefaults project.
Enabling service discovery
Next, we will need to enable service discovery so the applications can use it. In our example, this is done inside the AddServiceDefaults() method in the Extensions.cs file of the AspireApp.ServiceDefaults class library.
Here are the specific invocations inside this method that register all the dependencies necessary for service discovery:
- builder.Services.AddServiceDiscovery();
- http.AddServiceDiscovery();
Once we registered all the required components and can start using service discovery.
Using service discovery
If we open the Program.cs file under the AspireApp.Web project folder, we will find an example of service discovery usage.
First, we need to make sure we register all the relevant components, which we are doing by invoking the AddServiceDefaults() extension method. Then, inside a block where we are creating an HTTP client to connect to the API app, we have the following:
client.BaseAddress = new("https+http://apiservice");
Normally, we would use a standard URL as a base address, but not this time. Instead, we are pointing the HTTP client at the name of the service that we want to obtain the address of. The name is what we registered this service under in the .NET Aspire orchestrator.
In this example, we are defining the protocol as https+http. What this means is that we will try to connect to the service via HTTPS, but if we can't, we will use HTTP. However, HTTPS is preferred.
Then we have a standard colon followed by a double slash which we use in any URL. Finally, we have the name of the service we want to connect to, which is apiservice.
In this setup, the application registered as apiservice can move to a different server. Its address may change. Its port may change. But to our client application, none of it matters, as it doesn’t know its address and doesn’t care about it. The Aspire host application will resolve the correct address for it to connect to.
Wrapping up
As we can see, there is no accident that Aspire is loved by the .NET community. Compared to other orchestrators, it makes the process of building distributed applications locally effortless.