If you’re a .NET developer, chances are you’ve had to deal with scheduling tasks at some point. Cron jobs are a common way to do this, but they can be tedious to set up and maintain. Enter Hangfire, a powerful and easy-to-use library that simplifies scheduling Cron jobs in .NET. In this blog post, we’ll explore how to use Hangfire to automate Cron jobs in .NET, streamline your workflow, and improve your productivity. Whether you’re a seasoned developer or just getting started, Hangfire is a tool you won’t want to miss.
Table of Contents
Introduction to Hangfire
We use background jobs in our applications to run some long processing tasks which don’t need user interaction and can run in an isolated manner in other threads apart from the main application thread. These background jobs help our application run smoothly.
We also sometimes may have a requirement, when we want to run a task on a schedule every second, minute, hour, or any custom frequency.
For handling such scenarios, Hangfire comes to our rescue. Hangfire is an open-source library that provides an easy way to execute background processing tasks in .NET and .NET Core applications without using Windows Service or a separate process. It simplifies scheduling Cron jobs in .NET apps with minimal setup needed.
Using Hangfire, we can run multiple types of Jobs in the background –
- Fire and Forget Jobs.
- Recurring Jobs (Also Known as CRON Jobs)
- Delayed Jobs
- Continuation Jobs
Hangfire Architecture
Hangfire architecture has three main components which are interdependent on each other in the entire process – Storage, Client, and Server. Let’s check the role of each component in detail.
Hangfire Storage
Hangfire keeps all the information about the background jobs which are created in the storage. The details like types, method names, arguments, etc are serialized and maintained in the storage. These details are kept nowhere in the in-process memory. The Hangfire Storage sub-system is flexible enough to be implemented using In Memory storage, RDBMS, or NoSQL solutions.
Hangfire Client
The hangfire client is responsible to create the background jobs and maintain them in the storage. A background job is a unit of work that should be performed outside of the current execution context, e.g. in a background thread, another process, or even on a different server. All these scenarios are possible to be implemented with Hangfire with no additional configuration.
Hangfire Server
The hangfire server is a background thread that monitors the storage for new Jobs added by the client and performs the processing for these jobs by deserializing the types, methods, arguments, etc jobs.
How to use Hangfire in ASP.NET Core?
Now that we have looked into how hangfire works, let’s see the step-by-step process to use hangfire and how we can schedule Cron Jobs in .NET Web Applications using it. For this tutorial, we will be using Visual Studio.
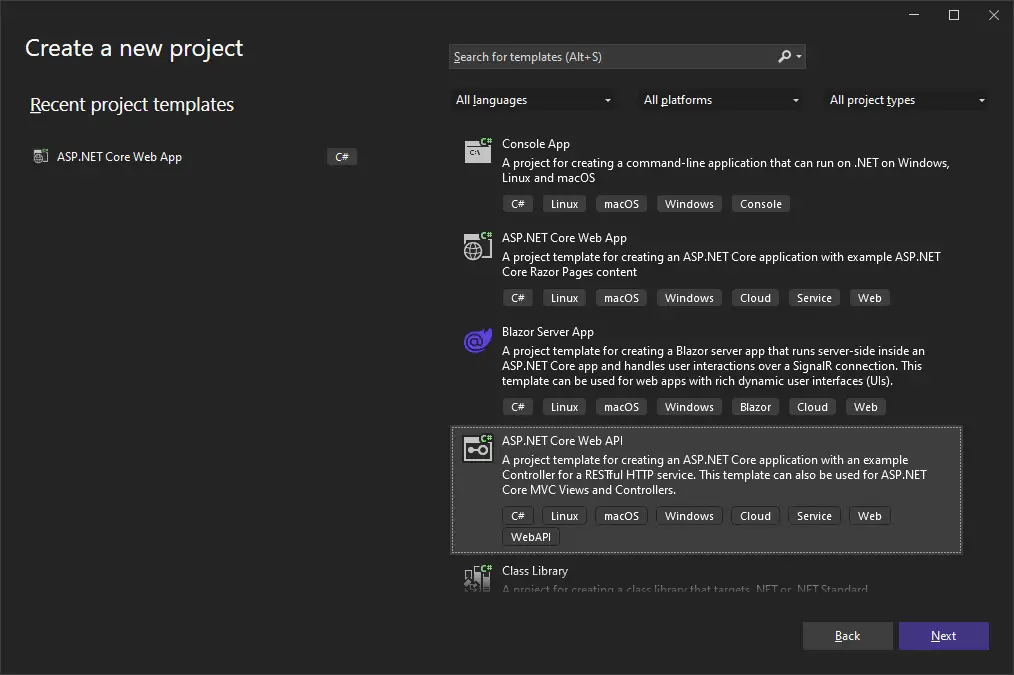
Step 1 – Create a new ASP.NET Web Core API
Open Visual Studio and go to create a new project. It will open the Create a new Project window. Select ASP.NET Core Web API.
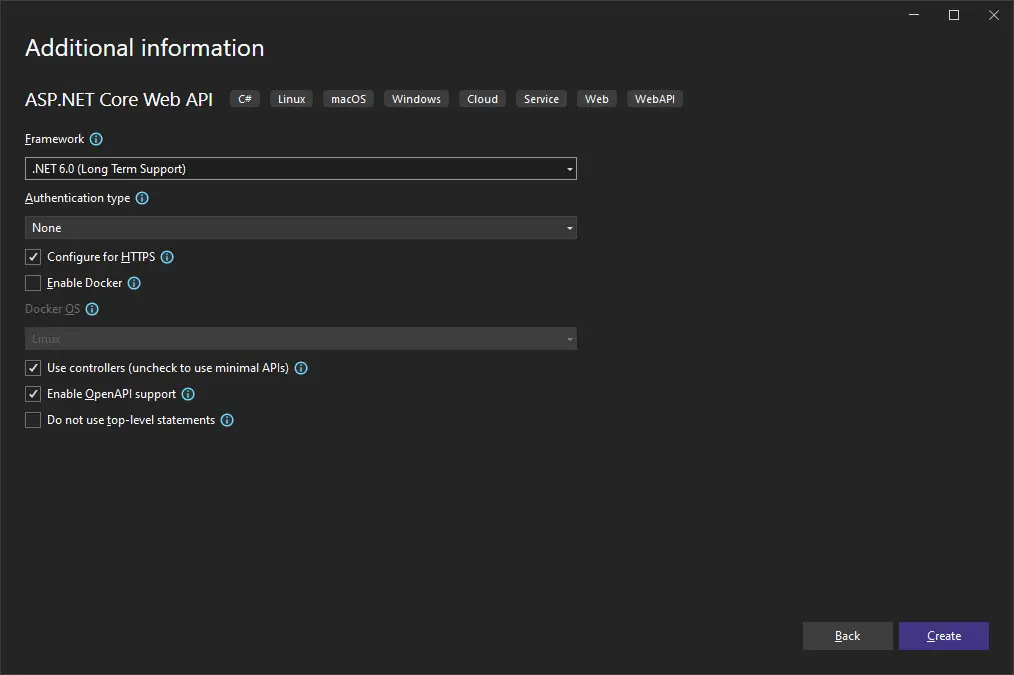
On the next screen, give the name of the project and click next. For this tutorial, I am using .NET 6 framework. Keep the other default options checked and click Create.
Step 2 – Install Hangfire Nuget Package
To use Hangfire in our application, let’s add the Hangfire Nuget Package. Open the Package Manager console and type the below command –
Install-Package Hangfire
You can also install this package by going to the Manage Nuget Package of your project.
Once this package is installed, it will also download and install the dependent NuGet packages Hangfire.AspNetCore, Hangfire.Core and Hangfire.SqlServer. By default, it installs a package for SqlServer as a storage subsystem, but if you want to use other storage options, make sure to add the relevant Hangfire storage package.
You can confirm the package installation by expanding project dependencies and packages.

Step 3 – Configure Hangfire
As explained above, Hangfire stores the background job information in persistent storage. For this tutorial, we will be using the default SQL Server storage. To do this create a SQL Server DB and add a connection string in the appsettings.json file for this database which can be used by Hangfire to store this information.
"ConnectionStrings": {

    "HangfireStorage": "Server=localhost\\SQLEXPRESS;Database=HangfireDB;Trusted_Connection=True;"

}
Now let’s modify the app startup to add Hangfire service. If you are using .NET 3.1 Core or .NET 5, add the below code to the ConfigureServices Method of Startup.cs file. But since we are using .NET 6, we will add the below code to the program.cs file.
builder.Services.AddHangfire(x =>

{

 x.UseSqlServerStorage(builder.Configuration.GetConnectionString("HangfireStorage"));

});


builder.Services.AddHangfireServer();
Now, let’s add the Hangfire dashboard to the application’s request processing pipeline. If you are using .NET 3.1 Core or .NET 5, add the below code to the Configure Method of Startup.cs file. But since we are using .NET 6, we will add the below code to the program.cs file.
app.UseHangfireDashboard();
The above line of code adds the inbuilt hangfire dashboard to our application, which can be used to monitor the jobs.
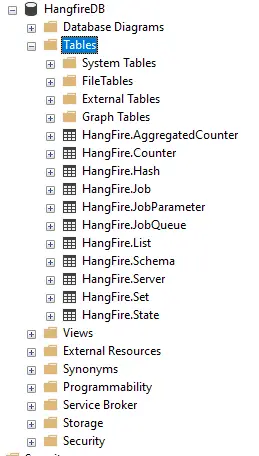
Now that we are done adding all the configurations for using Hangfire, let’s run the application and hangfire will automatically check the assigned storage for the necessary tables. If they don’t exist it will create them for us.
Step 4 – Hangfire Dashboard Overview
Before moving forward to add the background jobs, let quickly take a tour of the Hangfire dashboard. Run the application and navigate to the URL “https://localhost:7087/hangfire“. Here the port 7087 can be different in your case, so add accordingly. This will open the Hangfire dashboard.
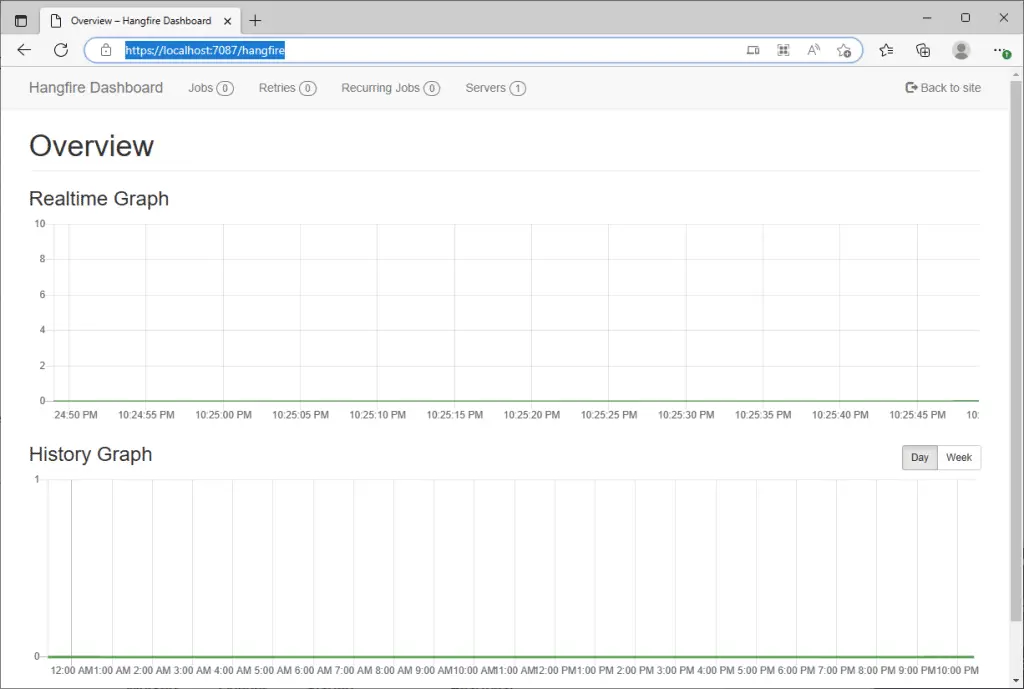
Hangfire provides out of the box dashboard which we can use to see the running background jobs, and scheduled jobs that we create using the Hangfire client. We can also monitor servers, job retries, and failed jobs and keep an eye on all jobs in the queue. Another amazing feature of this dashboard is that we can manually trigger any existing jobs on demand. We will cover each tab in detail when we will demo adding different types of job.
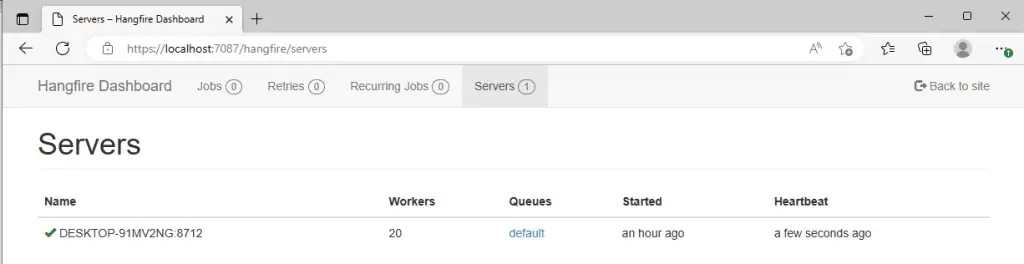
In the Server’s tab, as you can see below, we can see the server which is running in our application. If we had more server instances running, we would also see them listed here. Hangfire checks server usage periodically, so if there is a server that is not in use anymore, it will automatically remove it from the list.
Step 5 – Add Background Jobs
As explained earlier, with hangfire we can different types of background jobs based on our needs. We can run from one-time background jobs to recurring jobs at the given frequency. We can also easily run the Cron Jobs in .NET application by providing the cron expressions. Let’s try out all the types of jobs one by one.
Create a new interface with the name IHangfireTestJobService in your project. Add the below code to the file. In this interface, we have defined 4 methods that we will use to add 4 types of different hangfire jobs.
public interface IHangfireTestJobService

{

    void AddFireAndForgetJob();

    void AddReccuringJob();

    void AddDelayedJob();

    void AddContinuationJob();

}
Now, let’s add implementation for this interface. Add a new class to your project with the name HangfireTestJobService and add the below code to it.
public class HangfireTestJobService : IHangfireTestJobService

{

    public void AddContinuationJob()

    {

        Console.WriteLine($"{DateTime.Now.ToString()} - This is a continuation job!");

    }


    public void AddDelayedJob()

    {

        Console.WriteLine($"{DateTime.Now.ToString()} - This is a Delayed job!");

    }


    public void AddFireAndForgetJob()

    {

        Console.WriteLine($"{DateTime.Now.ToString()} - This is a Fire and Forget job!");

    }


    public void AddReccuringJob()

    {

        Console.WriteLine($"{DateTime.Now.ToString()} - This is a Recurring job!");

    }

}
As you can see the above, HangfireTestJobService implements the interface IHangfireTestJobService. In a real-world application, we will add the actual functionality that you want to do in these jobs uploading files, etc. But since this is a demo application, we will be just printing a few lines on Console explaining each job along with the timestamp.
Now, Let’s register this interface for dependency injection. In the case of .NET Core 3.1 or .NET 5, add the below code to ConfigureServices the method in Startup.cs class. In this case, we will add it to the Program.cs.
builder.Services.AddScoped<IHangfireTestJobService, HangfireTestJobService>();
Let’s also add a controller named HangfireJobTestController in the project. We will use this controller to expose endpoints which will create different types of hangfire jobs. Once you create the class, add the below code to it.
[Route("api/[controller]")]

[ApiController]

public class HangfireJobTestController : Controller

{

    private readonly IHangfireTestJobService _hangfireTestService;

    private readonly IBackgroundJobClient _backgroundJobClient;

    public HangfireJobTestController(IHangfireTestJobService hangfireTestService, IBackgroundJobClient backgroundJobClient)

    {

        _hangfireTestService = hangfireTestService;

        _backgroundJobClient = backgroundJobClient;

    }

}
In our controller constructor, we have injected IHangfireTestJobService that we created and also the IBackgroundJobClient which is provided by Hangfire and can be used to create background jobs.
Fire and Forget Job
Let’s try to create the first job of type Fire and Forget. When this type of job is created, the server executes it only once as soon as it can.
Add a new endpoint to the controller HangfireJobTestController and add below code to it –
[HttpGet("/AddFireAndForgetJob")]

public ActionResult AddFireAndForgetJob()

{

    _backgroundJobClient.Enqueue(() => _hangfireTestService.AddFireAndForgetJob());


    return Ok();

}
The new endpoint “/AddFireAndForgetJob” uses the injected Hangfire interface to schedule this type of job. We call the interface’s Enqueue() method and pass it our AddFireAndForgetJob() service method call as the parameter. This method Enqueue does all the necessary things for us. It adds the job definition to the configured storage and also adds it to the queue for processing.
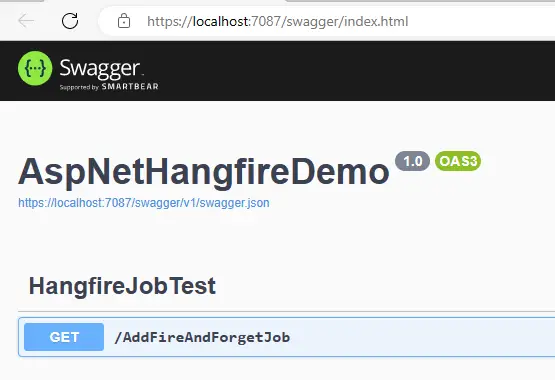
Let’s run the application and you will see the new endpoint available on the swagger page.
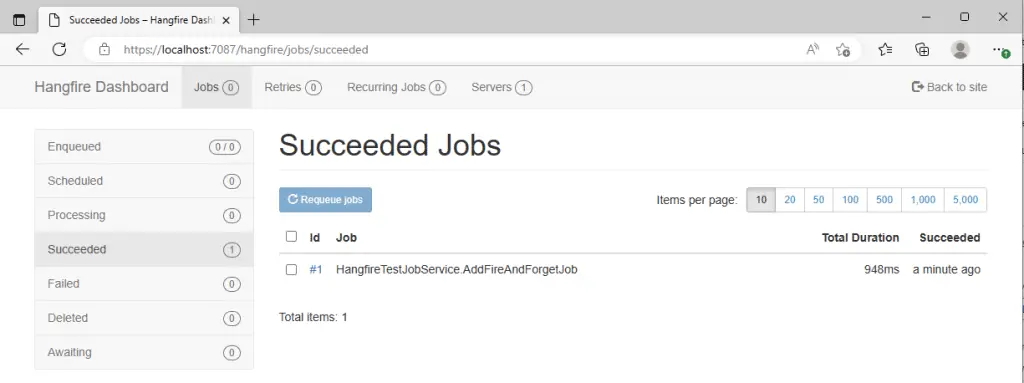
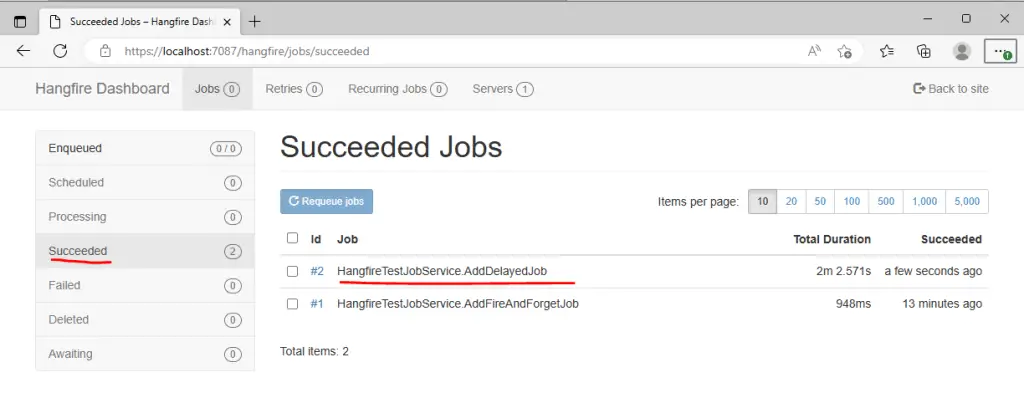
Now give the call to this endpoint which will queue the Job for us and navigate to the Hangfire dashboard and open the Jobs tab. Here under the Succeeded section, you will should be able to see the completed job.
You can also run this job again manually by selecting the job and clicking on Requeue Jobs.
Delayed Jobs
Delayed Jobs are the tasks that we definitely want to execute but later in time. We can schedule such tasks at the specified time.
To demo this job, let’s add a new endpoint "/AddDelayedJob" in our controller HangfireJobTestController.
[HttpGet("/AddDelayedJob")]

public ActionResult AddDelayedJob()

{

    _backgroundJobClient.Schedule(() => _hangfireTestService.AddDelayedJob(), TimeSpan.FromMinutes(2));


    return Ok();

}
This time, when we will call the Endpoint, AddDelayedJob, we will use the Schedule method, instead of the Enqueue method, to create the Delayed Job that we will run after 2 mins of adding it to the queue.
Now, let’s give the request to this new endpoint and then check the hangfire dashboard.
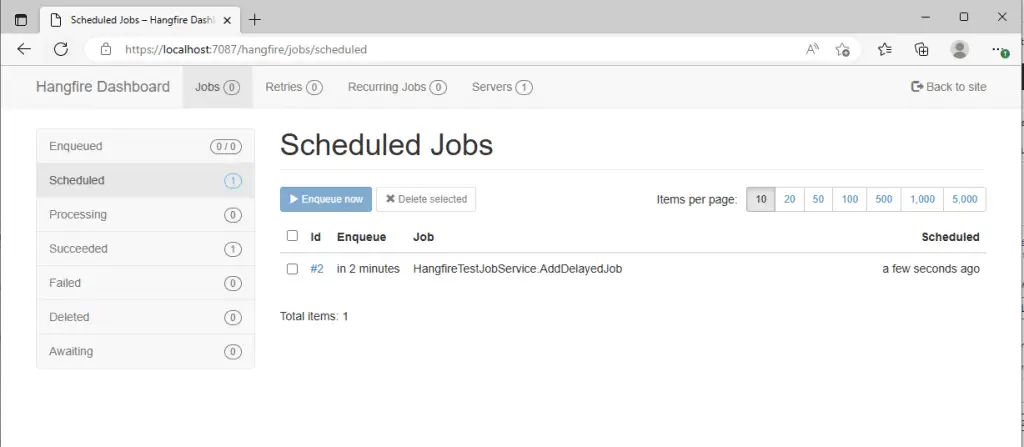
In the hangfire dashboard, you can clearly see the job in the Scheduled tab saying it will be executed in 2 mins. Let’s check the Hangfire dashboard in 2 mins, and you will see the job executed successfully in the success tab as shown below.
Recurring Jobs
Recurring jobs or Cron Jobs in .NET applications are used to execute the tasks in repetition at fixed intervals. For these types of tasks, hangfire uses the CRON utility.
To schedule recurring jobs, we will need to use a different interface IRecurringJobManager which is also provided by Hangfire and exposes useful methods to handle recurring jobs. So, let’s add it to the constructor of our controller.
private readonly IHangfireTestJobService _hangfireTestService;

private readonly IBackgroundJobClient _backgroundJobClient;

private readonly IRecurringJobManager _recurringJobManager;


public HangfireJobTestController(IHangfireTestJobService hangfireTestService, IBackgroundJobClient backgroundJobClient, IRecurringJobManager recurringJobManager)

{

    _hangfireTestService = hangfireTestService;

    _backgroundJobClient = backgroundJobClient;

    _recurringJobManager = recurringJobManager;

}
To demo this job, let’s add a new endpoint "/AddRecurringJob" in our controller "HangfireJobTestController".
[HttpGet("/AddRecurringJob")]

public ActionResult AddRecurringJob()

{

     _recurringJobManager.AddOrUpdate("TestJobId", () => _hangfireTestService.AddReccuringJob(), Cron.Minutely);


     return Ok();

}
In this endpoint, we used the IRecurringJobManager interface’s AddOrUpdate() method. To this method, we pass a job id of our choice, our AddReccuringJob() method call, and the CRON interval.
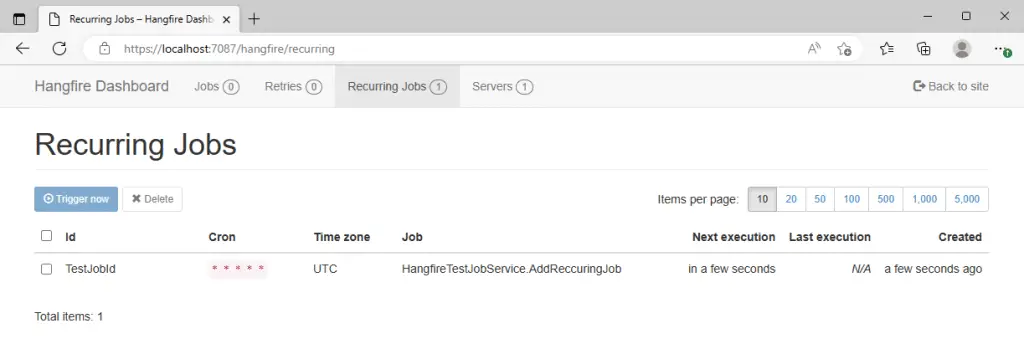
Now, let’s give the request to this new endpoint and then check the hangfire dashboard. our recurring job becomes visible under the Recurring Jobs tab in the dashboard
Every time the recurring job is processed by the server, the instance will be visible in the succeeded jobs section of the Jobs tab in the hangfire dashboard.
Continuation Jobs
The final type of job that we will check is the continuation job. In this type of job, we will chain the multiple tasks together to run one after another in continuation.
To see this type of job in action, let’s add a new endpoint "/AddContinuationJob" in our controller "HangfireJobTestController".
[HttpGet("/AddContinuationJob")]

public ActionResult AddContinuationJob()

{

    var parentJobId = _backgroundJobClient.Enqueue(() => _hangfireTestService.AddFireAndForgetJob());

    _backgroundJobClient.ContinueJobWith(parentJobId, () => _hangfireTestService.AddContinuationJob());


    return Ok();

}
In the AddContinuationJob() endpoint, using the IBackgroundJobClient of Hangfire, we created a simple Fire and Forget Job. Then we saved the id for this job which is returned by the Enqueue method and then we called the ContinueJobWith() method and pass the Job Id to it along with the AddContinuationJob() method call. This way we chained two calls to execute one after the other.
To see this in action, let’s give the GET request to this endpoint using Swagger and open the Hangfire dashboard and check the succeeded section of the Jobs Tab.
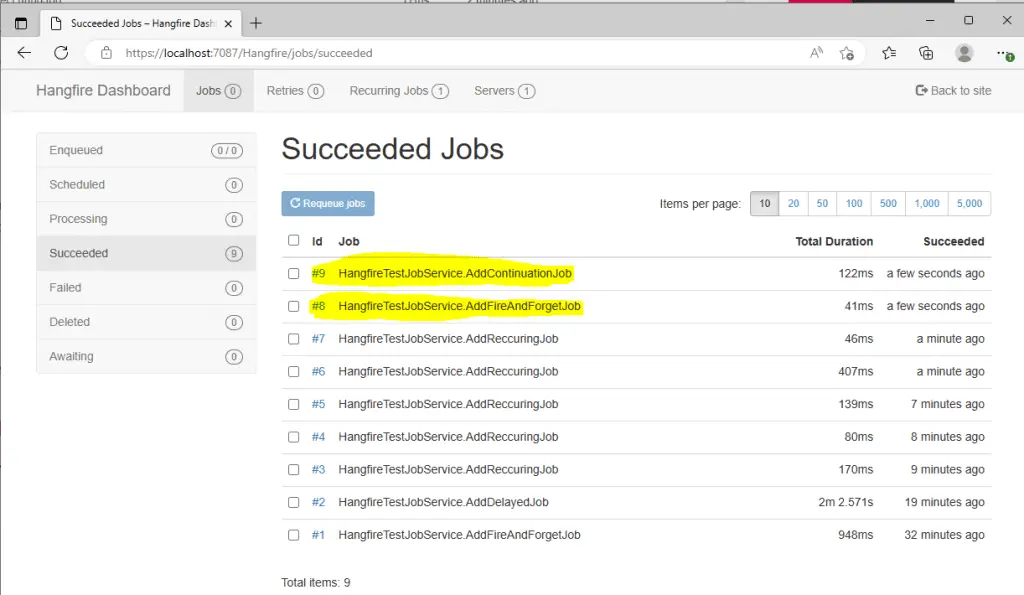
Voila, as you can see on the dashboard, the two tasks ran in continuation successfully.
Conclusion
That brings us to the end of our article. We learned how easy it is to use Hangfire which is a simple yet powerful library to schedule background Jobs.
You can check the code here at Github – https://github.com/TechArtifacts/AspNetHangfireDemo
I hope this article helps you.