Memory Caching is a powerful technique used to optimize the performance of .NET Core applications. By caching frequently accessed data in memory, you can reduce the number of database queries and improve the overall speed of your website. In this comprehensive guide, we'll take a deep dive into Memory Caching in .NET Core and show you how to implement it in your own applications. You'll learn expert tips and best practices for optimizing your website's performance and boosting your speed. Let's get started!
What is caching?
In web applications, Caching is a technique to store frequently accessed data in a temporary location. This helps to quickly retrieve the data without having to go back to the original data source. For example, let's say you have a service in your web application, which is retrieving data from the database. Let's say the data retrieved will stay constant for some fixed time. In this case, Caching technique can be used to save that information at a temporary location after it's retrieved from the database the first time. Then on the subsequent call, you can simply return the data from the temporary location, without giving the call again to the database.
This can improve the performance of web applications by reducing the amount of time and resources required to load and display data.
In web applications, there are different types of Caching Techniques.
- Client-side caching - This type of caching takes place on the client's browser. When a client requests a web page, their browser will store a copy of the page and its associated resources (such as images and scripts) in its cache. When the client requests the same page again, the browser can retrieve the cached version instead of requesting it from the server.
- Server-side caching - This type of caching takes place on the web server. When a server receives a request for a web page, it will check if a cached version of the page is available. If it is, the server will send the cached version to the client instead of generating the page dynamically.
- Reverse proxy caching - This type of caching takes place on a reverse proxy server, which sits between the client and the web server. The reverse proxy server can cache the responses from the web server and return them to the client without forwarding the request to the web server.
- CDN caching - A CDN (content delivery network) is a system of distributed servers that can cache and deliver content to clients based on their geographic location. CDN caching can help to reduce the load on web servers by storing and delivering content closer to the client.
Memory Caching which we are going to explore in this blog is one type of Server Side caching.
Memory Caching in .NET
As mentioned earlier, memory caching is one of the Server Caching techniques. This technique allows an application to store frequently accessed data in memory to quickly access it without having to go back to the original data source. This can significantly improve performance, as accessing data from memory is much faster than accessing it from a database or other external source.
In .NET Core, memory caching is implemented using the IMemoryCache interface, which is part of Microsoft.Extensions.Caching.Memory namespace. This interface provides a simple, yet powerful, way to store and retrieve data in memory.
Let's see the step-by-step guide to implementing memory caching in .NET Core.
Steps to implement Memory Caching in .NET Core
For this tutorial, let's consider a use case. In this use case, we will fetch the list of products from an external API and return it from our Web API. Let's consider that the product list from the external API can only change after 24 hours. In this case, we can cache the data returned from the API for 24 hours. Let's see step by step how to implement this use case using Memory caching in .NET Core.
Step 1 - Create a new ASP.NET Core Web API project
Create a new ASP.NET Core Web API project in Visual Studio and give the project name of your choice.

Step 2 - Install required NuGet packages
For this tutorial, we will need some Nuget Packages. Open Package Manager Console and execute the below commands.
Install-Package Newtonsoft.Json
As you can see above, we installed the package Newtonsoft.Json that we will need to handle JSON data in the application.
Step 3 - Create a Service to fetch the Product List
In this step, we will add the code to fetch the list of products from the External API - https://dummyjson.com/products.
Let's first add the model Product with the required properties.
namespace MemoryCachingTutorial

{

    public class Product

    {

        public int Id { get; set; }

        public string Title { get; set; }

        public string Description { get; set; }

        public string Price { get; set; }

    }

}
Now let's add a new Interface to the project named "IProductService".
namespace MemoryCachingTutorial

{

    public interface IProductService

    {

        Task<IList<Product>> GetProducts();

    }

}
Let's add the implementation for the product service. Create a class named ProductService that implements IProductService. Also, let's add the code to the implementation to fetch the list of products from the API https://dummyjson.com/products.
using Newtonsoft.Json;


namespace MemoryCachingTutorial

{

    public class ProductResponse

    {

        public List<Product> Products { get; set; }

    }

    public class ProductService : IProductService

    {

        public string ProductApiURL = "https://dummyjson.com/products";


        public async Task<IList<Product>> GetProducts()

        {

            using (var client = new HttpClient())

            {

                // Send a GET request to the API

                HttpResponseMessage response = await client.GetAsync(ProductApiURL);


                // Check the status code of the response

                if (response.IsSuccessStatusCode)

                {

                    // Read the response content as a string

                    string responseString = await response.Content.ReadAsStringAsync();


                    if (!string.IsNullOrEmpty(responseString))

                    {

                        var data = JsonConvert.DeserializeObject<ProductResponse>(responseString);

                        return data.Products;

                    }

                }

            }

            return null;

        }

    }

}
If you see the above code block, we have used .NET HttpClient to give the call to the API https://dummyjson.com/products. We have also used the async and await keywords to make the method asynchronous.
Finally, let's register the Product Service for Dependency Injection. If you are using .NET 6 or higher, then add the below line of code to Program.cs. Else if you are using a lower version of .NET Core, then add the below code to ConfigureServices method in Startup.cs file.
builder.Services.AddTransient<IProductService, ProductService>();
Step 4 - Initialize Memory Cache
Since we are planning to use a memory cache, let's initialize it so that it can be used as a dependency injection later in the application.
Again, If you are using .NET 6 or higher, then add the below line of code to Program.cs. Else if you are using a lower version of .NET Core, then add the below code to ConfigureServices method in Startup.cs file.
builder.Services.AddMemoryCache();
Step 5 - Add a Controller
Let's now create a new Controller named ProductController and add a new GET endpoint to it. Please add the below code to the Controller.
using Microsoft.AspNetCore.Mvc;

using Microsoft.Extensions.Caching.Memory;


namespace MemoryCachingTutorial.Controllers

{

    [Route("api/[controller]")]

    [ApiController]

    public class ProductController : ControllerBase

    {

        private readonly IProductService _productService;

        private readonly IMemoryCache _memoryCache;

        private const string ProductCacheKey = "PRODUCTS_CACHE";


        public ProductController(IProductService productService, IMemoryCache memoryCache)

        {

            _productService = productService;

            _memoryCache = memoryCache;

        }


        [HttpGet]

        public async Task<IList<Product>> GetProducts()

        {

            IList<Product> products = null;


            var productCacheFound = _memoryCache.TryGetValue(ProductCacheKey, out products);


            if (productCacheFound)

            {

                Console.WriteLine($"{DateTime.Now} - Products Found in Cache! Returning Cache Data.");

                return products;

            }

            else

            {

                Console.WriteLine($"{DateTime.Now} - Products Not Found in Cache! Returning Data From IProductService.");


                // Key is not available in the cache, so get data from IProduct Service.

                products = await _productService.GetProducts();


                // Set cache options. We will cache the data for 1 day.

                var cacheEntryOptions = new MemoryCacheEntryOptions()

                    .SetAbsoluteExpiration(TimeSpan.FromMinutes(1));


                // Save data in cache.

                _memoryCache.Set(ProductCacheKey, products, cacheEntryOptions);


                return products;

            }

        }


    }

}
Let's understand the code line by line.
- Firstly, in the constructor, we have done dependency injection for IProductService and IMemoryCache. In .NET Core, memory caching is implemented using the IMemoryCache interface, which is part of
Microsoft.Extensions.Caching.Memory namespace. This interface provides a simple, yet powerful, way to store and retrieve data in memory.
- Then, we added a new Action,
GetProducts(), and decorated it with the attribute HttpGet.
- We have also declared a constant string
ProductCacheKey. This will act as a CacheKey to access cached data.
- Then, in the action, we have called the method
TryGetValue of the IMemoryCache, to check if the cache with the cache key ProductCacheKey is available in the memory cache. If it's available, the data will be assigned to the out variable products.
- The method TryGetValue returns a boolean indicating whether the cache is found or not. We captured it in the bool variable
productCacheFound.
- We then checked the if condition, if productCacheFound is true, then return the product data assigned by the cache.
- If productCacheFound is false, then call the
_productService.GetProducts() method to get the product data.
- Once the data is returned by the product service, we then stored it in the memory cache using the method
_memoryCache.Set(ProductCacheKey, products, cacheEntryOptions).
- We passed 3 arguments to the method Set of IMemoryCache.
- First, the Cache Key that we want to use to access the cache data.
- Second, the actual data that we want to cache, in this case, the list of products returned by the Product Service.
- Third, the CacheEntryOptions using which we can pass different options for the cache. One such option is the CacheExpirationTime. We can set it using the method
SetAbsoluteExpiration.This time indicates the amount of time for which the data will be stored in the memory. In our case, ideally as per our use case, we can set it for 1 day, but for testing the concept we are keeping it for 1 min in this example.
- We have also added a few logs using
Console.WriteLine to test if the data actually is returned from the Cache.
Step 6 - Run and test the API
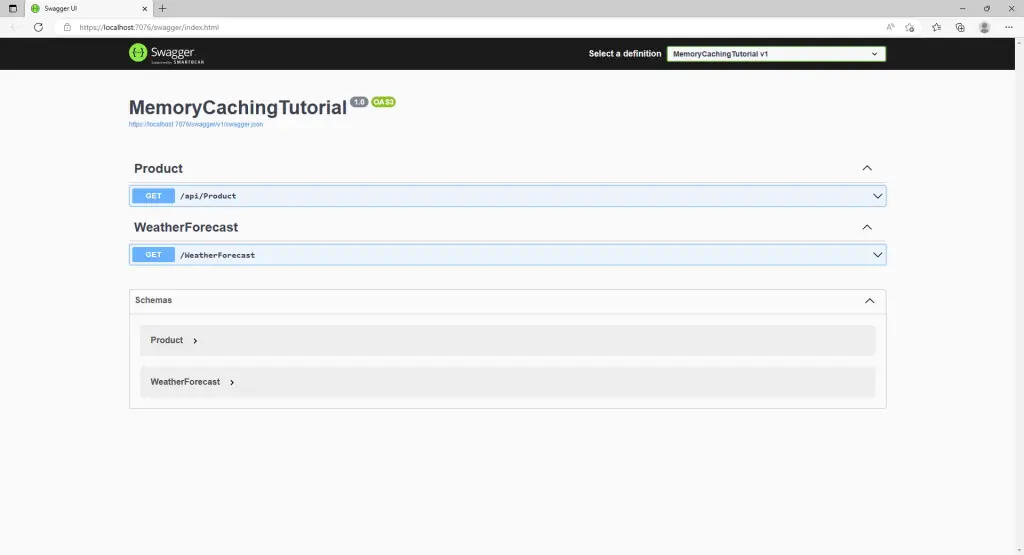
Now let's run the code. You should see the Swagger page.

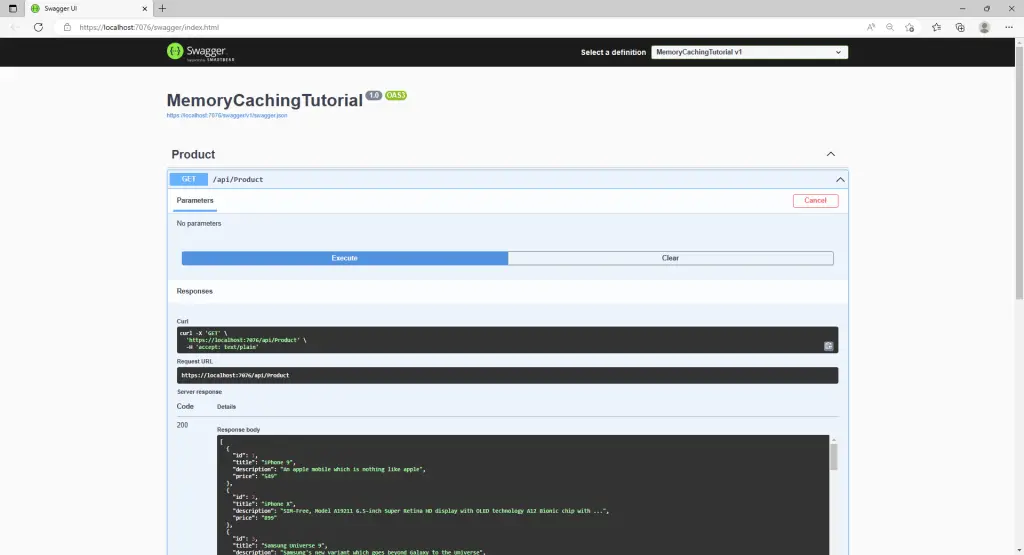
Using swagger, give the GET call to the products API. You should see the response as shown below.

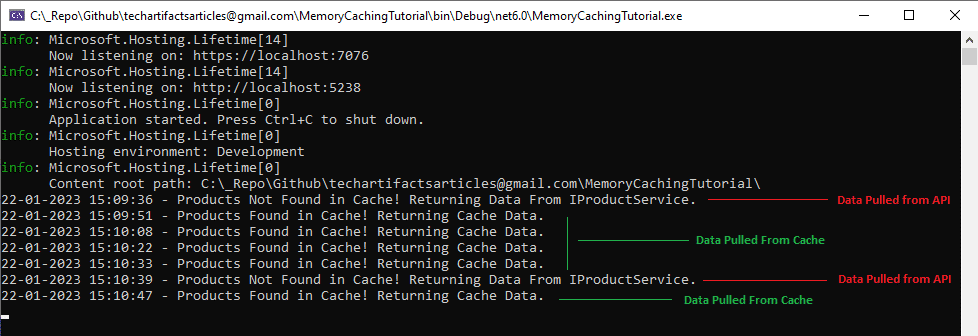
Now give the same call multiple times in the span of 10 to 20 seconds and check the console log of the application after giving multiple calls for about 2 mins.

As you can see in the console, for the first call, the data was not available in the cache and hence it gave the call to the Product Service to pull data from the API. Then since the data was cached for 1 minute, for the subsequence 4 calls, the data was pulled from the cache. And after 1 minute, the data was refreshed and pulled again from the API, since the cache got expired as per the setting.
Code reference
You can find the code for this blog on GitHub. Feel free to use and build upon the code for your own projects.
Conclusion
In conclusion, memory caching is an essential technique for improving the performance of our .NET Core application. By caching data in memory, we can significantly reduce the number of database or external API calls, which can lead to faster page load times and a better user experience. In this blog, we have discussed the basics of memory caching in .NET Core and demonstrated how to implement it step-by-step. We have also highlighted some best practices to follow when using memory caching, such as setting expiration times and using cache keys to ensure that the correct data is retrieved. By following these guidelines, you can effectively leverage the power of memory caching to boost the performance of your .NET Core application. Remember that caching is not always the solution and you need to evaluate the trade-off before implementing caching.