Introduction
In this article, we are going to discuss How to implement Authentication and Authorization in .NET 8 Web API. This is a continuation of.Net 8 series, so if you are new, Please have a look at my previous articles.
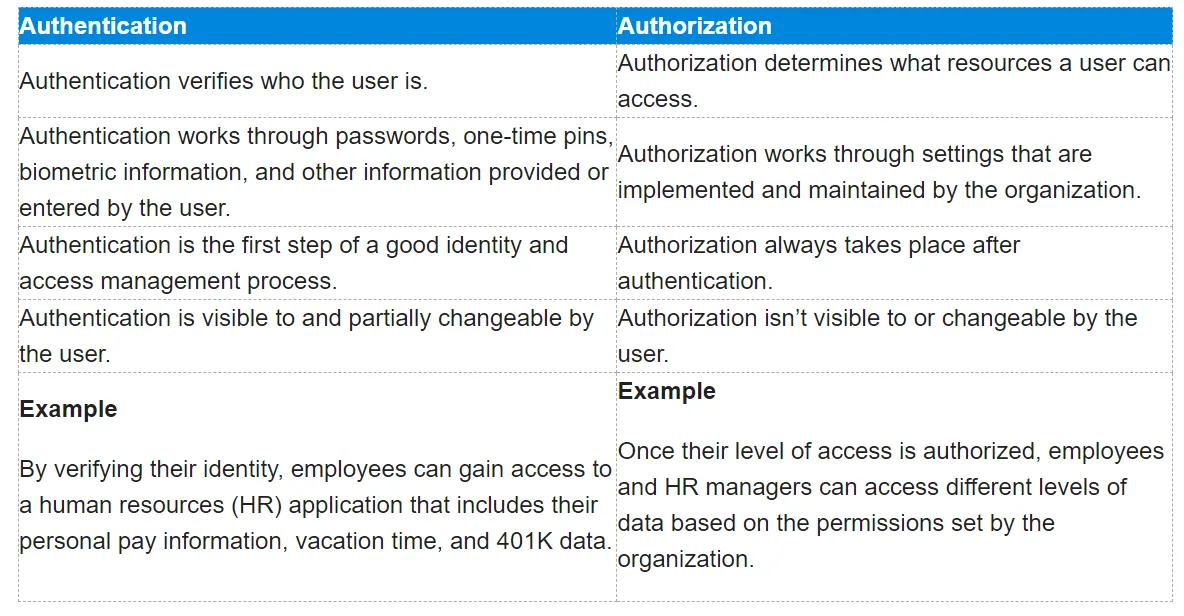
Authentication and Authorization represent fundamentally different functions. In this article, we compare and contrast the two to show how they protect applications in complementary ways.
Authentication
Authentication is knowing the identity of the user.
For example
Alice logs in with her username and password, and the server uses the password to authenticate Alice.
Authorization
Authorization is deciding whether a user is allowed to act.
For example
Alice has permission to get a resource but not create a resource.
Let’s start implementing the Jwt Bearer token in our application.
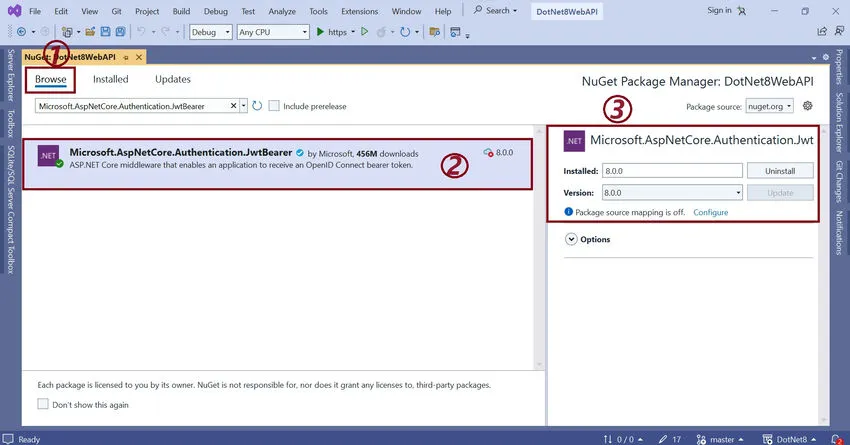
Step 1. Install Microsoft.AspNetCore.Authentication.JwtBearer
Install Microsoft.AspNetCore.Authentication.JwtBearer library to implement the JWT token in our application.
For this:
- Go to ne get the package manager.
- Search “Microsoft.AspNetCore.Authentication.JwtBearer” in Browse Tab.
- Select the appropriate version, then click on the Install button.
Step 2. Add Jwt Middleware
Add Jwt Middleware in our app. For this, please follow the below steps.
- Create a Helpers folder in an API solution
- Add a class called “JwtMiddleware”
- Add the JwtMiddleware constructor and inject RequestDelegate and AppSettings in the constructor.
// JwtMiddleware.cs

using DotNet8WebAPI.Model;

using Microsoft.Extensions.Options;


namespace DotNet8WebAPI.Helpers

{

    public class JwtMiddleware

    {

        private readonly RequestDelegate _next;

        private readonly AppSettings _appSettings;


        public JwtMiddleware(RequestDelegate next, IOptions<AppSettings> appSettings)

        {

            _next = next;

            _appSettings = appSettings.Value;

        }

    }

}
- implement Invoke method
- inside invoke method read the Authorization token from the current request and forward to the attachUserToContext method for validation and extract user info and attach to the current request.
// JwtMiddleware.cs

using DotNet8WebAPI.Model;

using DotNet8WebAPI.Services;

using Microsoft.Extensions.Options;

using Microsoft.IdentityModel.Tokens;

using System.IdentityModel.Tokens.Jwt;

using System.Text;


namespace DotNet8WebAPI.Helpers

{

    public class JwtMiddleware

    {

        private readonly RequestDelegate _next;

        private readonly AppSettings _appSettings;


        public JwtMiddleware(RequestDelegate next, IOptions<AppSettings> appSettings)

        {

            _next = next;

            _appSettings = appSettings.Value;

        }


        public async Task Invoke(HttpContext context, IUserService userService)

        {

            var token = context.Request.Headers["Authorization"].FirstOrDefault()?.Split(" ").Last();


            if (token != null)

                await attachUserToContext(context, userService, token);


            await _next(context);

        }


        private async Task attachUserToContext(HttpContext context, IUserService userService, string token)

        {

            try

            {

                var tokenHandler = new JwtSecurityTokenHandler();

                var key = Encoding.ASCII.GetBytes(_appSettings.Secret);

                tokenHandler.ValidateToken(token, new TokenValidationParameters

                {

                    ValidateIssuerSigningKey = true,

                    IssuerSigningKey = new SymmetricSecurityKey(key),

                    ValidateIssuer = false,

                    ValidateAudience = false,

                    // set clock skew to zero so tokens expire exactly at token expiration time (instead of 5 minutes later)

                    ClockSkew = TimeSpan.Zero

                }, out SecurityToken validatedToken);


                var jwtToken = (JwtSecurityToken)validatedToken;

                var userId = int.Parse(jwtToken.Claims.First(x => x.Type == "id").Value);


                //Attach user to context on successful JWT validation

                context.Items["User"] = await userService.GetById(userId);

            }

            catch

            {

                //Do nothing if JWT validation fails

                // user is not attached to context so the request won't have access to secure routes

            }

        }

    }

}
- Add our “JwtMiddleware” to our app
- for this, go to Program.cs and add it.
app.UseMiddleware<JwtMiddleware>();
Step 3. Implement UserService
Implement UserService. I will help to register a new user.
// IUserService.cs

using DotNet8WebAPI.Model;


namespace DotNet8WebAPI.Services

{

    public interface IUserService

    {

        Task<AuthenticateResponse?> Authenticate(AuthenticateRequest model);

        Task<IEnumerable<User>> GetAll();

        Task<User?> GetById(int id);

        Task<User?> AddAndUpdateUser(User userObj);

    }

}
// UserService.cs

using DotNet8WebAPI.Model;

using Microsoft.EntityFrameworkCore;

using Microsoft.Extensions.Options;

using Microsoft.IdentityModel.Tokens;

using System.IdentityModel.Tokens.Jwt;

using System.Security.Claims;

using System.Text;


namespace DotNet8WebAPI.Services

{

    public class UserService : IUserService

    {

        private readonly AppSettings _appSettings;

        private readonly OurHeroDbContext db;


        public UserService(IOptions<AppSettings> appSettings, OurHeroDbContext _db)

        {

            _appSettings = appSettings.Value;

            db = _db;

        }


        public async Task<AuthenticateResponse?> Authenticate(AuthenticateRequest model)

        {

            var user = await db.Users.SingleOrDefaultAsync(x => x.Username == model.Username && x.Password == model.Password);


            // return null if user not found

            if (user == null) return null;


            // authentication successful so generate jwt token

            var token = await generateJwtToken(user);


            return new AuthenticateResponse(user, token);

        }


        public async Task<IEnumerable<User>> GetAll()

        {

            return await db.Users.Where(x => x.isActive == true).ToListAsync();

        }


        public async Task<User?> GetById(int id)

        {

            return await db.Users.FirstOrDefaultAsync(x => x.Id == id);

        }


        public async Task<User?> AddAndUpdateUser(User userObj)

        {

            bool isSuccess = false;

            if (userObj.Id > 0)

            {

                var obj = await db.Users.FirstOrDefaultAsync(c => c.Id == userObj.Id);

                if (obj != null)

                {

                    // obj.Address = userObj.Address;

                    obj.FirstName = userObj.FirstName;

                    obj.LastName = userObj.LastName;

                    db.Users.Update(obj);

                    isSuccess = await db.SaveChangesAsync() > 0;

                }

            }

            else

            {

                await db.Users.AddAsync(userObj);

                isSuccess = await db.SaveChangesAsync() > 0;

            }


            return isSuccess ? userObj: null;

        }


        // helper methods

        private async Task<string> generateJwtToken(User user)

        {

            //Generate token that is valid for 7 days

            var tokenHandler = new JwtSecurityTokenHandler();

            var token = await Task.Run(() =>

            {


                var key = Encoding.ASCII.GetBytes(_appSettings.Secret);

                var tokenDescriptor = new SecurityTokenDescriptor

                {

                    Subject = new ClaimsIdentity(new[] { new Claim("id", user.Id.ToString()) }),

                    Expires = DateTime.UtcNow.AddDays(7),

                    SigningCredentials = new SigningCredentials(new SymmetricSecurityKey(key), SecurityAlgorithms.HmacSha256Signature)

                };

                return tokenHandler.CreateToken(tokenDescriptor);

            });


            return tokenHandler.WriteToken(token);

        }

    }

}
Step 4. Add respective class models
Add respective class models inside the Model folder.
// User.cs

using System.Text.Json.Serialization;


namespace DotNet8WebAPI.Model

{

    public class User

    {

        public int Id { get; set; }

        public required string FirstName { get; set; }

        public string LastName { get; set; }

        public required string Username { get; set; }


        [JsonIgnore]

        public string Password { get; set; }

        public bool isActive { get; set; }

    }

}
// AuthenticateRequest.cs

using System.ComponentModel;


namespace DotNet8WebAPI.Model

{

    public class AuthenticateRequest

    {

        [DefaultValue("System")]

        public required string Username { get; set; }


        [DefaultValue("System")]

        public required string Password { get; set; }

    }

}
// AuthenticateResponse.cs

namespace DotNet8WebAPI.Model

{

    public class AuthenticateResponse

    {

        public int Id { get; set; }

        public string FirstName { get; set; }

        public string LastName { get; set; }

        public string Username { get; set; }

        public string Token { get; set; }


        public AuthenticateResponse(User user, string token)

        {

            Id = user.Id;

            FirstName = user.FirstName;

            LastName = user.LastName;

            Username = user.Username;

            Token = token;

        }

    }

}
// AppSettings.cs

namespace DotNet8WebAPI.Model

{

    public class AppSettings

    {

        public string Secret { get; set; } = string.Empty;

    }

}
Step 5. Go to the OurHeroDbContext file
Go to the OurHeroDbContext file and add Users as a DBSet.
public DbSet<User> Users { get; set; }
// OurHeroDbContext.cs

using DotNet8WebAPI.Model;

using Microsoft.EntityFrameworkCore;


namespace DotNet8WebAPI

{

    public class OurHeroDbContext : DbContext

    {

        public OurHeroDbContext(DbContextOptions<OurHeroDbContext> options) : base(options)

        {

        }


        public DbSet<OurHero> OurHeros { get; set; }

        public DbSet<User> Users { get; set; }

        protected override void OnModelCreating(ModelBuilder modelBuilder)

        {

            modelBuilder.Entity<OurHero>().HasKey(x => x.Id);


            modelBuilder.Entity<OurHero>().HasData(

                new OurHero

                {

                    Id = 1,

                    FirstName = "System",

                    LastName = "",

                    isActive = true,

                }

            );


            modelBuilder.Entity<User>().HasData(

                new User

                {

                    Id = 1,

                    FirstName = "System",

                    LastName = "",

                    Username = "System",

                    Password = "System",

                }

            );

        }


    }

}
Step 6. Add JWT Secret
Add JWT Secret in the app setting file.
"AppSettings": {

  "Secret": "THIS IS USED TO SIGN AND VERIFY JWT TOKENS, REPLACE IT WITH YOUR OWN SECRET, IT CAN BE ANY STRING"

},
// appsettings.json

{

  "Logging": {

    "LogLevel": {

      "Default": "Information",

      "Microsoft.AspNetCore": "Warning"

    }

  },

  "AppSettings": {

    "Secret": "THIS IS USED TO SIGN AND VERIFY JWT TOKENS, REPLACE IT WITH YOUR OWN SECRET, IT CAN BE ANY STRING"

  },

  "ConnectionStrings": {

    "OurHeroConnectionString": "Data Source=LAPTOP-4TSM9SDC;Initial Catalog=OurHeroDB; Integrated Security=true;TrustServerCertificate=True;"

  },

  "AllowedHosts": "*"

}
Step 7. Register AppSettings and UserServices
Register AppSettings and UserServices in the app.
Go to Program.cs file and register our services.
// Program.cs

builder.Services.Configure<AppSettings>(builder.Configuration.GetSection("AppSettings"));

builder.Services.AddScoped<IUserService, UserService>();
Step 8. Run the below command
Run the below command to add migration and update the database.
- Run the add-migration [name]
- update-database
Step 9. Implement AuthorizeAttribute
Implement AuthorizeAttribute to protect our and point to anonymous uses.
- Add the AuthorizeAttribute class in the Helpers folder.
- the extent of this class with Attribute and IAuthorizationFilter.
- implements OnAuthorization method.
// AuthorizeAttribute.cs

using DotNet8WebAPI.Model;

using Microsoft.AspNetCore.Mvc.Filters;

using Microsoft.AspNetCore.Mvc;


namespace DotNet8WebAPI.Helpers

{

    [AttributeUsage(AttributeTargets.Class | AttributeTargets.Method)]

    public class AuthorizeAttribute : Attribute, IAuthorizationFilter

    {

        public void OnAuthorization(AuthorizationFilterContext context)

        {

            var user = (User?)context.HttpContext.Items["User"];

            if (user == null)

            {

                context.Result = new JsonResult(new { message = "Unauthorized" }) { StatusCode = StatusCodes.Status401Unauthorized };

            }

        }

    }

}
Step 10. Apply AuthorizeAttribute
Apply AuthorizeAttribute either controller level or Action method level based on your requirement.
using DotNet8WebAPI.Helpers;

using DotNet8WebAPI.Model;

using DotNet8WebAPI.Services;

using Microsoft.AspNetCore.Mvc;


namespace DotNet8WebAPI.Controllers

{

    [Route("api/[controller]")]

    [ApiController] // Controller level

    [Authorize]

    public class OurHeroController : ControllerBase

    {

        private readonly IOurHeroService _heroService;

        public OurHeroController(IOurHeroService heroService)

        {

            _heroService = heroService;

        }


        //[ApiController]  // Action method level

        [HttpGet]

        public async Task<IActionResult> Get([FromQuery] bool? isActive = null)

        {

            var heros = await _heroService.GetAllHeros(isActive);

            return Ok(heros);

        }


        [HttpGet("{id}")]

        //[Route("{id}")] // /api/OurHero/:id

        public async Task<IActionResult> Get(int id)

        {

            var hero = await _heroService.GetHerosByID(id);

            if (hero == null)

            {

                return NotFound();

            }

            return Ok(hero);

        }


        [HttpPost]

        public async Task<IActionResult> Post([FromBody] AddUpdateOurHero heroObject)

        {

            var hero = await _heroService.AddOurHero(heroObject);


            if (hero == null)

            {

                return BadRequest();

            }


            return Ok(new

            {

                message = "Super Hero Created Successfully!!!",

                id = hero!.Id

            });

        }


        [HttpPut]

        [Route("{id}")]

        public async Task<IActionResult> Put([FromRoute] int id, [FromBody] AddUpdateOurHero heroObject)

        {

            var hero = await _heroService.UpdateOurHero(id, heroObject);

            if (hero == null)

            {

                return NotFound();

            }


            return Ok(new

            {

                message = "Super Hero Updated Successfully!!!",

                id = hero!.Id

            });

        }


        [HttpDelete]

        [Route("{id}")]

        public async Task<IActionResult> Delete([FromRoute] int id)

        {

            if (!await _heroService.DeleteHerosByID(id))

            {

                return NotFound();

            }


            return Ok(new

            {

                message = "Super Hero Deleted Successfully!!!",

                id = id

            });

        }

    }

}
// UsersController.cs

using DotNet8WebAPI.Helpers;

using DotNet8WebAPI.Model;

using DotNet8WebAPI.Services;

using Microsoft.AspNetCore.Mvc;


namespace DotNet8WebAPI.Controllers

{

    [Route("api/[controller]")] //    /api/Users

    [ApiController]

    public class UsersController : ControllerBase

    {

        private IUserService _userService;


        public UsersController(IUserService userService)

        {

            _userService = userService;

        }


        [HttpPost("authenticate")]

        public async Task<IActionResult> Authenticate(AuthenticateRequest model)

        {

            var response = await _userService.Authenticate(model);


            if (response == null)

                return BadRequest(new { message = "Username or password is incorrect" });


            return Ok(response);

        }


        // POST api/<CustomerController>

        [HttpPost]

        [Authorize]

        public async Task<IActionResult> Post([FromBody] User userObj)

        {

            userObj.Id = 0;

            return Ok(await _userService.AddAndUpdateUser(userObj));

        }


        // PUT api/<CustomerController>/5

        [HttpPut("{id}")]

        [Authorize]

        public async Task<IActionResult> Put(int id, [FromBody] User userObj)

        {

            return Ok(await _userService.AddAndUpdateUser(userObj));

        }

    }

}
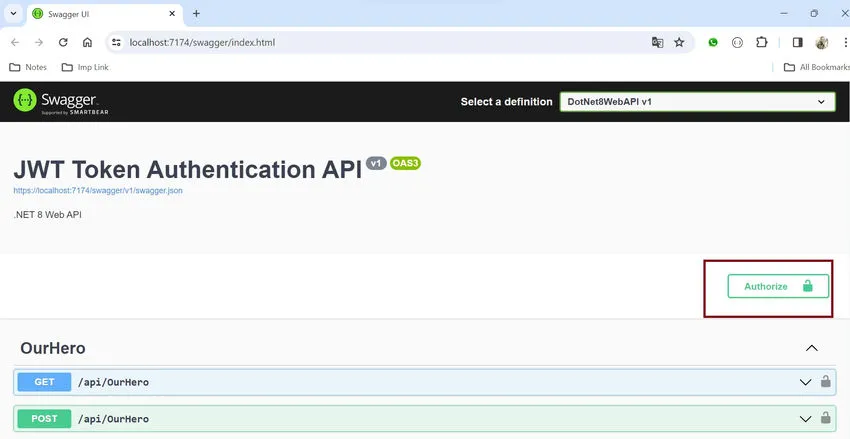
Step 11. API Security
Now Our API is secure from unauthenticated users.
But if you want to test our API using Swagger, then we need to accept the Bearer token.
Go to Program.cs file and implement this.
builder.Services.AddSwaggerGen(swagger =>

{

    // This is to generate the Default UI of Swagger Documentation

    swagger.SwaggerDoc("v1", new OpenApiInfo

    {

        Version = "v1",

        Title = "JWT Token Authentication API",

        Description = ".NET 8 Web API"

    });

    // To Enable authorization using Swagger (JWT)

    swagger.AddSecurityDefinition("Bearer", new OpenApiSecurityScheme()

    {

        Name = "Authorization",

        Type = SecuritySchemeType.ApiKey,

        Scheme = "Bearer",

        BearerFormat = "JWT",

        In = ParameterLocation.Header,

        Description = "JWT Authorization header using the Bearer scheme. \r\n\r\n Enter 'Bearer' [space] and then your token in the text input below.\r\n\r\nExample: \"Bearer 12345abcdef\"",

    });

    swagger.AddSecurityRequirement(new OpenApiSecurityRequirement

                {

                    {

                          new OpenApiSecurityScheme

                            {

                                Reference = new OpenApiReference

                                {

                                    Type = ReferenceType.SecurityScheme,

                                    Id = "Bearer"

                                }

                            },

                            new string[] {}


                    }

                });

});
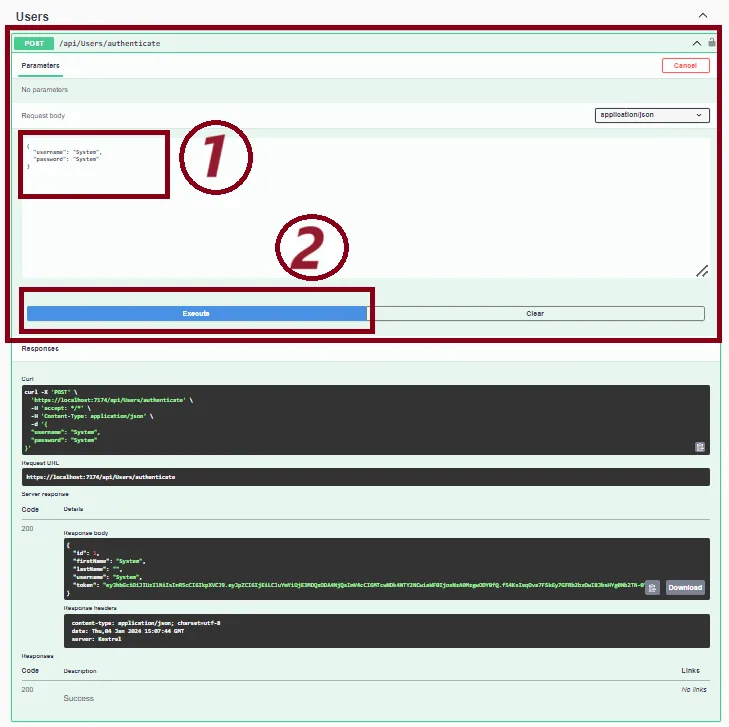
Step 12. Run Web API
Run Web API (Press F5) and call “/api/Users/authenticate” API.
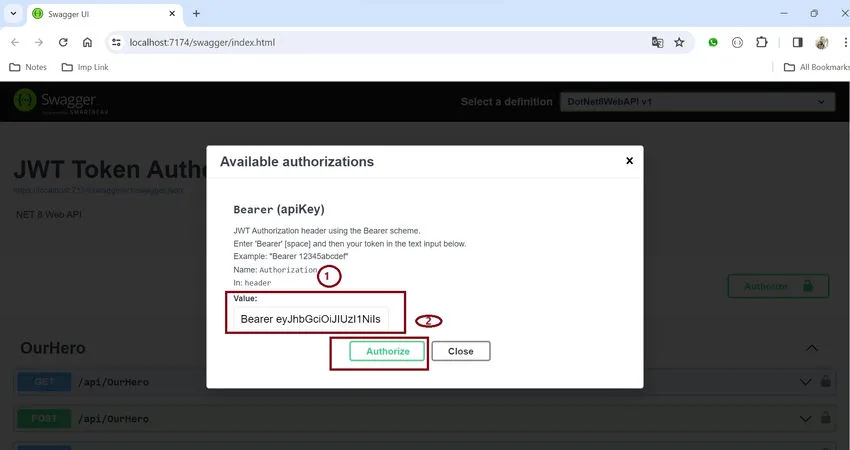
Step 13. Copy the JWT token
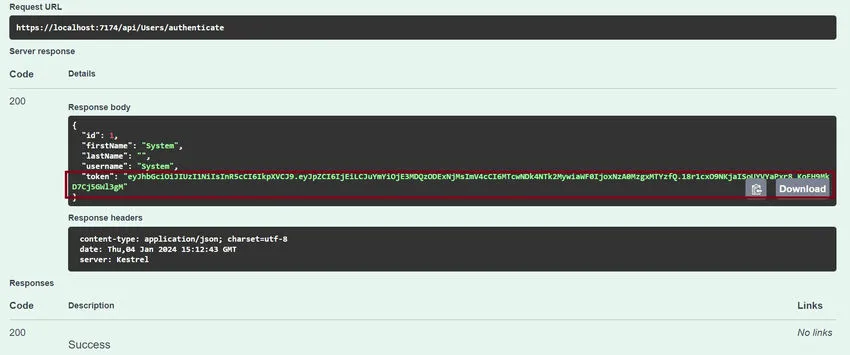
- Click on the Authorization button, and in the value section, provide the token “Bearer <token>”.
- then click on the Authorization button to authenticate web API.
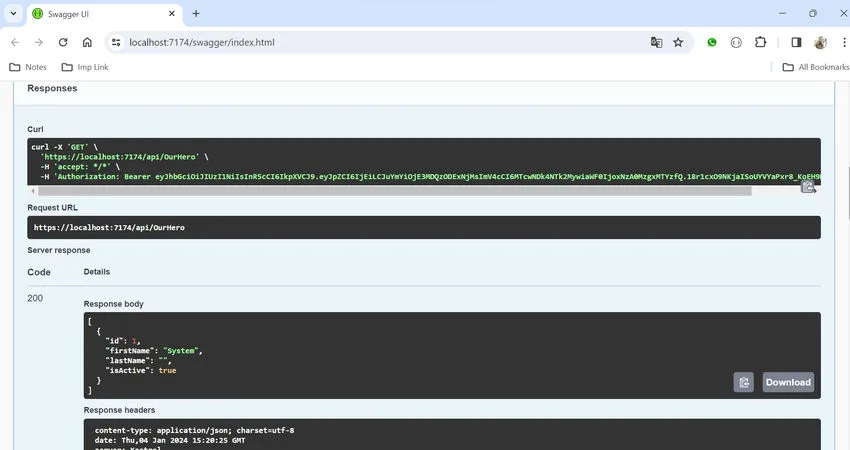
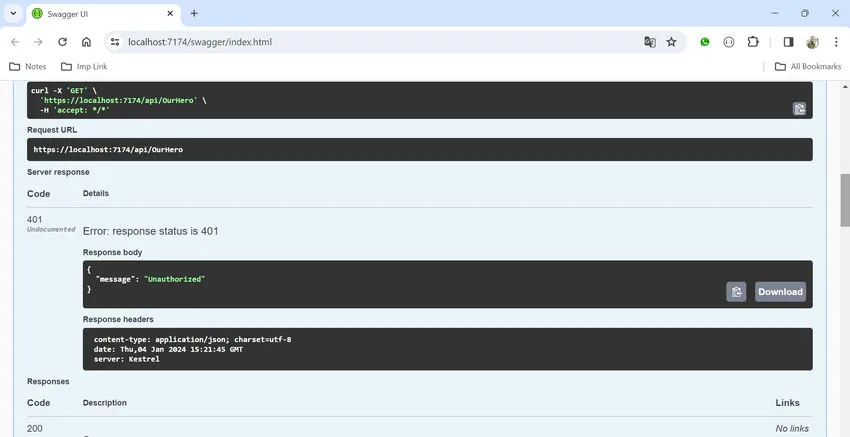
Step 14. Call the “/api/OurHero” API
Now if you call the “/api/OurHero” API, it will work, but without a JWT token, it will throw a 401 (Unauthorized) error.
- With JWT token — working fine.
Without a JWT token — throwing a 401 error.
Summary
That’s it! You’ve created a complete .NET 8 Web API for CRUD operations with an In-memory database and JWT Authentication. You can now integrate this API into your front-end application.
Thanks for reading.