In this blog, I am going to provide a walkthrough on developing REST APIs using ASP.NET Core 3.1, connecting with existing databases using Entity Framework, creating a JWT token, and securing APIs. I am going to develop a sample application for an inventory REST service with basic operations.
Table of contents:
- What is a REST API?
- What is a JWT token?
- Create an ASP.NET Core REST API application
- Install necessary NuGet packages
- Create database and connect it to application
- Build REST APIs
- Run and test APIs using Postman
- Create a JWT token
- Secure API endpoint
Note: In this demo application, I have used ASP.NET Core 3.1, Entity Framework Core 3.1 with Visual Studio 2019 16.4.0, SQL Server 2017, and Postman.
What is a REST API?
Due to the increasing number of different varieties of clients (mobile apps, browser-based SPAs, desktop apps, IOT apps, etc.), we need better ways for transferring data from servers to clients, independent of technology and server stacks.
REST APIs solve this problem. REST stands for representational state transfer. REST APIs are HTTP-based and provide applications the ability to communicate using lightweight JSON format. They run on web servers.
REST consists of the following entities:
Resource: Resources are uniquely identifiable entities (for example: data from a database, images, or any data).
Endpoint: A resource can be accessed through a URL identifier.
HTTP method: HTTP method is the type of request a client sends to a server. Operations we perform on the resource should follow this.
HTTP header: An HTTP header is a key-value pair used to share additional information between a client and server, such as:
- Type of data being sent to server (JSON, XML).
- Type of encryption supported by client.
- Authentication-related token.
- Customer data based on application need.
Data format: JSON is a common format to send and receive data through REST APIs.
What is a JWT Token?
In the previous section, we saw what a REST API is, and here we will see what a JWT bearer token is, which secures the REST APIs.
JWT stands for JSON Web Token. It is open standard and defines a better way for transferring data securely between two entities (client and server).
A JWT is digitally signed using a secret key by a token provider or authentication server. A JWT helps the resource server verify the token data using the same secret key, so that you can trust the data.
JWT consists of the following three parts:
Header: encoded data of token type and the algorithm used to sign the data.
Payload: encoded data of claims intended to share.
Signature: created by signing (encoded header + encoded payload) using a secret key.
The final JWT token will be like this: Header.Payload.Signature. Please find the token workflow in the following.
Step 1: Client requesting token
The client sends a request to the authentication server with the necessary information to prove its identity.
Step 2: Token creation
The authentication server receives the token request and verifies the identity. If it is found valid, a token will be created (as explained previously) with the necessary claims, and a JWT token will be sent back to the client.
Step 3: Client sends token to resource server
For each request to Resource or the API server, the client needs to include a token in the header and request the resource using its URI.
Step 4: Resource server verifies the token
Follow these steps to verify the token:
- Read the token from authentication header.
- Split the header, payload, and signature from token.
- Create signature of received header and payload using the same secret key used when creating the token.
- Check whether both newly created signature and signature received from token are valid.
- If the signatures are the same, the tokens are valid (not altered in the middle) and they provide access to the requested resource.
- If the signatures are different, an unauthorized response will be sent back to the client. (In the middle, if claims are alerted, they will generate a different signature, hence resource access will be restricted.)
Don’t share confidential information using a JWT, since a JWT can be decoded and the claims or data it possesses can be viewed.
The following section explains how to create a REST API and secure it using a token.
Create an ASP.NET Core REST API application
Follow these steps to create an ASP.NET Core application in Visual Studio 2019:
Step 1: Go to File > New, and then select Project.
Step 2: Choose Create a new project.
Step 3: Select ASP.NET Core Web Application template.
Step 4: Enter the Project name, and then click Create. The Project template dialog will be displayed.
Step 5: Select .NET Core, ASP.NET Core 3.1, and API template (highlighted in the following).
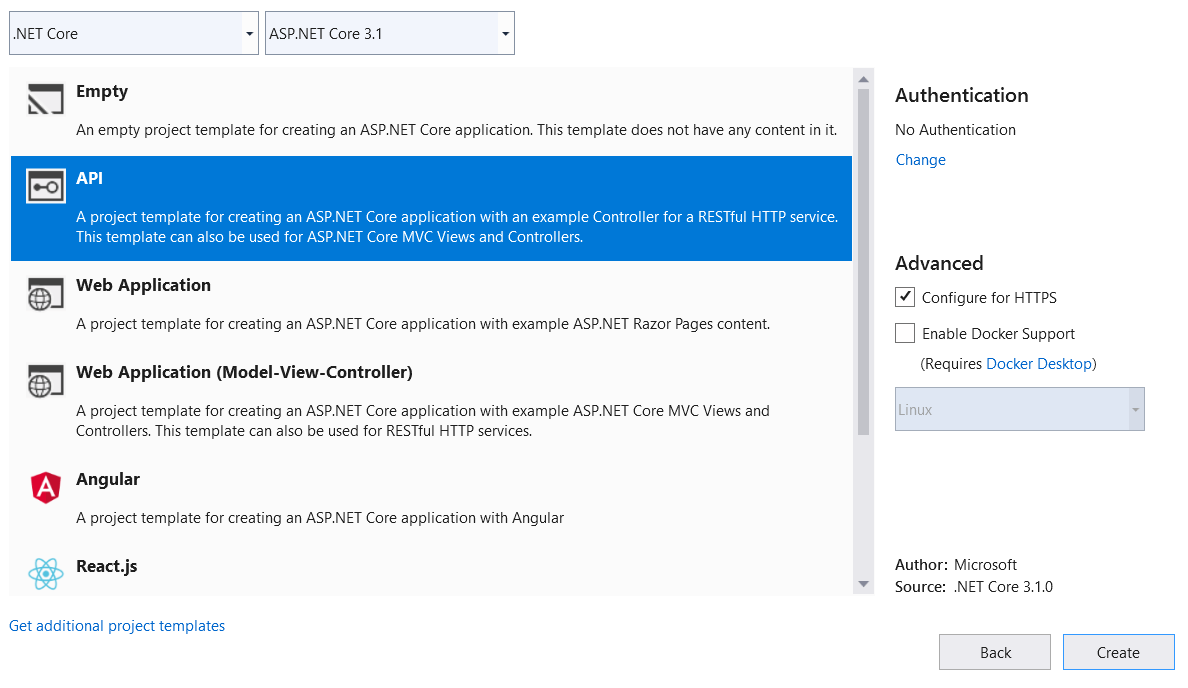
Select .NET Core, ASP.NET Core 3.1, and API template
Step 6: Click Create. The sample ASP.NET Core API application will be created. Find the project structure in the following screenshot.
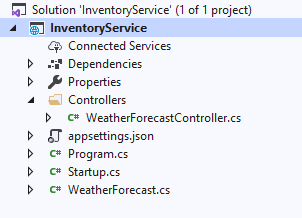
The project structure
By default, a sample WeatherForecast API is created. We can remove this.
Install necessary NuGet packages
Add the following NuGet packages to work with SQL Server database and scaffolding, and run the following commands in Package Manager Console (click Tools -> NuGet Package Manager -> Package Manager Console).
This package helps generate controllers and views.
- Install-Package Microsoft.VisualStudio.Web.CodeGeneration.Design -Version 3.1.0
This package helps create database context and model classes from the database.
- Install-Package Microsoft.EntityFrameworkCore.Tools -Version 3.1.0
Database provider allows Entity Framework Core to work with SQL Server.
- Install-Package Microsoft.EntityFrameworkCore.SqlServer -Version 3.1.0
It provides support for creating and validating a JWT token.
- Install-Package System.IdentityModel.Tokens.Jwt -Version 5.6.0
This is the middleware that enables an ASP.NET Core application to receive a bearer token in the request pipeline.
- Install-Package Microsoft.AspNetCore.Authentication.JwtBearer -Version 3.1.0
Create database and connect it to application
I hope you have installed SQL Server 2017 in your machine. (You can also use SQL Server 2008, 2012, or 2016.)
Step 1: Create a new database (Inventory).
Step 2: For this application, I am going to create tables called Products and UserInfo with basic attributes. Paste the following SQL query into the Query window to create necessary tables.
Create Table Products(
ProductId Int Identity(1,1) Primary Key,
Name Varchar(100) Not Null,
Category Varchar(100),
Color Varchar(20),
UnitPrice Decimal Not Null,
AvailableQuantity Int Not Null)
GO
Create Table UserInfo(
UserId Int Identity(1,1) Not null Primary Key,
FirstName Varchar(30) Not null,
LastName Varchar(30) Not null,
UserName Varchar(30) Not null,
Email Varchar(50) Not null,
Password Varchar(20) Not null,
CreatedDate DateTime Default(GetDate()) Not Null)
GO
Insert Into UserInfo(FirstName, LastName, UserName, Email, Password)
Values ('Inventory', 'Admin', 'InventoryAdmin', 'InventoryAdmin@abc.com', '$admin@2017')
Step 3: Run the following scaffold command in Package Manager Console to reverse engineer the database to create database context and entity POCO classes from tables. The scaffold command will create POCO class only for the tables that have a primary key.
Scaffold-DbContext “Server=******;Database=Inventory;Integrated Security=True” Microsoft.EntityFrameworkCore.SqlServer -OutputDir Models
- Connection: Sets connection string of the database.
- Provider: Sets the provider to be used to connect database.
- OutputDir: Sets the directory where the POCO classes are generated.
In our case, the Products class and Inventory context class will be created as shown in the following screenshot.
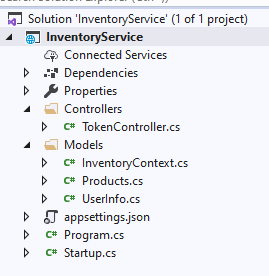
Creating the Products class and Inventory context class
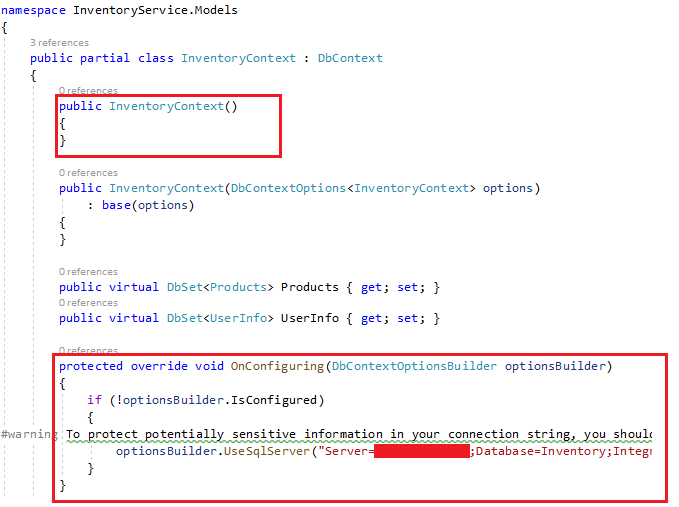
In the autogenerated InventoryContext class file, the database credentials you can see are hard coded in the OnConfiguring method. It is not a good practice to have SQL Server credentials in C# class, considering the security issues. So, remove the following OnConfiguring method and parameterless constructor from context file (highlighted).
Add a connection string to the appsetting.json file.

Then, register the database context service (InventoryContext) during application startup. In the following code, the connection string is read from the appsetting file and is passed to the context service.

Add the following namespaces to the startup file:
using InventoryService.Models;
using Microsoft.EntityFrameworkCore;
Then this context service is injected with the required controllers via dependency injection.
Build REST APIs
Now, we have database and entity classes in place. Follow these steps to create Products API:
Step 1: Right–click the Controllers folder, choose Add, and then click Controller.
Step 2: Select API Controller with actions using the Entity Framework template.
Step 3: Choose the Products model class and InventoryContext context class, and then name the control ProductsController.
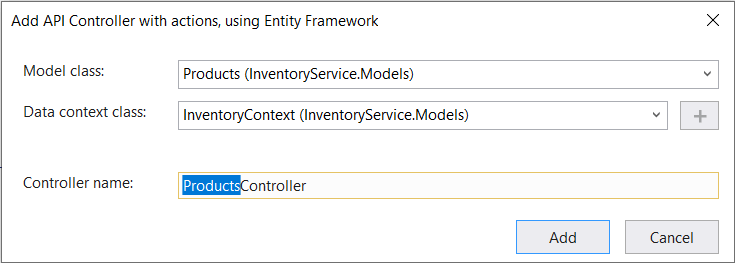
Choosing the Products model class and InventoryContext context class and naming the control ProductsController.
When we click Add, the API is automatically created using the ASP.NET CORE scaffolding code generation technique.
The following APIs are created:
- To list all products: HTTP Get method
- Get product detail: HTTP Get method
- Update product detail: HTTP Put method
- Create product: HTTP Post method
- Delete product: HTTP Delete method
As per REST best practice, each endpoint is assigned with respective HTTP methods based on its operation.
using System;
using System.Collections.Generic;
using System.Linq;
using System.Threading.Tasks;
using Microsoft.AspNetCore.Http;
using Microsoft.AspNetCore.Mvc;
using Microsoft.EntityFrameworkCore;
using InventoryService.Models;
using Microsoft.AspNetCore.Authorization;
namespace InventoryService.Controllers
{
[Authorize]
[Route("api/[controller]")]
[ApiController]
public class ProductsController : ControllerBase
{
private readonly InventoryContext _context;
public ProductsController(InventoryContext context)
{
_context = context;
}
[HttpGet]
public async Task<ActionResult<IEnumerable<Products>>> GetProducts()
{
return await _context.Products.ToListAsync();
}
// GET: api/Products/5
[HttpGet("{id}")]
public async Task<ActionResult<Products>> GetProducts(int id)
{
var products = await _context.Products.FindAsync(id);
if (products == null)
{
return NotFound();
}
return products;
}
// PUT: api/Products/5
// To protect from overposting attacks, please enable the specific properties you want to bind to, for
// more details see https://aka.ms/RazorPagesCRUD.
[HttpPut("{id}")]
public async Task<IActionResult> PutProducts(int id, Products products)
{
if (id != products.ProductId)
{
return BadRequest();
}
_context.Entry(products).State = EntityState.Modified;
try
{
await _context.SaveChangesAsync();
}
catch (DbUpdateConcurrencyException)
{
if (!ProductsExists(id))
{
return NotFound();
}
else
{
throw;
}
}
return NoContent();
}
// POST: api/Products
// To protect from overposting attacks, please enable the specific properties you want to bind to, for
// more details see https://aka.ms/RazorPagesCRUD.
[HttpPost]
public async Task<ActionResult<Products>> PostProducts(Products products)
{
_context.Products.Add(products);
await _context.SaveChangesAsync();
return CreatedAtAction("GetProducts", new { id = products.ProductId }, products);
}
// DELETE: api/Products/5
[HttpDelete("{id}")]
public async Task<ActionResult<Products>> DeleteProducts(int id)
{
var products = await _context.Products.FindAsync(id);
if (products == null)
{
return NotFound();
}
_context.Products.Remove(products);
await _context.SaveChangesAsync();
return products;
}
private bool ProductsExists(int id)
{
return _context.Products.Any(e => e.ProductId == id);
}
}
}
Now, we are going to make the following modifications to the Get Products API to filter the products:
- Return the products that are in stock.
- Support limiting the number of results returned.
[HttpGet]
public async Task<ActionResult<IEnumerable<Products>>> GetProducts(bool? inStock, int? skip, int? take)
{
var products = _context.Products.AsQueryable();
if (inStock != null) // Adds the condition to check availability
{
products = _context.Products.Where(i => i.AvailableQuantity > 0);
}
if (skip != null)
{
products = products.Skip((int)skip);
}
if (take != null)
{
products = products.Take((int)take);
}
return await products.ToListAsync();
}
Change the launch URL to api/products in launchSettings.js.
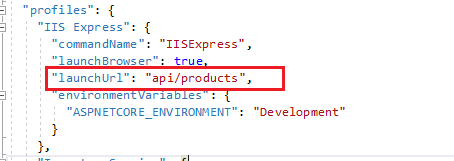
Changing the launch URL to API or products in launchSettings.js
Run and test APIs using Postman
Click Run to view the Inventory service. A new browser tab will open, and we’ll be able to see the product listing.

Viewing the Inventory service
Our Inventory REST service is up and running.
Note: The localhost port number may be different in your development machine.
In this section, we will see how to consume our service using Postman (Postman is an API testing tool that helps developers consume and check how an API works).
Follow these steps to view the products list:
Step 1: Open Postman and enter this endpoint: https://localhost:44305/api/products
Step 2: Choose the GET method and click Send. Now, all the products will be listed as shown in the following screenshot.
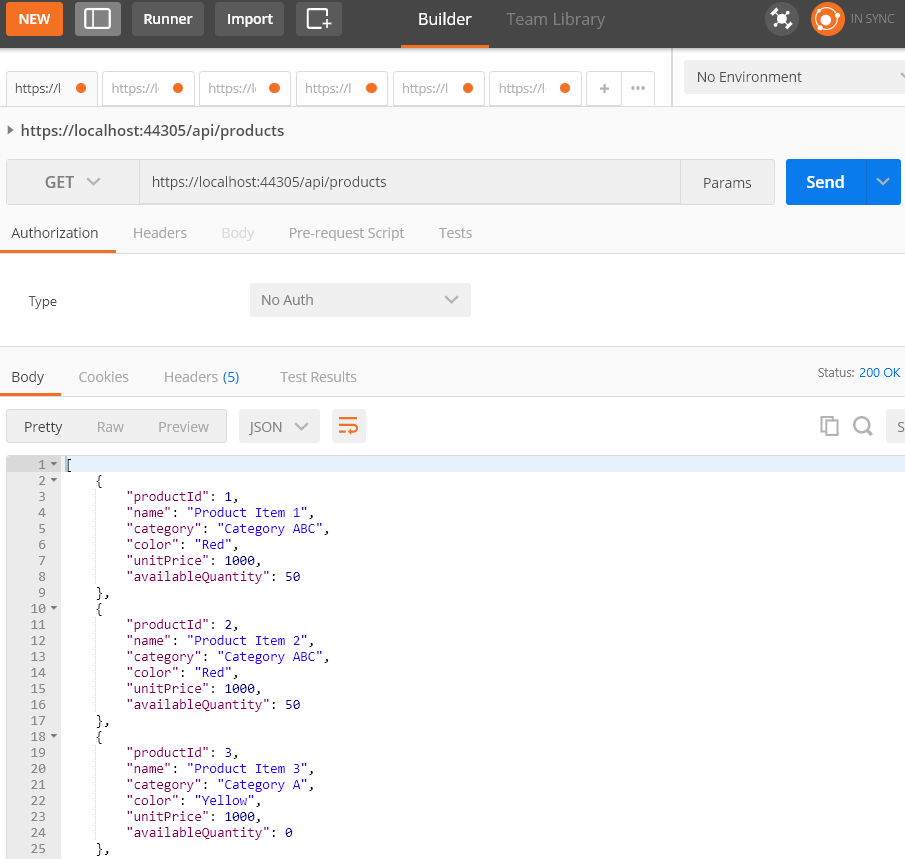
Listing all the products
Now, apply the filter to return products that are in stock and fetch only necessary items using skip and take.
Enter the following endpoint into Postman: https://localhost:44305/api/products?instock=true&skip=2&take=3
Now, you can see only the products that are in stock. It skips the first two records and displays the next three records.

Listing only the products that are in stock
Follow these steps to view the details of a product:
Step 1: Open Postman and enter this endpoint: https://localhost:44305/api/products/1
Step 2: Choose GET method and click Send. Now, you can see the details of the product. Here, the product id is 1.
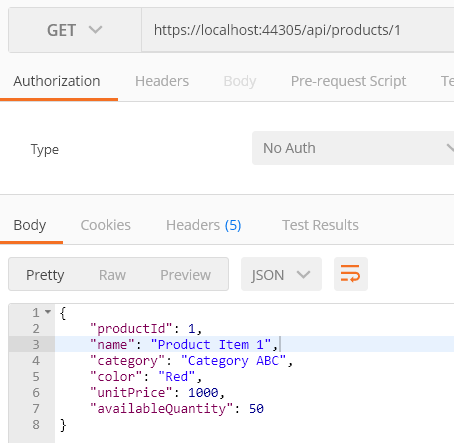
The details of a product
Note: Change ProductId based on records available in your database.
Follow these steps to create a product:
Step 1: Enter this endpoint into Postman: https://localhost:44305/api/products
Step 2: Choose POST method and set as header: ‘Content-Type’: ‘application/json’.
Step 3: Under Body > Raw, choose type JSON (application/javascript) and paste the product details.
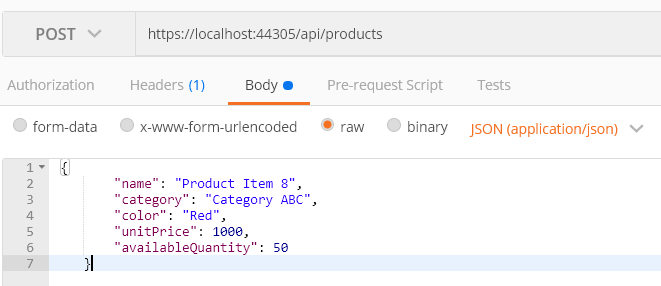
Choosing type JSON (application or javascript) and paste the product details
By clicking Send, a product is created, and by loading the product listing page, you can see the newly created product.
Follow these steps to update the product:
Step 1: Enter this endpoint into Postman: https://localhost:44305/api/products/7
Step 2: Choose the PUT method and set as header: ‘Content-Type’: ‘application/json’.
Step 3: Under Body > Raw, choose type JSON (application/javascript) and paste the product details.
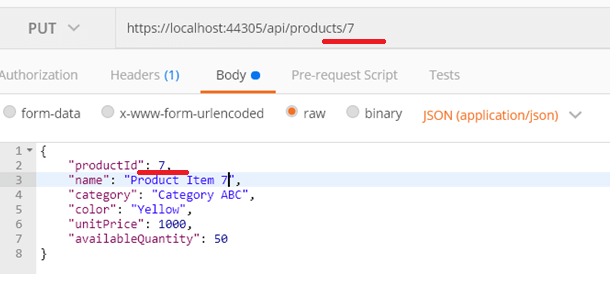
Choosing type JSON (application or javascript) and paste the product details to update the product
By clicking Send, the product details are updated.
Note: ProductId must be the same in the endpoint and product details (see the red highlight in the previous image), otherwise the API will throw bad request.
Follow these steps to delete a product:
Step 1: Enter this endpoint into Postman: https://localhost:44305/api/products/7
Step 2: Choose the DELETE method and click Send. Now, the product will be deleted from the database.
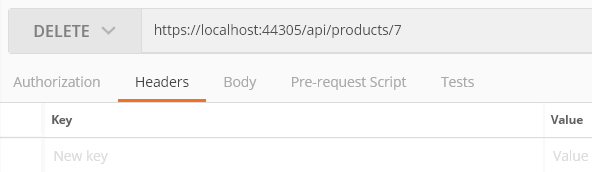
Deleting the product from database
Create a JWT
We can consume and test our API using Postman, but the problem here is anyone who knows the endpoint can consume it. So this is not the case, we need an option to control who can consume our service. This is achieved by a JWT bearer token.
Here, we will see how to create a token:
Step 1: Create an empty API controller called TokenController.
Step 2: Paste the below JWT configuration into the appsetting.json file.

Step 3: Add the action method under TokenController to perform the following operations:
- Accept username and password as input.
- Check users’ credentials with database to ensure users’ identity:
o If valid, access token will be returned.
o If invalid, bad request error will be returned.
The following code example demonstrates how to create a token.
using InventoryService.Models;
using Microsoft.AspNetCore.Mvc;
using Microsoft.EntityFrameworkCore;
using Microsoft.Extensions.Configuration;
using Microsoft.IdentityModel.Tokens;
using System;
using System.IdentityModel.Tokens.Jwt;
using System.Security.Claims;
using System.Text;
using System.Threading.Tasks;
namespace InventoryService.Controllers
{
[Route("api/[controller]")]
[ApiController]
public class TokenController : ControllerBase
{
public IConfiguration _configuration;
private readonly InventoryContext _context;
public TokenController(IConfiguration config, InventoryContext context)
{
_configuration = config;
_context = context;
}
[HttpPost]
public async Task<IActionResult> Post(UserInfo _userData)
{
if (_userData != null && _userData.Email != null && _userData.Password != null)
{
var user = await GetUser(_userData.Email, _userData.Password);
if (user != null)
{
// create claims details based on the user information
var claims = new[] {
new Claim(JwtRegisteredClaimNames.Sub, _configuration["Jwt:Subject"]),
new Claim(JwtRegisteredClaimNames.Jti, Guid.NewGuid().ToString()),
new Claim(JwtRegisteredClaimNames.Iat, DateTime.UtcNow.ToString()),
new Claim("Id", user.UserId.ToString()),
new Claim("FirstName", user.FirstName),
new Claim("LastName", user.LastName),
new Claim("UserName", user.UserName),
new Claim("Email", user.Email)
};
var key = new SymmetricSecurityKey(Encoding.UTF8.GetBytes(_configuration["Jwt:Key"]));
var signIn = new SigningCredentials(key, SecurityAlgorithms.HmacSha256);
var token = new JwtSecurityToken(_configuration["Jwt:Issuer"], _configuration["Jwt:Audience"], claims, expires: DateTime.UtcNow.AddDays(1), signingCredentials: signIn);
return Ok(new JwtSecurityTokenHandler().WriteToken(token));
}
else
{
return BadRequest("Invalid credentials");
}
}
else
{
return BadRequest();
}
}
private async Task<UserInfo> GetUser(string email, string password)
{
return await _context.UserInfo.FirstOrDefaultAsync(u => u.Email == email && u.Password == password);
}
}
}
Follow these steps to check the token endpoint using Postman:
Step 1: Enter this endpoint https://localhost:44305/api/token
Step 2: Choose the POST method and set the header to ‘Content-Type’: ‘application/json’.
Step 3: Under Body > Raw, choose type JSON (application/javascript) and paste the product details.
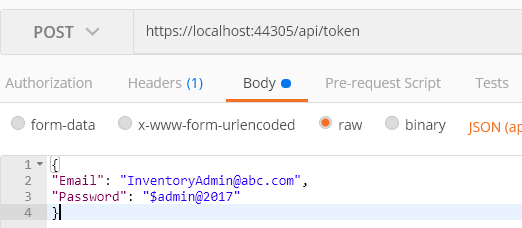
Choosing type JSON (application or javascript) and paste the product details to check the token end point
By clicking Send, user credentials will be checked, and a token will be generated and returned. See the highlighted body section.
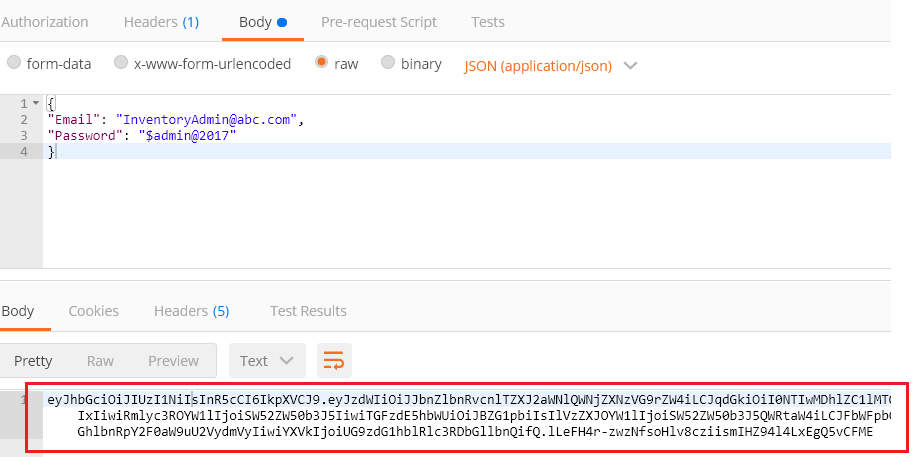
Checking user credentials and generating a token
Secure API endpoint
Now, we have a JWT token and will see how to secure our API.
Step 1: Add the following namespaces to the startup file:
using Microsoft.AspNetCore.Authentication.JwtBearer;
using Microsoft.IdentityModel.Tokens;
using System.Text;
Step 2: Configure authorization middleware in the startup configureService method.
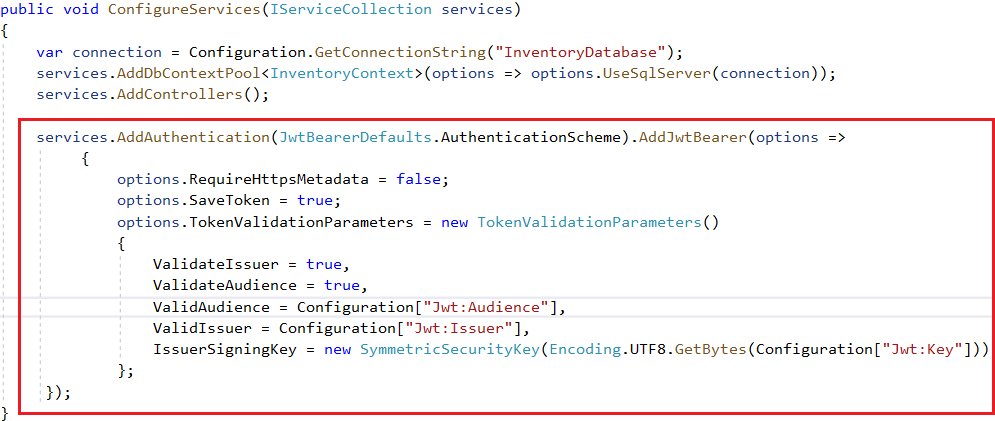
We have passed the security key used when creating the token, and we have also enabled validation of Issuer and Audience.
Also, we have set SaveToken to true, which stores the bearer token in HTTP Context. So we can access the token in the controller when needed.
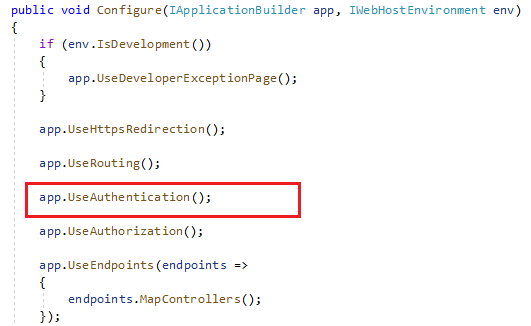
Step 3: Inject the authorization middleware into the Request pipeline.
Step 4: Add authorization attribute to the controller.
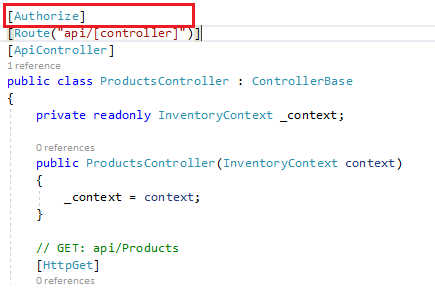
Here I have added authorization to the whole controller, so all the APIs under this controller will be secured with the token. You can also add authorization to a particular API method.
Follow these steps to test whether the APIs are secured by the JWT:
Step 1: In Postman, enter this endpoint: https://localhost:44305/api/products
Step 2: Choose the GET method and then click Send. Now, you can see the Status code is 401 Unauthorized.
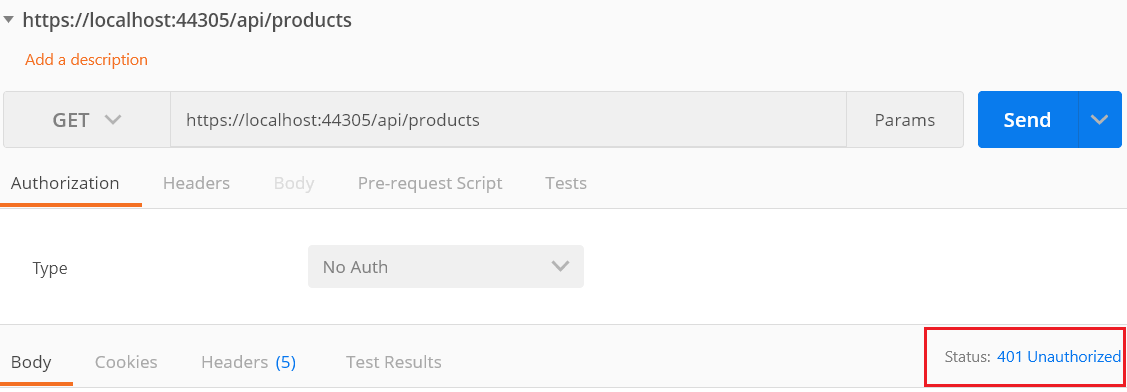
Status code 401 Unauthorized
The anonymous access has been blocked and the APIs have been secured. Now, we will see how to access the APIs using the token.
Step 3: Copy the token that was created in earlier steps.

Copying the token created earlier
Step 4: Prepend text Bearer with this token, and finally you will have a token as follows.
Bearer eyJhbGciOiJIUzI1NiIsInR5cCI6IkpXVCJ9.eyJzdWIiOiJJbnZlbnRvcnlTZXJ2aWNlQWNjZXNzVG9rZW4iLCJqdGkiOiIwMGY2MjcwYy05NmFlLTQwMDUtOWUwOS00YWVkMjU5NWNjMTIiLCJpYXQiOiIxMS8yOS8yMDE5IDY6MTc6MDIgQU0iLCJJZCI6IjEiLCJGaXJzdE5hbWUiOiJJbnZlbnRvcnkiLCJMYXN0TmFtZSI6IkFkbWluIiwiVXNlck5hbWUiOiJJbnZlbnRvcnlBZG1pbiIsIkVtYWlsIjoiSW52ZW50b3J5QWRtaW5AYWJjLmNvbSIsImV4cCI6MTU3NTA5NDYyMiwiaXNzIjoiSW52ZW50b3J5QXV0aGVudGljYXRpb25TZXJ2ZXIiLCJhdWQiOiJJbnZldG9yeVNlcnZpY2VQb3N0bWFuQ2xpZW50In0.r3gDqAL9FmH2LA_-nfyLDrihfhuY5ODk1bGOLECaKcI
Step 5: Now, come back to the product list. Under the Authorization header, paste the previous token in the Value field, and then click Send. Now you can see the products from our API.
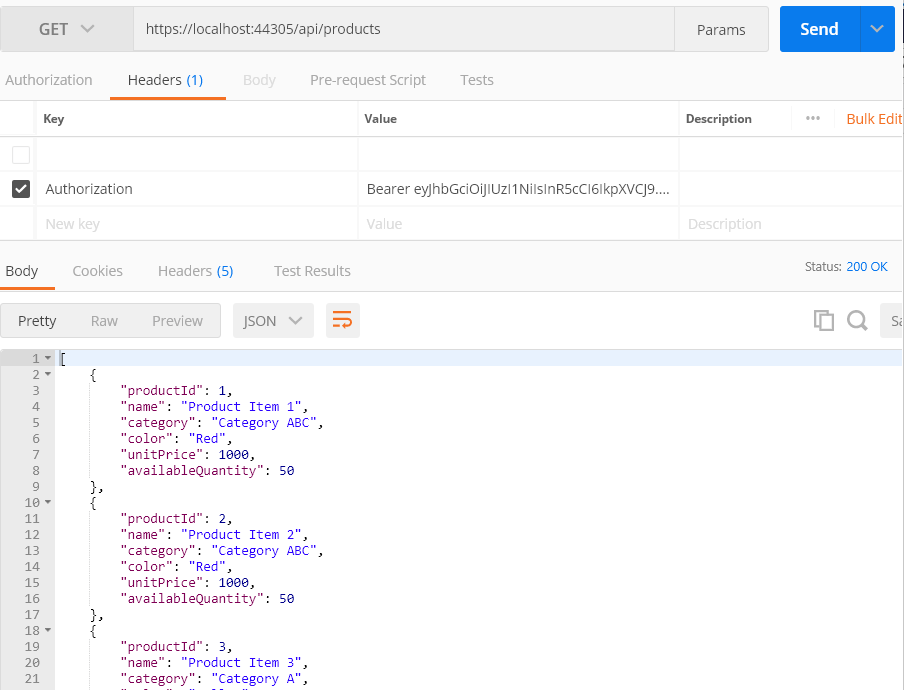
The products from our API
- In code-behind, when we pass the authorization header to the API, authentication middleware parses and validates the token. If it is found valid, it will set UIdentity.IsAuthenticated to true.
- The Authorize attribute added in the controller will check whether the request is authenticated. If it is true, the API can be accessed.
- If UIdentity.IsAuthenticated returns false, a 401 unauthorized error will be returned.
- If you need to, you can read claims from Identity.
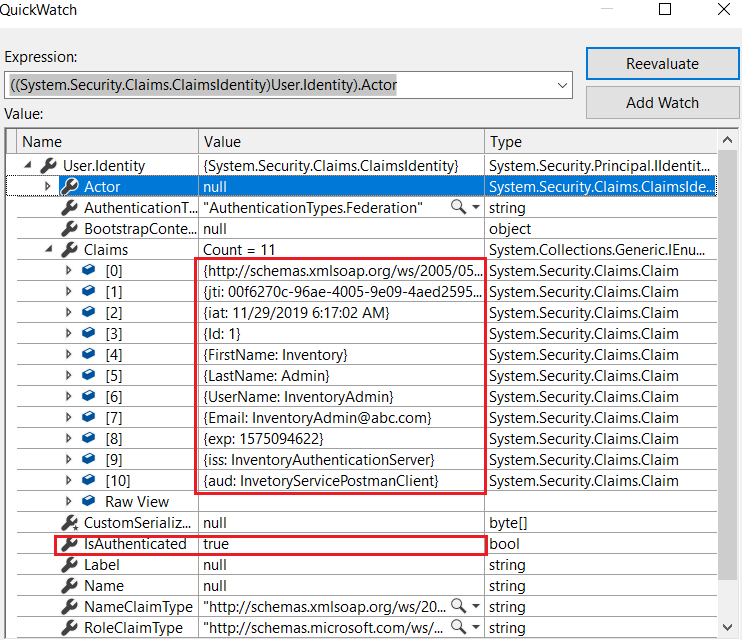
Quickwatch
I have shared the sample application in GitHub. Extract the application, change the connection string in the appsettings.json file that points to your SQL Server, and then run the application.
Conclusion
In this blog, we have learned how to create a REST API using ASP.NET Core 3.1 and Entity Framework Core to perform basic CRUD operations, create a JWT token, and secure the API.