
We are going to discuss Caching in .NET Core and how it works. So, we look at the following things one by one.
- Introduction of Caching.
- What is Cache.
- Types of cache.
- Cache Implementation.
So, let’s start one by one.
Introduction
Caching is very popular nowadays in the software industry because it will improve the performance and scalability of the application. We use many web applications like Gmail and Facebook and see how responsive they are and we have a great user experience. There are a lot of users using the internet and if an application has huge network traffic and demand, we need to take care of many things which help us to improve the performance and responsiveness of the application. So, because of that, there is the solution of caching and that’s why caching comes into the picture.
What is Caching?
The cache is the memory storage that is used to store the frequent access data into the temporary storage, it will improve the performance drastically and avoid the unnecessary database hit and store frequently used data into the buffer whenever we need it.
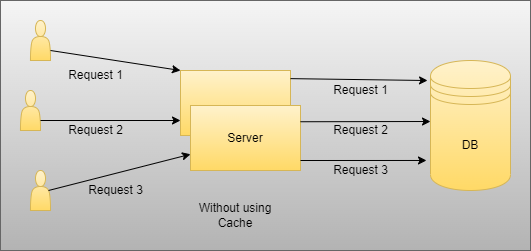
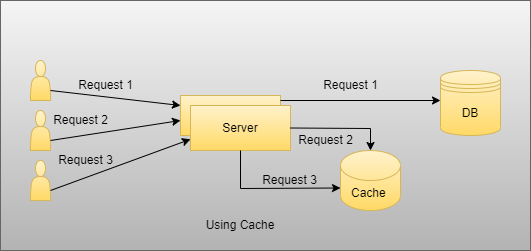
As you see in the above image there are two scenarios, one is without using cache and another is with cache. So here when we do not use the cache, in that case, suppose users want data then they will hit each time database and it will increase the time complexity and reduce performance in case there is some static data users want and it is the same for all users. In that case when we do not use cache then each one hits the unnecessary database to fetch data. On the other side as you can see we use cache, and in that case if there is the same static and the same data for all users then only the first user will hit the database and fetch data and store it into the cache memory and then other two users used that from the cache without unnecessarily hit database to fetch data.
Types of Cache
Basically, there are two types of caching .NET Core supports:
- In-Memory Caching.
- Distributed Caching.
When we use In-Memory Cache then in that case data is stored in the application server memory and whenever we need then we fetch data from that and use it wherever we need it. And in Distributed Caching there are many third-party mechanisms like Redis and many others. But in this section, we look into the Redis Cache in detail and how it works in the .NET Core.
Distributed Caching

- Basically, in the distributed cachin,g data are stored and shared between multiple servers.
- Also, it’s easy to improve scalability and performance of the application after managing the load between multiple servers when we use multi-tenant application.
- Suppose, In the future, if one server is crashed and restarted then the application does not have any impact because multiple servers are as per our need if we want.
Redis is the most popular cache which is used by many companies nowadays to improve the performance and scalability of the application. So, we are going to discuss Redis and usage one by one.
Redis Cache
- Redis is an Open Source (BSD Licensed) in-memory Data Structure store used as a database.
- Basically, it is used to store the frequently used and some static data inside the cache and use and reserve that as per user requirement.
- There are many data structures present in the Redis which we are able to use like List, Set, Hashing, Stream, and many more to store the data.
Installation of Redis Cache
Step 1
Download the Redis Server using the following URL
https://github.com/microsoftarchive/redis/releases/tag/win-3.0.504
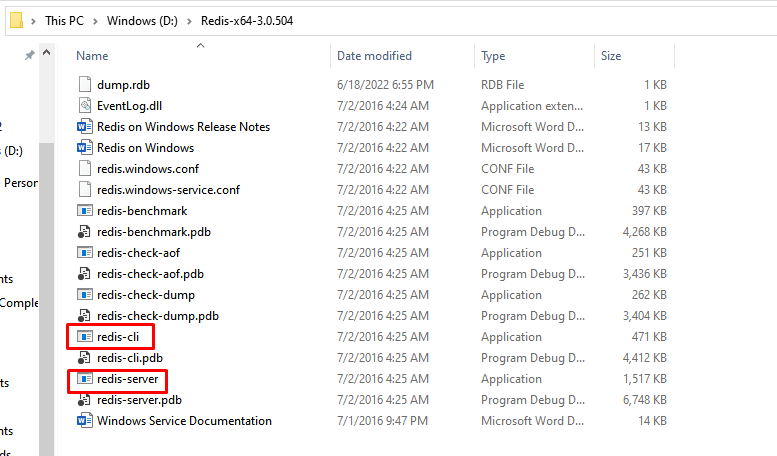
Step 2
Extract the zip file and later on open the Redis Server and Redis CLI.
Implementation of Redis Cache using .NET Core API
Step 1
Create the .NET Core API Web Application.
Step 2
Install the following NuGet Packages which need step by step in our application.
- Microsoft.EntityFrameworkCore
- Microsoft.EntityFrameworkCore.Design
- Microsoft.EntityFrameworkCore.SqlServer
- Microsoft.EntityFrameworkCore.Tools
- Swashbuckle.AspNetCore
- StackExchange.Redis
Step 3
Create the Model folder and create one Product Class inside that with details:
namespace RedisCacheDemo.Model

{

    public class Product

    {

        public int ProductId { get; set; }

        public string ProductName { get; set; }

        public string ProductDescription { get; set; }

        public int Stock { get; set; }

    }

}
Step 4
Next, Create the DbContextClass Class for Database related operations as I showed below:
using Microsoft.EntityFrameworkCore;

using RedisCacheDemo.Model;


namespace RedisCacheDemo.Data

{

    public class DbContextClass : DbContext

    {

        public DbContextClass(DbContextOptions <DbContextClass>options) : base(options)

        {

        }


        public DbSet <Product>Products { get; set; }

    }

}
Step 5
Now, we are going to create ICacheService Interface and CacheService Class for Redis Cache-related usage:
using System;


namespace RedisCacheDemo.Cache

{

    public interface ICacheService

    {

        /// <summary>

        /// Get Data using key

        /// </summary>

        /// <typeparam name="T"></typeparam>

        /// <param name="key"></param>

        /// <returns></returns>

        T GetData<T>(string key);


        /// <summary>

        /// Set Data with Value and Expiration Time of Key

        /// </summary>

        /// <typeparam name="T"></typeparam>

        /// <param name="key"></param>

        /// <param name="value"></param>

        /// <param name="expirationTime"></param>

        /// <returns></returns>

        bool SetData<T>(string key, T value, DateTimeOffset expirationTime);


        /// <summary>

        /// Remove Data

        /// </summary>

        /// <param name="key"></param>

        /// <returns></returns>

        object RemoveData(string key);

    }

}
using Newtonsoft.Json;

using StackExchange.Redis;

using System;


namespace RedisCacheDemo.Cache

{

    public class CacheService : ICacheService

    {

        private IDatabase _db;

        public CacheService()

        {

            ConfigureRedis();

        }


        private void ConfigureRedis()

        {

            _db = ConnectionHelper.Connection.GetDatabase();

        }


        public T GetData <T>(string key)

        {

            var value = _db.StringGet(key);

            if (!string.IsNullOrEmpty(value))

            {

                return JsonConvert.DeserializeObject <T>(value);

            }


            return default;

        }


        public bool SetData <T>(string key, T value, DateTimeOffset expirationTime)

        {

            TimeSpan expiryTime = expirationTime.DateTime.Subtract(DateTime.Now);

            var isSet = _db.StringSet(key, JsonConvert.SerializeObject(value), expiryTime);


            return isSet;

        }


        public object RemoveData(string key)

        {

            bool _isKeyExist = _db.KeyExists(key);

            if (_isKeyExist == true)

            {

                return _db.KeyDelete(key);

            }


            return false;

        }

    }

}
Step 6
Create the ProductController class and create the following method as shown below:
using Microsoft.AspNetCore.Mvc;

using RedisCacheDemo.Cache;

using RedisCacheDemo.Data;

using RedisCacheDemo.Model;

using System;

using System.Collections.Generic;

using System.Linq;

using System.Threading.Tasks;


namespace RedisCacheDemo.Controllers

{

    [Route("api/[controller]")]

    [ApiController]

    public class ProductController : ControllerBase

    {

        private readonly DbContextClass _dbContext;

        private readonly ICacheService _cacheService;


        public ProductController(DbContextClass dbContext, ICacheService cacheService)

        {

            _dbContext = dbContext;

            _cacheService = cacheService;

        }


        [HttpGet("products")]

        public IEnumerable <Product> Get()

        {

            var cacheData = _cacheService.GetData <IEnumerable<Product>>("product");

            if (cacheData != null)

            {

                return cacheData;

            }


            var expirationTime = DateTimeOffset.Now.AddMinutes(5.0);

            cacheData = _dbContext.Products.ToList();

            _cacheService.SetData <IEnumerable<Product>>("product", cacheData, expirationTime);


            return cacheData;

        }


        [HttpGet("product")]

        public Product Get(int id)

        {

            Product filteredData;

            var cacheData = _cacheService.GetData <IEnumerable<Product>>("product");

            if (cacheData != null)

            {

                filteredData = cacheData.Where(x => x.ProductId == id).FirstOrDefault();


                return filteredData;

            }


            filteredData = _dbContext.Products.Where(x => x.ProductId == id).FirstOrDefault();


            return filteredData;

        }


        [HttpPost("addproduct")]

        public async Task <Product>Post(Product value)

        {

            var obj = await _dbContext.Products.AddAsync(value);

            _cacheService.RemoveData("product");

            _dbContext.SaveChanges();


            return obj.Entity;

        }


        [HttpPut("updateproduct")]

        public void Put(Product product)

        {

            _dbContext.Products.Update(product);

            _cacheService.RemoveData("product");

            _dbContext.SaveChanges();

        }


        [HttpDelete("deleteproduct")]

        public void Delete(int Id)

        {

            var filteredData = _dbContext.Products.Where(x => x.ProductId == Id).FirstOrDefault();

            _dbContext.Remove(filteredData);

            _cacheService.RemoveData("product");

            _dbContext.SaveChanges();

        }

    }

}
Step 7
Add the SQL Server connection string and Redis URL inside appsetting.json:
{

    "Logging": {

        "LogLevel": {

            "Default": "Information",

            "Microsoft": "Warning",

            "Microsoft.Hosting.Lifetime": "Information"

        }

    },

    "AllowedHosts": "*",

    "RedisURL": "127.0.0.1:6379",

    "ConnectionStrings": {

        "DefaultConnection": "Data Source=Server;Initial Catalog=RedisCache;User Id=sa;Password=***;"

    }

}
Step 8
Next, Register the ICacheService inside Configure Service method of Startup Class and also add some configuration related to Swagger to test our API endpoints:
using Microsoft.AspNetCore.Builder;

using Microsoft.AspNetCore.Hosting;

using Microsoft.EntityFrameworkCore;

using Microsoft.Extensions.Configuration;

using Microsoft.Extensions.DependencyInjection;

using Microsoft.Extensions.Hosting;

using Microsoft.OpenApi.Models;

using RedisCacheDemo.Cache;

using RedisCacheDemo.Data;


namespace RedisCacheDemo

{

    public class Startup

    {

        public Startup(IConfiguration configuration)

        {

            Configuration = configuration;

        }


        public IConfiguration Configuration

        {

            get;

        }


        // This method gets called by the runtime. Use this method to add services to the container.

        public void ConfigureServices(IServiceCollection services)

        {

            services.AddControllers();

            services.AddScoped <ICacheService, CacheService>();

            services.AddDbContext <DbContextClass>(options => options.UseSqlServer(Configuration.GetConnectionString("DefaultConnection")));

            services.AddSwaggerGen(c =>

            {

                c.SwaggerDoc("v1", new OpenApiInfo

                {

                    Title = "RedisCacheDemo", Version = "v1"

                });

            });

        }


        // This method gets called by the runtime. Use this method to configure the HTTP request pipeline.

        public void Configure(IApplicationBuilder app, IWebHostEnvironment env)

        {

            if (env.IsDevelopment())

            {

                app.UseDeveloperExceptionPage();

                app.UseSwagger();

                app.UseSwaggerUI(c => c.SwaggerEndpoint("/swagger/v1/swagger.json", "RedisCacheDemo v1"));

            }

            app.UseHttpsRedirection();

            app.UseRouting();

            app.UseAuthorization();

            app.UseEndpoints(endpoints =>

            {

                endpoints.MapControllers();

            });

        }

    }

}
Step 9
Create one ConfigurationManger Class to configure app setting over there:
using Microsoft.Extensions.Configuration;

using System.IO;


namespace RedisCacheDemo

{

    static class ConfigurationManager

    {

        public static IConfiguration AppSetting

        {

            get;

        }


        static ConfigurationManager()

        {

            AppSetting = new ConfigurationBuilder().SetBasePath(Directory.GetCurrentDirectory()).AddJsonFile("appsettings.json").Build();

        }

    }

}
Step 10
Next, Create Connection Helper Class for Redis Connection:
using StackExchange.Redis;

using System;


namespace RedisCacheDemo.Cache

{

    public class ConnectionHelper

    {

        static ConnectionHelper()

        {

            ConnectionHelper.lazyConnection = new Lazy<ConnectionMultiplexer>(() =>

            {

                return ConnectionMultiplexer.Connect(ConfigurationManager.AppSetting["RedisURL"]);

            });

        }


        private static Lazy<ConnectionMultiplexer>lazyConnection;

        public static ConnectionMultiplexer Connection

        {

            get

            {

                return lazyConnection.Value;

            }

        }

    }

}
Step 11
Perform Migration and Database Update for DB Creation using the following commands in Package Manager Console.
add-migration “FirstMigration”

update-database
So, when you enter and execute this command it will generate a few things related to migration and create the database inside SQL Server as you put inside Connection String in the appsetting.json.
Step 12
Finally, run the application and add the data using swagger UI and then check how caching works inside products and product endpoint.
Basically, I added cache into the product and products endpoints in the controller, as you see when the user wants to fetch data of all products then firstly it will check whether the data is present inside the Redis Cache or not and if it’s present inside the cache then return that data to the user and if the data is not present inside the cache, then it will fetch the data from database and also, set that into the cache. So next time user will get that from cache only and avoid hitting the database unnecessarily.
Also, when the user wants to fetch data from by using product id as you see in the controller in product second endpoint, we fetch data from cache of all products then filter using product id and if that will present then return to user from cache and not then fetch from database and return to the user after applying the filter.
So, as you see inside update, delete and post endpoint of Product Controller, then we use remove method to remove data of product key which is present inside the cache. So, there are many scenarios and use of memory caches you can use as per your need and requirements. I just want to introduce the basics of the Redis Cache and how it works inside the .NET Core that I covered here.
Also, there is one scenario you need to take care of while using caching. Suppose there are two users using your application then the following scenarios will happen.
- When the First User sends the request to fetch the data of all products then the first request comes and then it will check if the data is present inside the cache or not and if the data is present inside the cache, then it will fetch the data from and database and also set it to the cache.
- Meanwhile, the Second User sends the request to get the product details then what happened is that request also hits the database before completing the first user’s request and because of that second user also hit the database to fetch product details.
- So, there is one solution for this to use the Lock Mechanism as shown below.
Create this private object of lock on top of the class:
private static object _lock = new object();
Next, Modify the Get method as I showed below:
public IEnumerable <Product>Get()

{

    var cacheData = _cacheService.GetData <IEnumerable<Product>>("product");

    if (cacheData != null)

    {

        return cacheData;

    }


    lock(_lock)

    {

        var expirationTime = DateTimeOffset.Now.AddMinutes(5.0);

        cacheData = _dbContext.Products.ToList();

        _cacheService.SetData <IEnumerable<Product>>("product", cacheData, expirationTime);

    }


    return cacheData;

}
So here as you see, first, we check if the data is present inside the cache or not if data is available then return that. Next, if the value is not present in the Redis cache, then we apply the lock over there and then the request is locked and entered into the section and fetch the product details from the database, and then also set it to the cache and then return the data. So, what happened when the second user sends a request before the user one’s request is complete. So, in that case, the second request is in the queue and after completing the first user request the second request comes into the picture.
Also, you can see key details which already present inside Redis using Redis CLI as shown below:
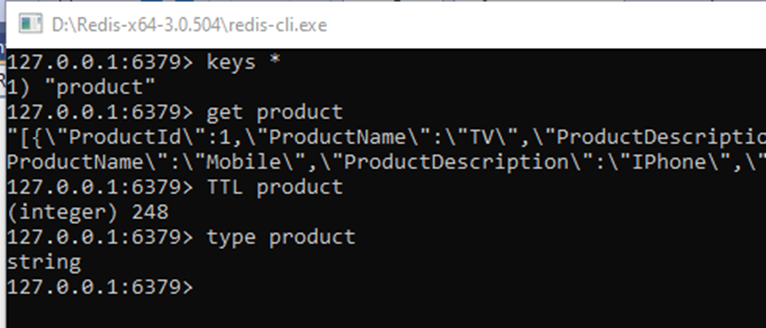
So, here you can see there are many commands which provide us information about keys that are present in the Redis Cache.
This is all about Redis Cache in .NET Core. I hope you understand things related to that.
Happy Coding!