Follow me on Twitter, happy to take your suggestions on topics or improvements.
Introduction
Many third-party feature flagging services are available, or your internal team could develop its own feature flag service. For those who prefer standardization, following the OpenFeature guidelines is also an option. However, none of these solutions may perfectly fit your needs, especially in a Blazor project, which is relatively new terrain for many. Even the Microsoft.FeatureManagement library doesn't offer robust support for Blazor.
In this blog post, I will share my insights on how to implement feature flags in Blazor using a third-party feature flag tool.
I've experimented with various methods, and in this post, I will introduce the following approaches to implementing feature flags in Blazor:
- The traditional method: Using if/else statements to control your features (or code blocks). This method is applicable to both backend and frontend.
- Using Components instead of TagHelper in Blazor: This approach wraps the feature flag code block in the frontend and is effective for both Server-Side Rendering (SSR) and WebAssembly.
- Custom Feature Gate Attribute for Controller Actions: If a feature flag is not enabled for a request, it will return a 404 error.
- Route filtering: This controls page access. If a feature flag is not enabled for a request, it redirects to a 404 page."
Click to Download the Code Source used in this article here.
Create an ASP.NET Core 8 Blazor Web APP
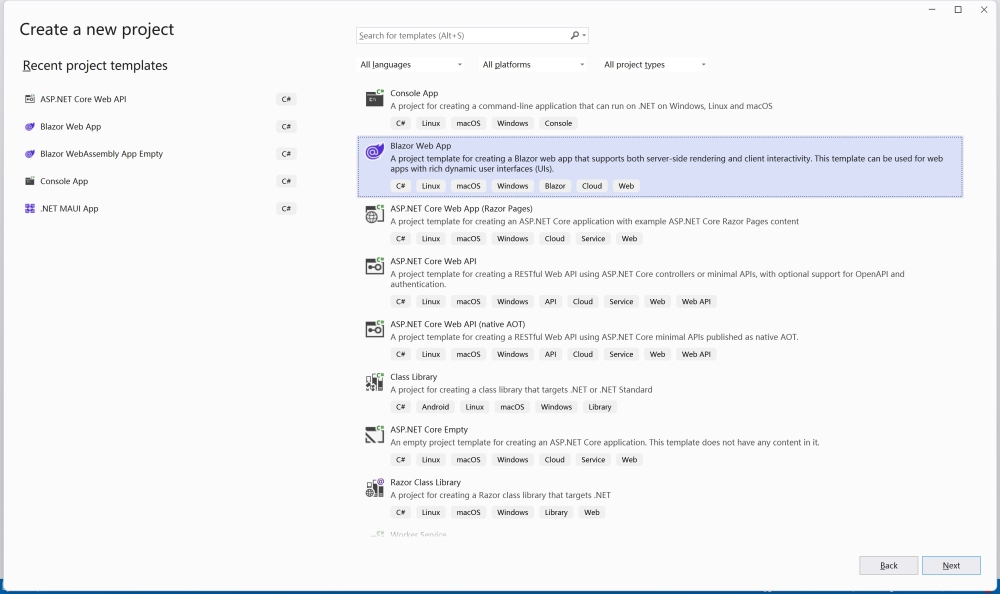
I will introduce the methods using a simple Blazor Web App. You can create a new ASP.NET Core 8 Blazor Web App by selecting Blazor Web App, and then clicking Next.
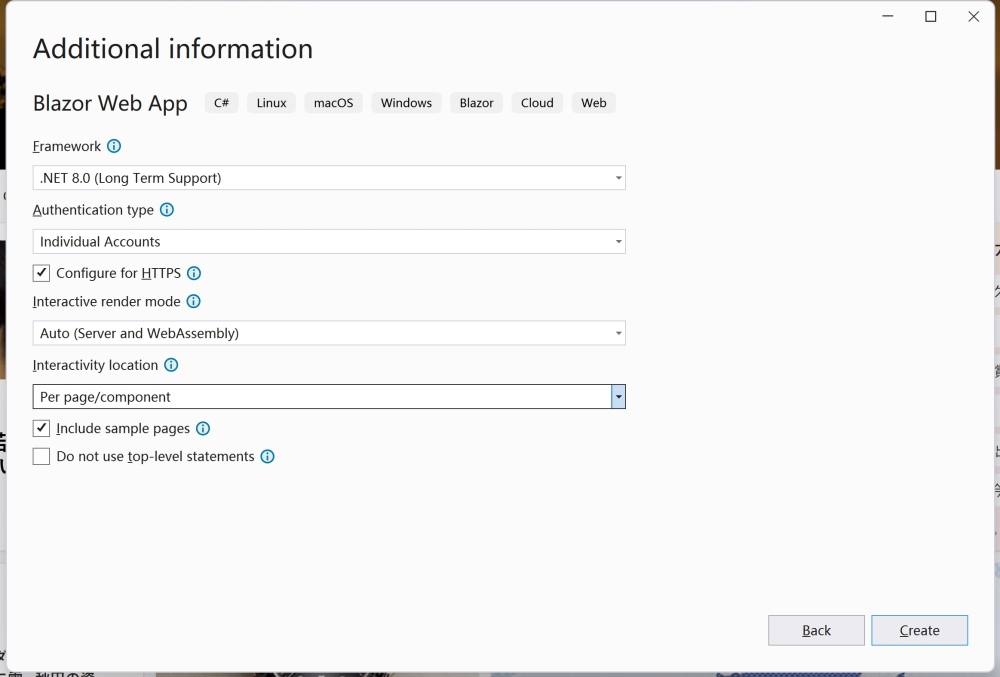
Name your project and click Next. Then, configure the project as shown below and click Create
- .NET 8
- Configure for HTTPS
- Interactive render mode: Auto (Server and WebAssembly)
- Per page/component Interactivity location
You now have a Blazor Web App project. Run the project to view the default page. We will begin implementing the feature flag in this project.
Choose a third-party feature flag tool
There are numerous third-party feature flag tools available, including LaunchDarkly, Unleash, and Microsoft.FeatureManagement. However, in this blog post, I will be using FeatBit for several reasons:
- FeatBit is an open-source project with an extensive free plan. It is widely used by companies that primarily utilize .NET as their framework.
- The backend services of the project are built in .NET, and it includes a robust, real-time updated .NET SDK.
- FeatBit offers a comprehensive feature flag management service, rather than just being a feature flag library.
Install and initialize Feature Flag SDK
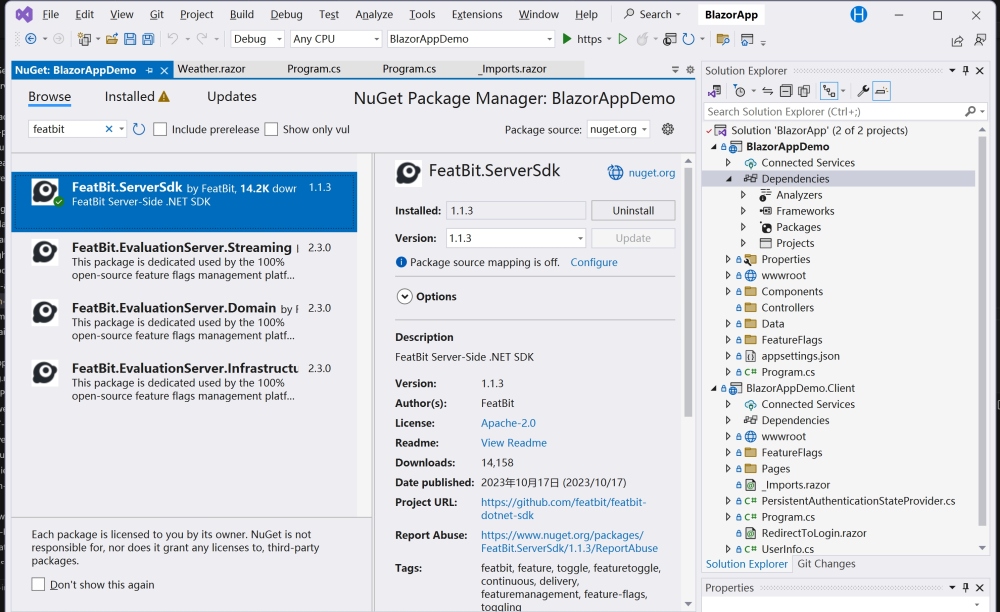
In your Blazor Web App's server project, install the FeatBit .NET SDK using the NuGet Package Manager.
Following the SDK's tutorial, add the FeatBit service to your Program.cs file to initialize the SDK.
// add FeatBit service

builder.Services.AddFeatBit(options =>

{

    options.EnvSecret = "<replace-with-your-env-secret>";

    options.StreamingUri = new Uri("ws://localhost:5100");

    options.EventUri = new Uri("http://localhost:5100");

    options.StartWaitTime = TimeSpan.FromSeconds(3);

});
Here's what it looks like in the project's Program.cs file:
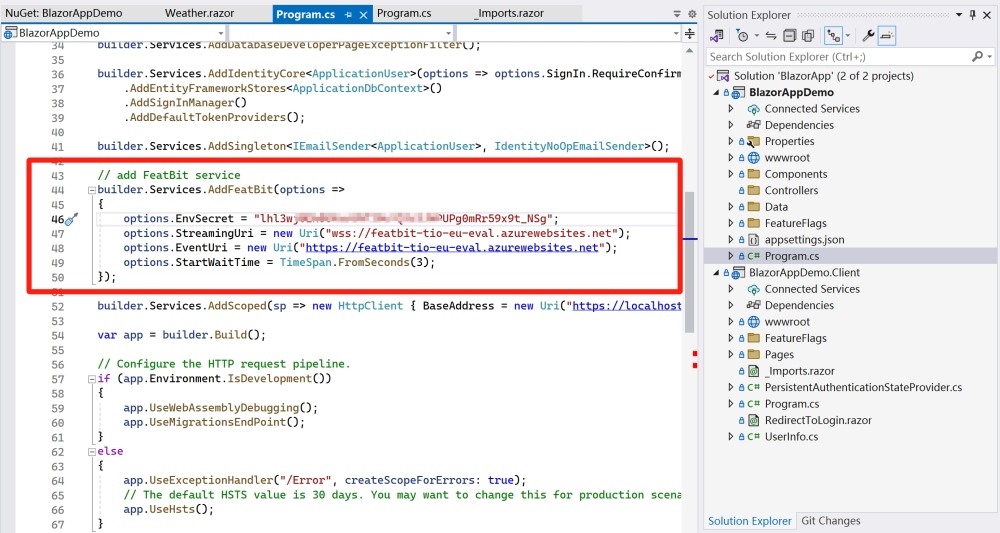
Now that the SDK is initialized, we can begin implementing the feature flag in our Blazor Web App.
Traditional method: Using if/else statements to control your features (or code blocks)
This method can be applied to both the backend and frontend, offering a straightforward approach. It provides the flexibility to control features (or code blocks) in both areas.
For example, For instance, if I want to add a new welcome sentence on the Home page and control it using a feature flag, I would:
1. Inject the service by adding the following code to the Home.razor file:
@inject IFbClient FeatureFlags
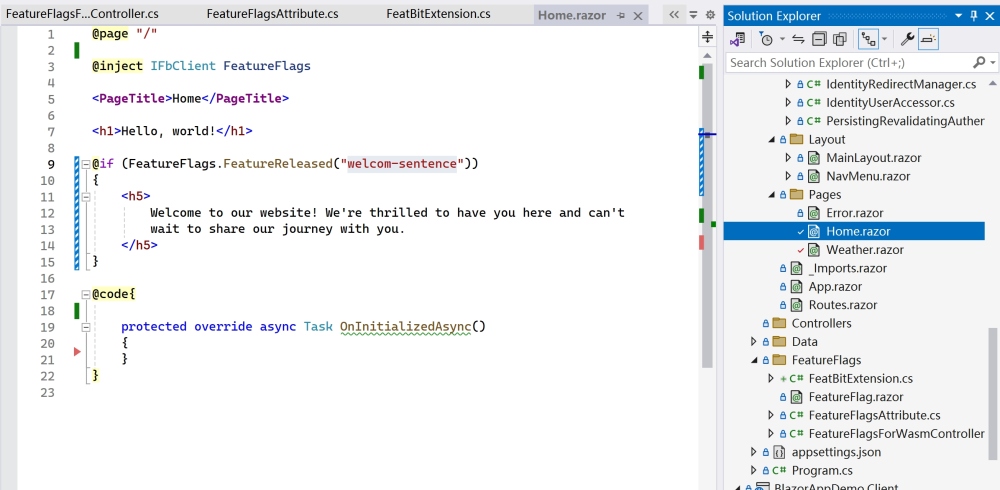
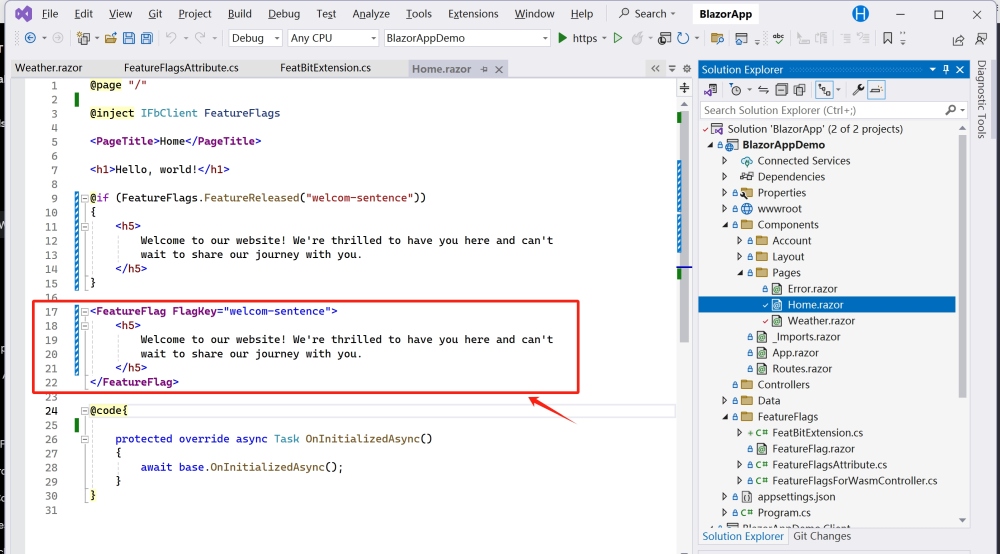
2. In the razor code block, after the original "Hello World" code, add the following:
@if (FeatureFlags.FeatureReleased("weather-page"))

{

    <h5>

        Welcome to our website! We're thrilled to have you here and can't

        wait to share our journey with you.

    </h5>

}
The code above demonstrates that FeatureFlags is the service injected in the previous step. FeatureReleased is the method used to check if the feature flag is enabled, with the feature flag key as its parameter. When the feature flag is enabled, the "Welcome Sentence" code block will be rendered.
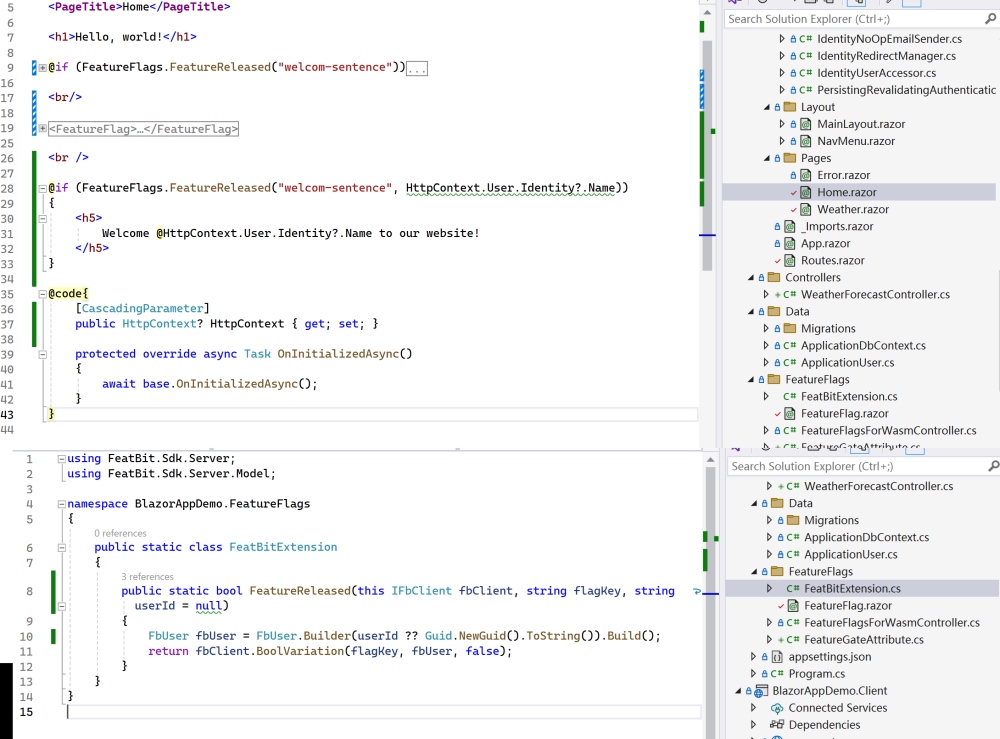
Here's what it looks like in the project's Home.razor file:
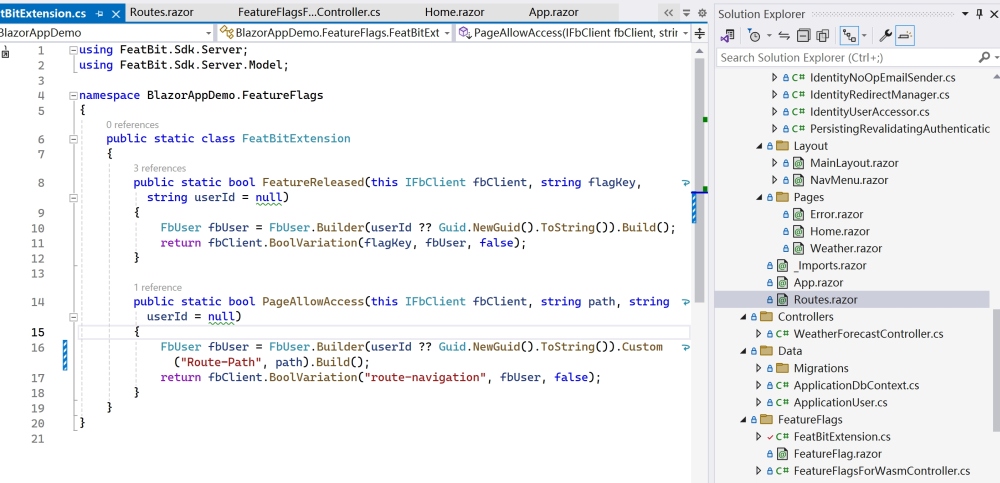
NOTE: The FeatureReleased method is not provided by FeatBit; it's an extension that I created to encapsulate FeatBit's BoolVariation method. If you examine the extension code, you'll find it's quite straightforward:
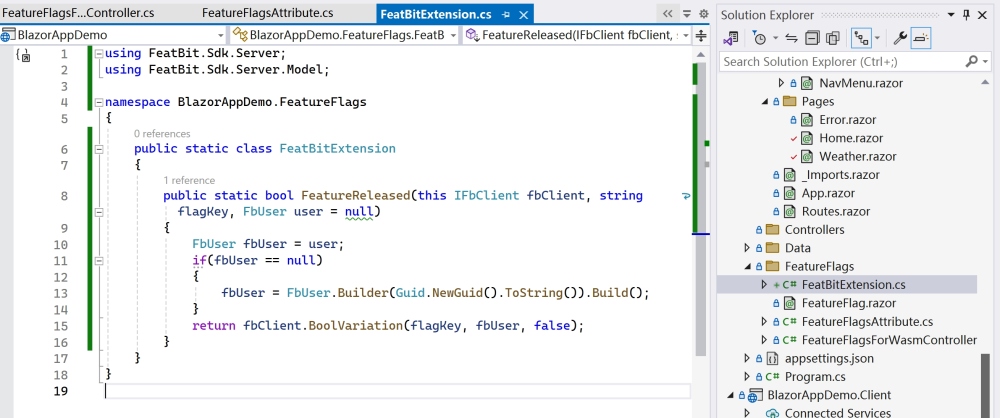
FeatBit SDK requires a user parameter to help identify the user. In this example, I've passed null`, which will generate a user with a random ID for the sake of simplifying our demo. However, in a real-world application, you should pass a user object with a unique ID:
- If user is logged in, pass UserId, Name and any other information which my useful for the feature release.
- If user is not logged in, pass a random Id or a cookie Id. Be sure that the same end user will always get the same Id.
For more information, refer to the SDK's tutorial
Having implemented the feature flag in the code, you might notice that the feature flag is always disabled when you launch the project. This happens because the BoolVariation method returns false by default. To enable the feature flag, navigate to the FeatBit dashboard, create a feature flag named "welcome-sentence," and enable it.
Create feature flag in FeatBit dashboard
- Go to the "Feature Flags" page and click the green + Add button in the top right corner.
- In the pop-up drawer, name the feature flag "welcome-sentence".
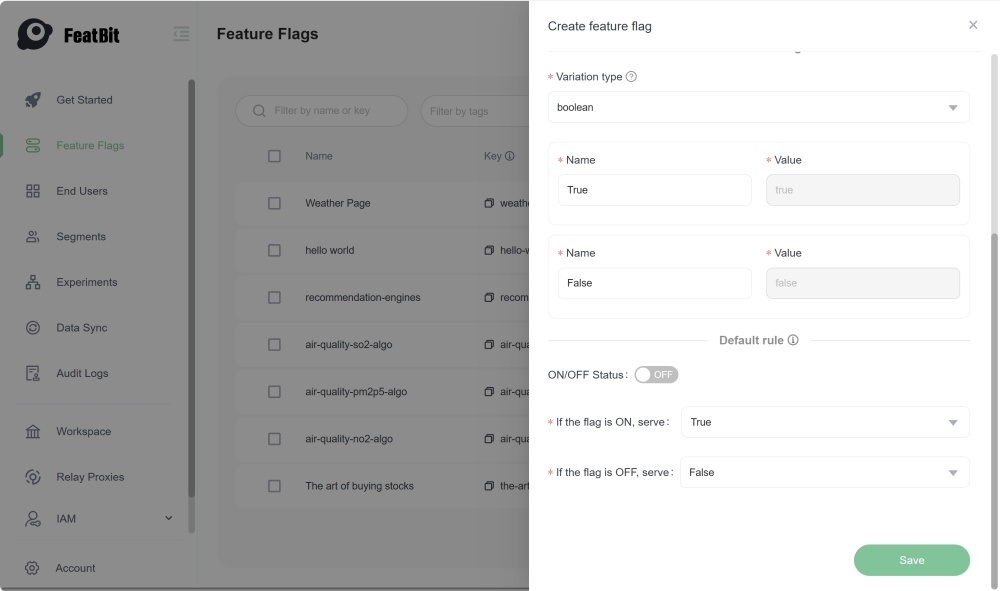
- Choose boolean as the type.
- Leave the other fields at their default values and click Save...
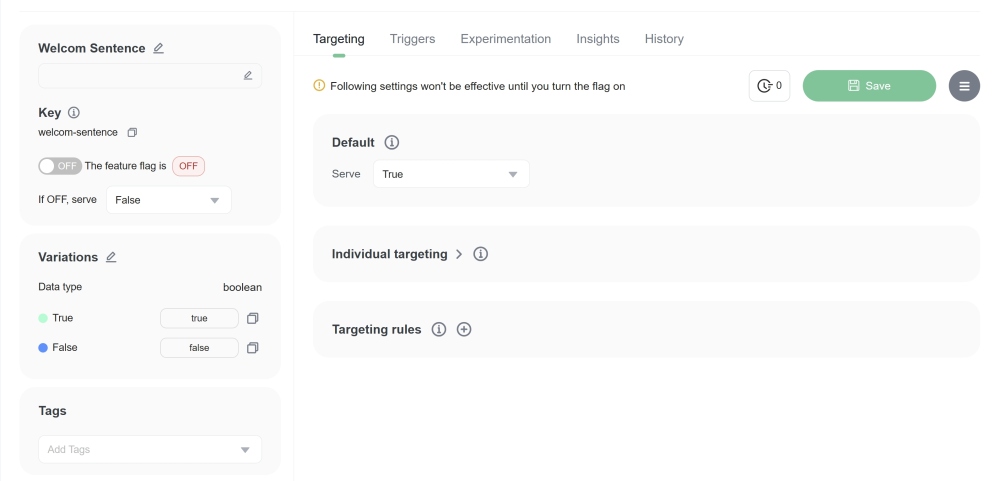
To display the "Welcome Sentence" to users, simply rerun the project and enable the feature flag in the dashboard. Alternatively, you can roll out the feature progressively. Here's how to do it:
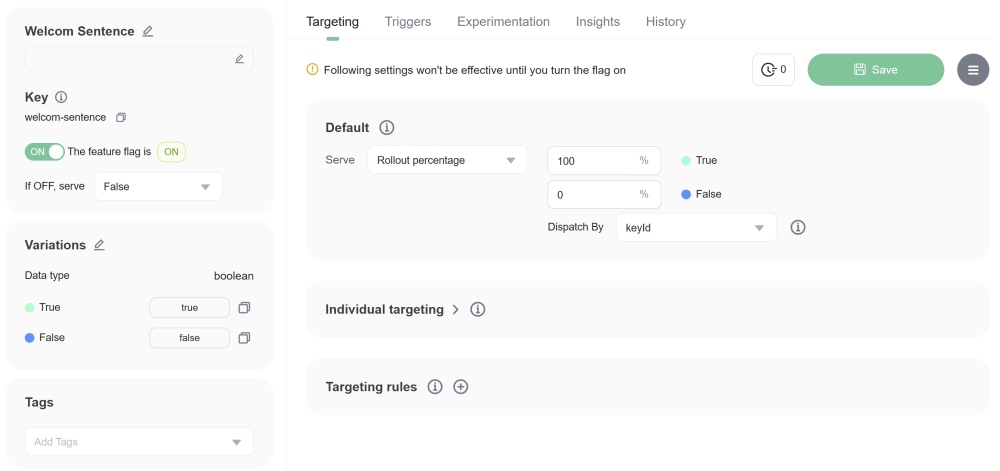
Activate the feature flag in the left panel. In the right panel, configure the Default rule to return a value of true for 100% of end users (or requests).
Method 2: Use Component to control your features
Using Components instead of TagHelper in Blazor: This approach wraps the feature flag code block in the frontend and is effective for both Server-Side Rendering (SSR) and WebAssembly. This approach is similar to the previous one, but instead of using if/else statements, we will use a component to wrap the feature flag code block.
FeatureFlag component is a simple component that takes a feature flag key as a parameter and renders the child content if the feature flag is enabled. Here's how I design and implement this component:
The FeatureFlag component is a straightforward component that accepts a feature flag key as a parameter. It renders the child content only if the feature flag is enabled. This is achieved by using a shared component and the FeatureReleased method to check the feature flag's status. If the flag is enabled, the child content is rendered.
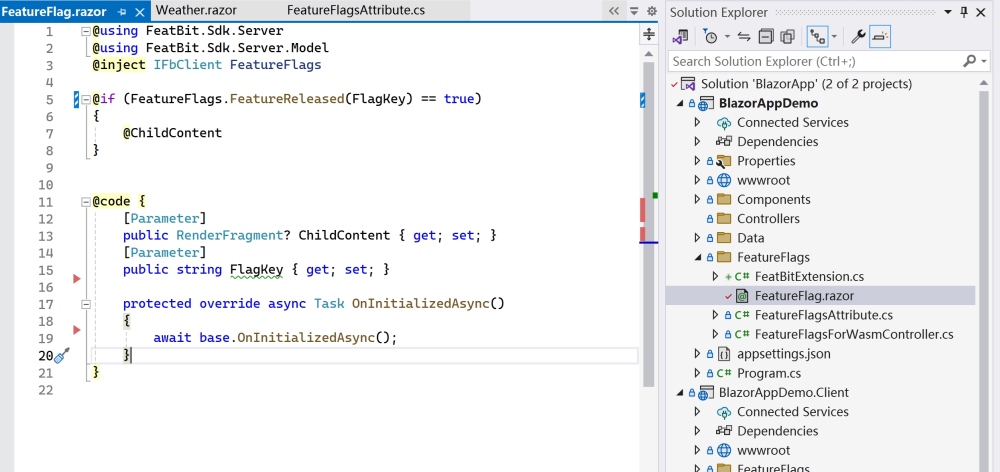
This is achieved by using a shared component and the FeatureReleased method to check the feature flag's status. If the flag return true, the child content is rendered.
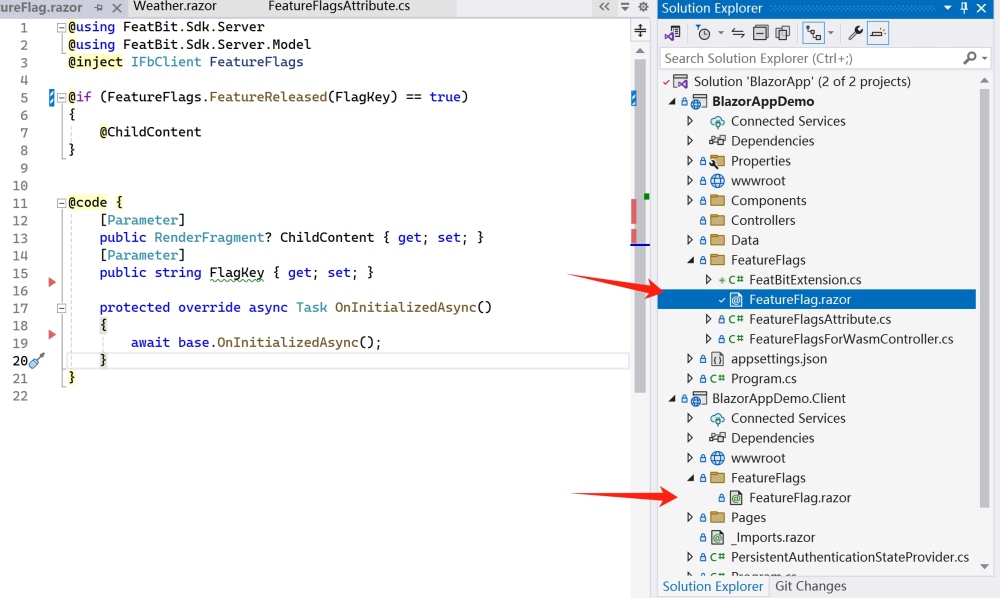
I have implemented this component in both a Server-Side Rendering (SSR) project and a WebAssembly project. Currently, I am exploring more efficient methods to achieve this functionality but have not found an alternative yet. If you have any suggestions or know a better approach, please feel free to share.
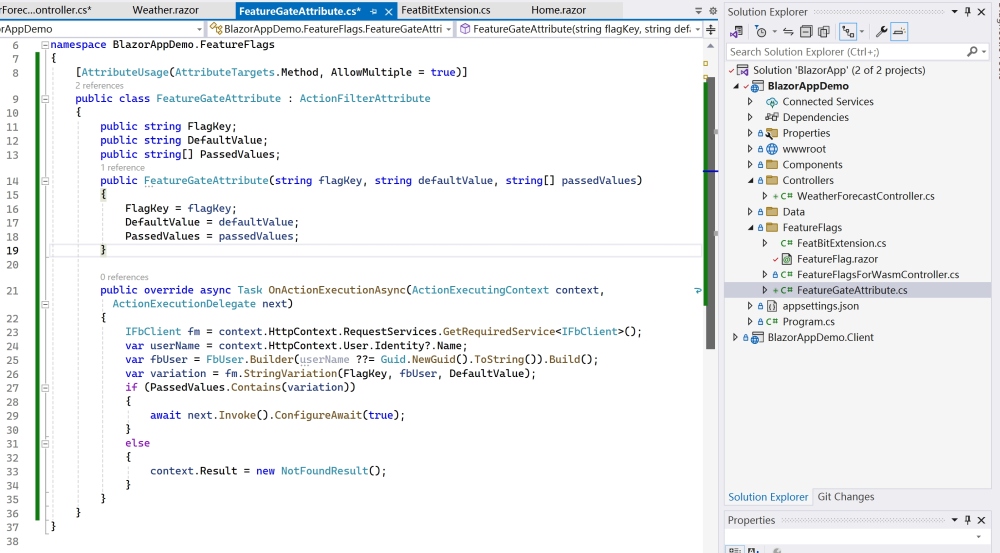
Method 3: Custom Feature Gate Attribute for Controller Actions
Different from the previous two methods, this method is specifically applicable to the backend. It controls access to a controller action. If a feature flag is not enabled for a user/request, the method will return a 404 error.
In this project, I created an API controller named 'WeatherForecastController'. This controller includes APIs for special weather forecast algorithms. For example, to obtain the air SO2 quality forecast for the next 7 days, you can call the API api/WeatherForecast/AirQualitySO2Algo. However, access to this API is restricted and only available to users or requests with authorization.
The following code demonstrates how I use a custom 'FeatureGate' attribute to control access to this API:

- Add
FeatureGate attribute to API api/WeatherForecast/AirQualitySO2Algo action.
- Set feature flag key
air-quality-so2-algo as first attribute parameter.
- Set
regression as default value. This means by default (for example, no correlate feature flag created), the feature flag will return regression value.
- Set
menet as one of the pass value. This means if the feature flag doesn't return metnet, the API will return a 404 error.
- I added the
FeatureGate attribute to the api/WeatherForecast/AirQualitySO2Algo action.
- I set the feature flag key to
air-quality-so2-algo as the first attribute parameter.
- The default value is set to
regression. This means that, by default (for example, if no corresponding feature flag is created), the feature flag will return the value regression.
metnet is set as one of the pass values. This implies that if the feature flag does not return metnet, the API will respond with a 404 error.
Implementing an attribute to control API access is straightforward and efficient. It's beneficial because it allows for easy identification of which APIs are feature-flag controlled. Moreover, changing the feature flag key in the attribute is simple.
Let's delve into the implementation of this custom attribute. In the OnActionExecutionAsync method, I use the FeatBit SDK's StringVariation method to check the feature flag status. If the feature flag does not return a value defined in the 'PassedValues' string list, a 404 error is returned.
You can develop your own logic for a feature flag custom attribute. The example provided is basic, but you can add more parameters to the attribute for greater flexibility. You could also use other variation methods, such as BoolVariation, DoubleVariation, JsonVairation, etc.
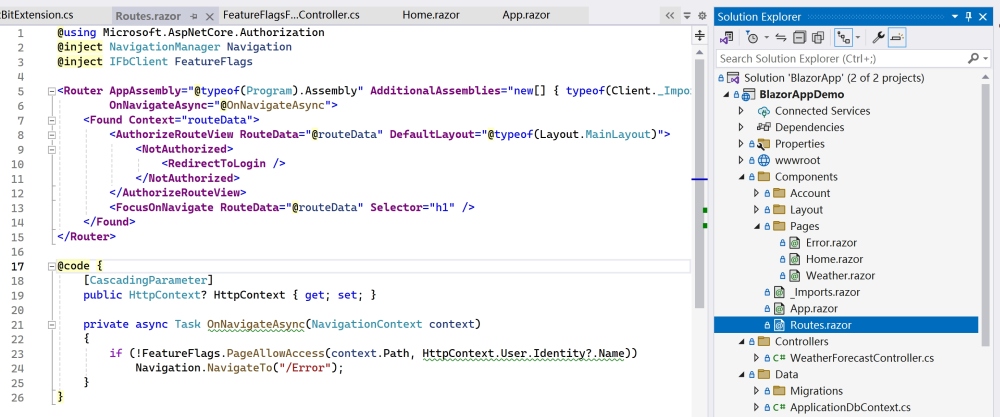
Method 4: Route filtering
I am also exploring a method to centralize page access control. This would eliminate the need to embed feature flag code blocks in every individual page.
In Blazor, the "Router" component supports an OnNavigateAsync feature. The OnNavigateAsync handler is invoked when the user:
- Visits a route for the first time by navigating to it directly in their browser.
- Navigates to a new route using a link or a NavigationManager.NavigateTo invocation.
Therefore, I attempted to centralize route control within the OnNavigateAsync method in the Routes.razor file.
Delving into the FeatureFlags.PageAllowAccess method, we find that it utilizes a single feature flag, route-navigation, to control all routes. The path is passed as a custom attribute for FbUser, offering a simple and flexible management approach. This means that we can add new routes in the future without needing to create new feature flags or alter the existing code for routing release strategies.
The release strategy needs to be configured in the FeatBit feature flag interface. The figure below demonstrates that only users matching specific conditions can access the weather page.
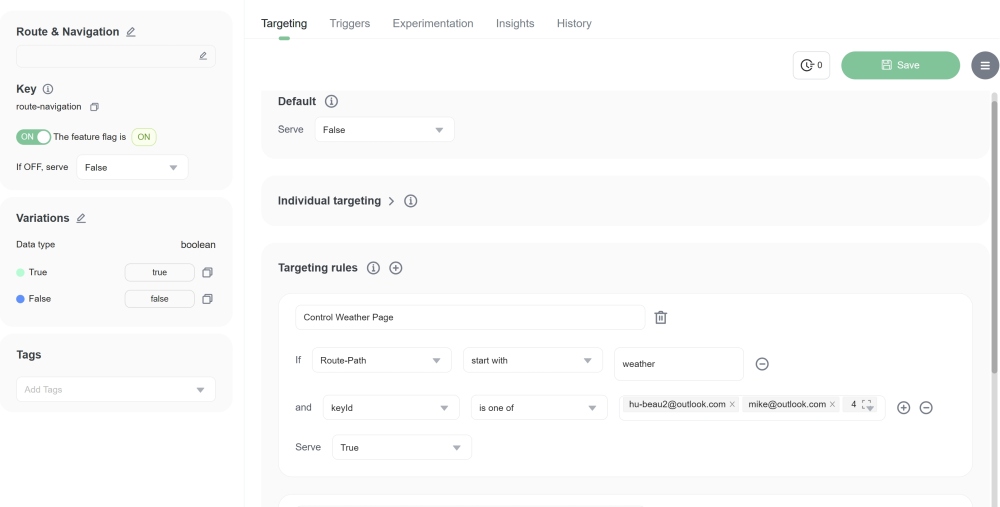
To control access to more pages, simply add new custom targeting rules.
Release features flexibly and progressively
Adding a new page and controlling its release is a common scenario in feature flag management. For example, you might want to initially release the page to 10% of users and then gradually increase this rate to 100%. FeatBit offers a straightforward method to achieve this.
Typically, it requires passing users (or other contexts) to identify each call to the feature flag. This ensures that a user consistently receives the same result for the same feature flag. This consistency is crucial for practices like Testing in Production, AB Testing, and Progressive Release.
Here's an example of how I implemented this in my project. I passed a username into the FeatureReleased method to identify the user.
In the FeatBit feature flag interface, I can include this user in the individual targeting list. In the image below, only users on the true individual targeting list have access to the welcom-sentece feature.
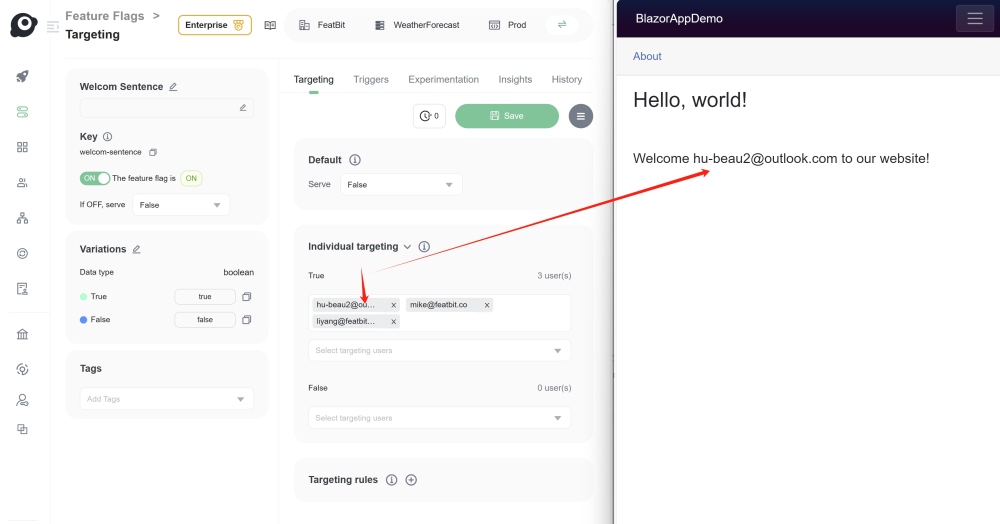
This method allows for flexible and controlled release strategies, essential for effective feature management.
Conclusion
In most cases, you can use an if/else statement to control everything. However, if you're aiming to manage your feature flags in a standardized manner, you can use the methods I've introduced in this blog post. You're also encouraged to devise your own ways to ensure that feature flags are used in a consistent and easily referenceable manner. This approach facilitates easier deletion of stale feature flags.