The flight monitor case study: Applying Vertical Slices in a real-world scenario

In my last articles I talked about Vertical Slice Architecture and how to organize code in a non-technical way. I showed some simple examples of how to do this in C# using the Minimal API and Blazor in .NET 8.
I got a lot of feedback on this article and some of my readers asked for a more complex example. And here it is.
Note: If you’re not familiar with Vertical Slice Architecture, I recommend reading my previous articles, such as this one: Goodbye Controllers: Building Better Blazor Web Apps with Vertical Slices
The use case
Let’s assume we need to implement a flight monitor that displays a list of departures from an airport. Users of this list naturally want to be informed of changes, such as a change in departure time or even cancellation of the flight. To ensure the best possible user experience, we want to avoid the need for users to constantly refresh their page to receive updates. Therefore, the core requirement is that an airline employee can change the flight information and all users can see the change in their flight list.
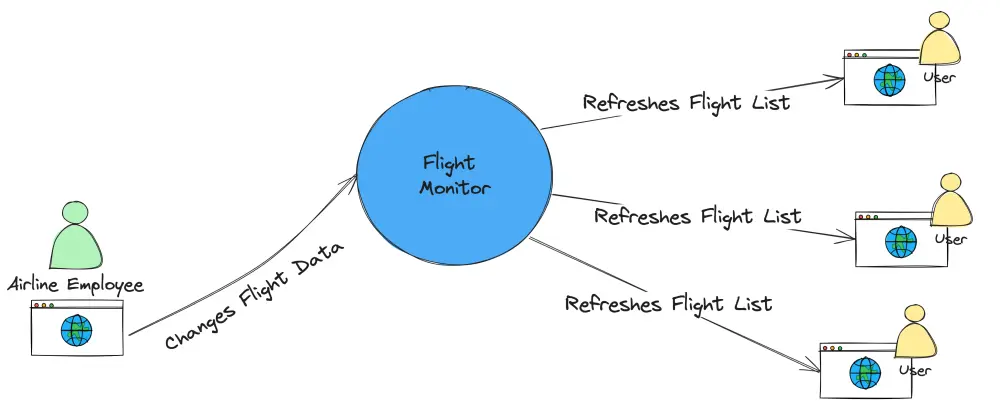
Simplified representation of what should happen
There are already two features that we can derive from this scenario.
The first feature is the display of arrivals as a list and the second is the possibility to change the data of a flight. Since this is an example in the context of a blog article, I will ignore the issue of permissions. In a productive scenario we would still need a login for the airline employee. Here we want to look at how two isolated functions can be implemented in vertical slices and how the changes to the data in one feature can be passed to the already rendered output of the other feature to illustrate a more complex scenario.
Before we start with the implementation, we should remember that Blazor Server is a server-side technology. This means that all requests are processed on the server side and only the result of the processing is sent to the client. Blazor Server works by maintaining a persistent connection with the client using SignalR, a real-time communication framework. This connection is used to handle user interactions and UI updates. While the application logic and component rendering happens on the server, only the UI diff (changes to the UI) is sent over the connection to the client. This approach minimizes the amount of data transferred between the server and client, resulting in efficient communication, especially in scenarios with limited bandwidth. However, it also means that the application requires a constant connection to the server and can be more sensitive to network latency.
Preparation and structure
To implement the requirements in ASP.NET Core, we need to install some packages. This works in the terminal with dotnet add package or via IDE features.
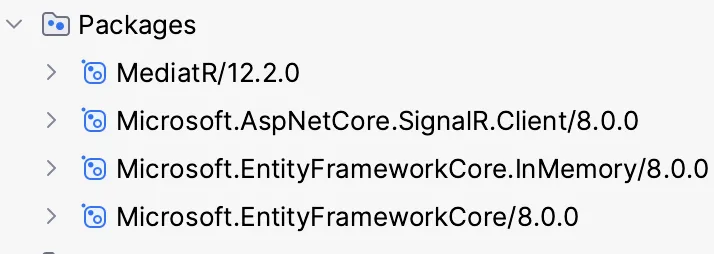
Packages required for our project
In order to follow the approach of structuring our application in vertical slices according to business requirements, as I have described in my previous articles, we need a feature folder where we will ultimately place the two features discussed.
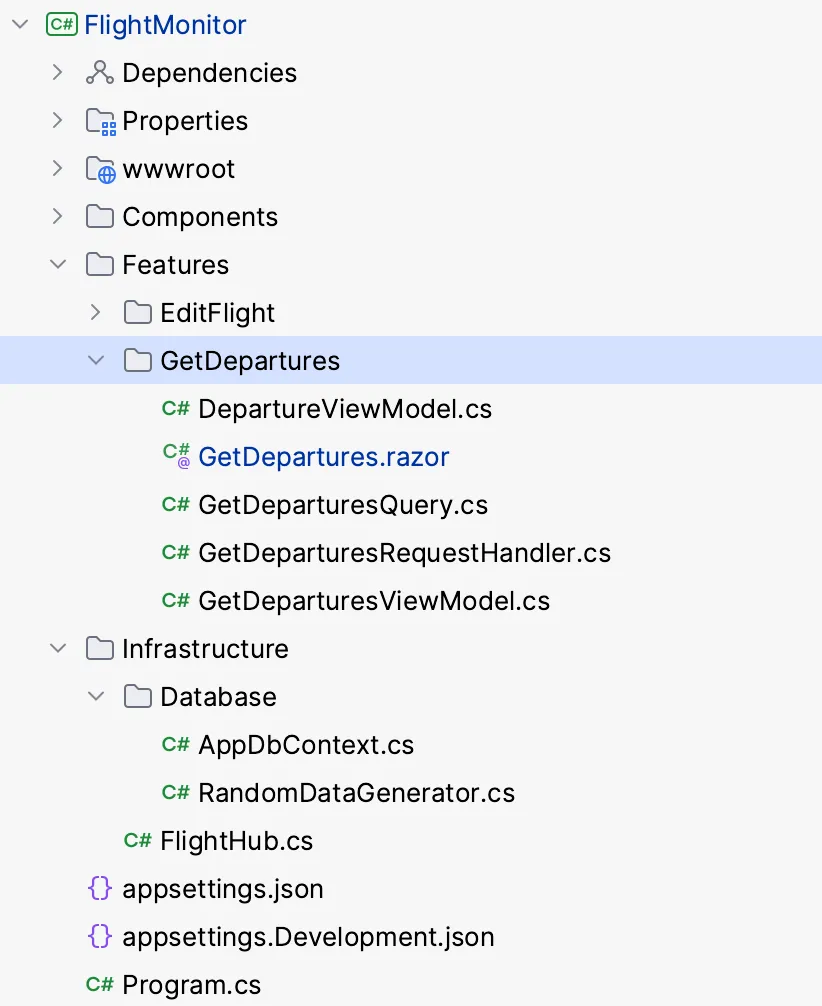
The basic structure of the Flight Monitor project
Infrastructure
First, let’s set up the database and create a simple data model for the flights. The data will be generated randomly. So that my scenario can be easily reproduced and no external system is needed, I will use an in-memory database in this example. This will be seeded with random data at startup. That’s enough to get to the actual scenario quickly.
Let us create the AppDbContext in the Infrastructure/Database folder as shown below.
public class AppDbContext : DbContext

{

    public DbSet<Flight> Flights => Set<Flight>();


    public AppDbContext(DbContextOptions<AppDbContext> options)

        : base(options)

    { }


    protected override void OnModelCreating(ModelBuilder modelBuilder)

    {

        modelBuilder.Entity<Flight>().HasData(RandomDataGenerator.GenerateFlights());

    }

}
And the Flight data model as follows.
public class Flight

{

    public Guid Id { get; set; }

    public string FlightNumber { get; set; }

    public string Airline { get; set; }

    public string Destination { get; set; }

    public DateTime ScheduledDeparture { get; set; }

    public DateTime ActualDeparture { get; set; }

    public string Gate { get; set; }

    public FlightStatus Status { get; set; }

}


public enum FlightStatus

{

    Scheduled,

    Boarding,

    Delayed,

    Cancelled

}
To generate test data I built a RandomDataGenerator which is called in the OnModelCreating method of the database context implementation. The implementation of the data generator is beyond the scope of this article, but you can find the data generator in the corresponding Git repository.
To initialize the AppDbContext and seed the data, the following two lines must be added to Program.cs.
builder.Services.AddDbContextFactory<AppDbContext>(options =>

    options.UseInMemoryDatabase("FlightsDb"));


...


// Seed the database

using (var scope = app.Services.CreateScope())

{

    var services = scope.ServiceProvider;

    var context = services.GetRequiredService<AppDbContext>();

    context.Database.EnsureCreated();

}
We are now ready to implement the features. Let’s get started!
The departure list
Let’s start with the list of outgoing flights. And there is nothing really new here compared to my explanations in previous articles. We stick to the pattern that we need a query implementation using the IRequest<T> interface as input, a projection as output (in this case a View Model) and of course a request handler to process the request. Of course, we also have the Blazor component that describes the representation.
public class GetDeparturesRequestHandler(IDbContextFactory<AppDbContext> contextFactory) : IRequestHandler<GetDeparturesQuery, GetDeparturesViewModel>

{

    public async Task<GetDeparturesViewModel> Handle(GetDeparturesQuery request, CancellationToken cancellationToken)

    {

        var dbContext = await contextFactory.CreateDbContextAsync(cancellationToken);

        var flights = await dbContext.Flights

            .Take(20)

            .OrderBy(c => c.ScheduledDeparture)

            .ToListAsync(cancellationToken);


        var viewModels = flights.Select(f => new DepartureViewModel(f.Id, f.ActualDeparture.ToString("hh:mm tt"), f.FlightNumber, f.Destination, f.Status.ToString())).ToList();


        var viewModel = new GetDeparturesViewModel(viewModels);

        return viewModel;

    }

}
Let’s take a quick look at the implementation of the request handler. Basically, the departures are retrieved from the database sorted by arrival time, mapped into the view model and returned as a response.
To display the list, we still need the GetDepartures Blazor component, as shown below. This is able to retrieve the data via MediatR and display it as a list. Of course, the necessary interactivity regarding updates is still missing. We will come to that later.
@attribute [StreamRendering(true)]


@inject IConfiguration Configuration

@using MediatR

@using Microsoft.AspNetCore.Components.Web

@inject IMediator  Mediator


@if (_model == null)

{

    <p><em>Loading...</em></p>

}

else

{

    <div class="table-responsive">

        <table class="table mb-0 table-bordered  table-hover table-striped small">

            <thead>

            <tr>

                <th class="py-2" scope="col">Time</th>

                <th class="py-2" scope="col">Destination</th>

                <th class="py-2" scope="col">Flight</th>

                <th class="py-2" scope="col">Status</th>

                <th class="py-2" scope="col"/>

            </tr>

            </thead>

            <tbody>


            @foreach (var item in _model.Departures)

            {

                <tr class="@(item.Status == "Delayed" ? "delayed-status" : "")">

                    <td>@item.Time</td>

                    <td>@item.Destination</td>

                    <td>@item.Flight</td>

                    <td>@item.Status</td>

                    <td><a href="/flight/@item.Id">Edit</a></td>

                </tr>

            }

            </tbody>

        </table>

    </div>

}


@code {

    private GetDeparturesViewModel? _model;


    protected override async Task OnInitializedAsync()

    {

        _model = await Mediator.Send(new GetDeparturesQuery());

    }

}
The edit flight feature
Now let’s look at the EditFlight slice. This feature changes data, which is why it is classified as a command. Let’s review Command Query Separation (CQS). The idea of CQS is that a method can only do one of two things: either perform an action (a command) or answer a question (a query), but never both.
The principle also applies to the feature slice approach; while GetDepartures is a query performer and does not change any data, EditFlight is a command. Of course, the scope of a feature slice is greater than that of a single method. Nevertheless, the focus is on changing data, even if the feature contains a representation of the flight data in the form of a ViewModel and a Blazor component.
The idea of vertical slicing is also high coherence within a feature, which means that everything needed to perform a task must be contained in the feature itself. There must be no direct dependencies between features. By encapsulating everything related to a specific feature (e.g., Edit Flight) into a single feature slice, we improve maintainability and scalability. This ensures that all aspects of a feature, from data retrieval to processing to presentation, are organized coherently, respecting their different roles (queries vs. commands) according to CQS principles through the specific handler implementation within the slice.
That’s why we also need functionality to get the flight by a given flight ID. Surely we can do this using the same pattern we discussed before.
public record GetFlightEditQuery(Guid Id) : IRequest<FlightEditViewModel>;


public record FlightEditViewModel(Guid Id, string Flight, string Destination, DateTime Scheduled, DateTime Actual, FlightStatus Status);


public class GetFlightEditRequestHandler(IDbContextFactory<AppDbContext> contextFactory)  : IRequestHandler<GetFlightEditQuery, FlightEditViewModel>

{

    public async Task<FlightEditViewModel> Handle(GetFlightEditQuery request, CancellationToken cancellationToken)

    {

        var dbContext = await contextFactory.CreateDbContextAsync(cancellationToken);

        var flight = await dbContext.Flights.SingleAsync(f => f.Id == request.Id, cancellationToken);

        return new FlightEditViewModel(flight.Id, flight.FlightNumber, flight.Destination, flight.ScheduledDeparture, flight.ActualDeparture, flight.Status);

    }

}
This is necessary in order for the user to have a view of the flight data being edited. What I really like is that we don’t need layers or services in the traditional sense, we can just focus on getting the job done, which is to display the data. First, let’s create an EditFlight view that displays the selected flight based on its ID and sends a request to the GetFlightEditRequestHandler.
For that, we create a file named EditFlight.razor directly in the EditFlight feature folder.
@attribute [StreamRendering(true)]


@using MediatR

@using Microsoft.AspNetCore.Components.Web

@inject IMediator  Mediator


@if (_model == null)

{

    <p><em>Loading...</em></p>

}

else

{

    <h3>Edit Flight: @_model.Flight to @_model.Destination</h3>

    <p>Status: @_model.Status.ToString()</p>

    <p>Scheduled: @_model.Scheduled.Date.ToShortDateString() @_model.Scheduled.ToString("hh:mm tt")</p>

    <p>Actual: @_model.Actual.Date.ToShortDateString() @_model.Actual.ToString("hh:mm tt")</p>

}


@code {

    [Parameter]

    public string Id { get; set; }


    private FlightEditViewModel? _model;


    protected override async Task OnInitializedAsync()

    {

        _model = await Mediator.Send(new GetFlightEditQuery(Guid.Parse(Id)));

    }

}
The output of our fictitious flight, as displayed in the EditFlight view in the browser, looks like this:
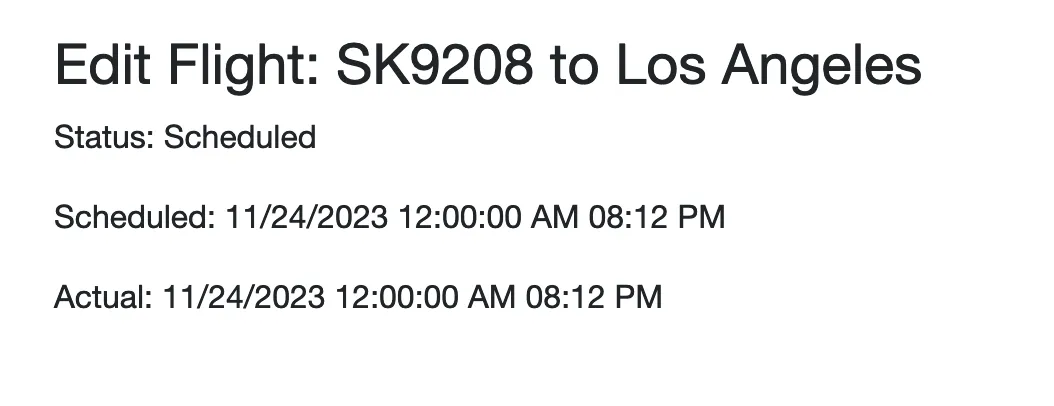
Flight Edit View
For the sake of simplicity, let’s assume that a function is required that makes it possible to simply set a 30-minute flight delay.
To do this, we now need a command that requests the change to the data. I think it makes sense to call this command SetDelayCommand. Therefore, we will create an according file within our feature slice.
public record SetDelayCommand(Guid Id, uint DelayInMinutes) : IRequest;
In the view itself, we now need to add a button and a method that will be triggered by the OnClick event, instantiate the command, and send it via MediatR.
Add the following line in the markup code of the EditFlight Blazor component.
<button class="btn btn-primary" @onclick="SetDelay">Set 30 Minutes Delay</button>
And, in addition, this method in the C# code of the Razor file.
@code {

    // Existing code...


    private async Task SetDelay()

    {

        var command = new SetDelayCommand(_model.Id, 30);

        await Mediator.Send(command);


        _model = await Mediator.Send(new GetFlightEditQuery(Guid.Parse(Id)));

    }

}
Of course, we still need a handler to take care of processing the command. To do this, we need to implement a request handler that receives the command and makes the appropriate changes to the record.
In accordance with our now well-proven approach that a RequestHandler is responsible for exactly one issue, this implementation is also straightforward again.
public class SetDelayCommandHandler(AppDbContext dbContext, IMediator publisher) : IRequestHandler<SetDelayCommand>

{

    public async Task Handle(SetDelayCommand request, CancellationToken cancellationToken)

    {

        var flight = await dbContext.Flights.SingleAsync(f => f.Id == request.Id, cancellationToken);


        flight.ActualDeparture = flight.ActualDeparture.AddMinutes(request.DelayInMinutes);

        flight.Status = FlightStatus.Delayed;


        await dbContext.SaveChangesAsync(cancellationToken);

    }

}
Since we have already re-sent the GetFlightEditQuery after the SetDelayCommand in the SetDelay method of the EditFlight Blazor component above, the view will already be updated in this view if it is successful.
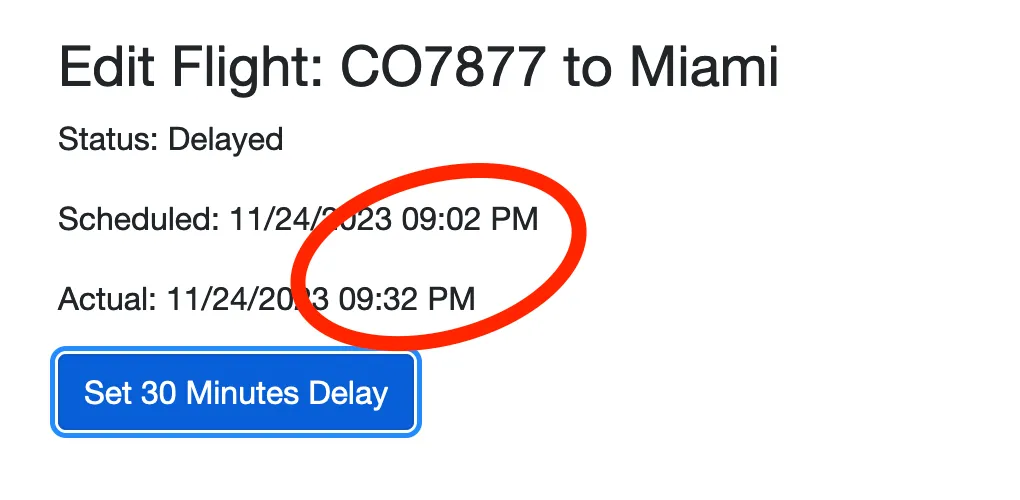
After the Command was sent, the departure time was postponed by half an hour
Tell the other browsers
Of course, all the previously rendered data in the departures list that we discussed at the beginning will remain unchanged until the user reloads the page. However, the core requirement of our application is to immediately notify users viewing their departures list of any changes without requiring them to manually reload the list.
We can solve this problem with SignalR. This is ideal for relaying updates from the server to all connected clients. To do this, we only need to set up a SignalR hub in our application. This approach allows real-time communication between the server and all connected clients. When a flight is updated, all clients receive a message via SignalR to update their departure lists, allowing them to retrieve the latest data, possibly using MediatR queries.
But first, let’s create a FlightUpdatedNotification and the associated handler. This will publish a message that a flight has been updated. Lets define a notification class that represents the event of a flight update:
public record FlightUpdatedNotification(Guid Id) : INotification;
Next, we implement a notification handler for FlightUpdatedNotification. In this handler, we use SignalR to send a message to all connected clients. The implementation should look as follows.
public async Task Handle(FlightUpdatedNotification notification, CancellationToken cancellationToken)

{

    await hubContext.Clients.All.SendAsync("RefreshFlightList", cancellationToken);

}
One important piece is still missing, namely the definition of the hub, which is needed to manage the connections and broadcast message. To do this, we need to add the FlightHub class to the Infrastructure folder, which in turn implements the Hub base class. That’s it.
public class FlightHub : Hub

{

}
In Program.cs, we need to add the following code to define the endpoint.
app.UseEndpoints(endpoints =>

{

    endpoints.MapHub<FlightHub>("/flightHub");

});
This specifies that requests to the /flightHub URL will be handled by FlightHub, the SignalR hub class we just implemented for real-time communication. This setup is required to allow bi-directional real-time communication between the server and the connected clients.
This completes all the server-side implementations for notifying clients. The only thing missing is the implementation of the client-side logic to receive and process the notifications.
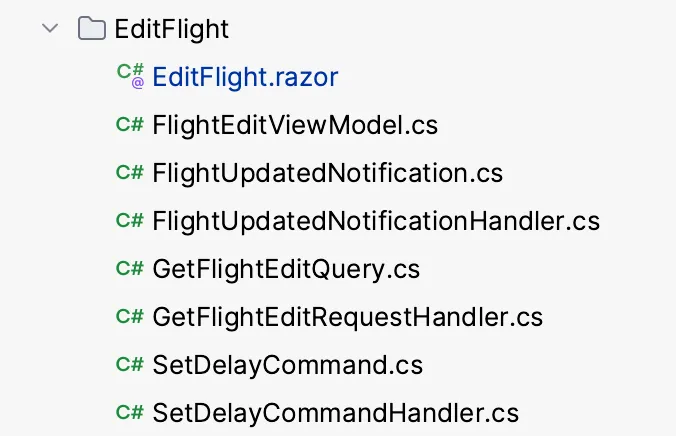
This is what the complete slice of the Edit Flight feature looks like
Client-Side implementation
In our Blazor component, we first connect to the SignalR hub. This step is crucial for enabling communication with the server. Next, we listen for a message named “RefreshFlightList” from the server. As soon as we receive this message, we update our list of flights to reflect the latest changes.
To do this, we need to extend the code of the departure list Blazor component as follows.
@code {

    private GetDeparturesViewModel? _model;

    private HubConnection? _hubConnection = null;


    protected override async Task OnInitializedAsync()

    {

        _model = await Mediator.Send(new GetDeparturesQuery());


        var hubUrl = Configuration["SignalRHubUrl"];

        _hubConnection = new HubConnectionBuilder().WithUrl(hubUrl!).Build();

        _hubConnection.On("RefreshFlightList", async () =>

        {

            try

            {

                var newModel = await Mediator.Send(new GetDeparturesQuery());

                await InvokeAsync(() =>

                {

                    _model = newModel;

                    StateHasChanged(); // Ensure this is inside InvokeAsync

                });

            }

            catch (Exception ex)

            {

                Console.WriteLine($"Error refreshing flight list: {ex.Message}");

                Console.WriteLine($"Stack Trace: {ex.StackTrace}");

            }


        });


        await _hubConnection.StartAsync();

    }

}
With this, we have fulfilled the requirement that the departure list in the client browsers is immediately informed of any changes to the flight data and that the list is updated without having to be reloaded.
To test this, you can open two browser windows side by side, call the edit view in one and move a flight by 30 minutes. The change will be immediately visible in the second window with the departure list.
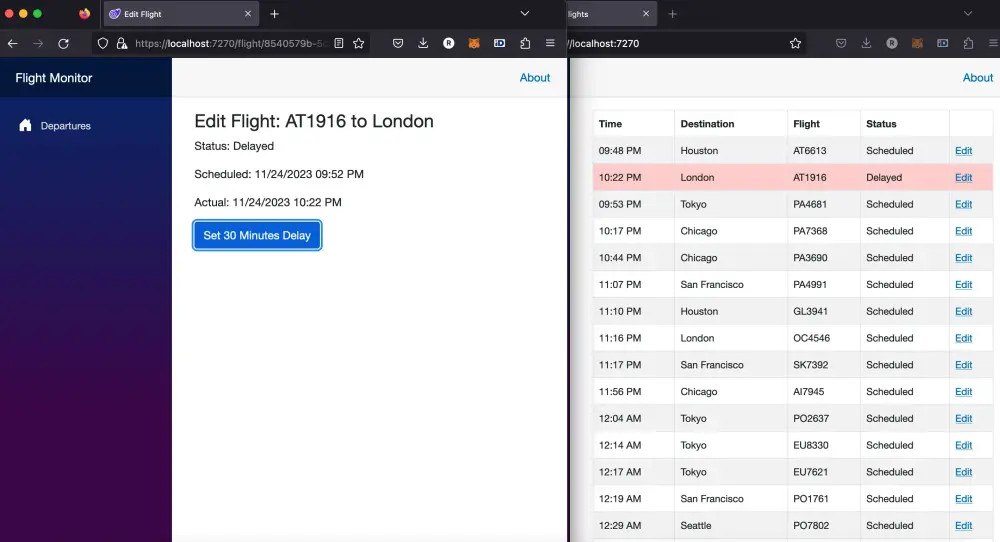
The second window was updated by the action in the first window without reloading
Wrap-Up section
As we close the chapter on our exploration of Vertical Slice Architecture within the realm of C# and Blazor in .NET 8, it’s clear that this architecture opens up a world of streamlined, efficient coding practices. This article has taken you through a more complex example to demonstrate the use of Vertical Slice Architecture in a real-world scenario.
Reflecting on the journey, we’ve seen how breaking down features into vertical slices not only simplifies the development process but also enhances the maintainability and scalability of applications. The use of Blazor Server and SignalR in this example illustrated the power of server-side technologies in handling real-time data updates.
Cheers!
• • •
For those interested in the code and exploring the practical application of these concepts, the full code example is available on GitHub for review and experimentation.