We will demonstrate how to setup Elasticsearch and learn how to write basics statements. You will learn about the structure, commands, tools in Elasticsearch API and get it up and running using standard settings.
Introduction
We will be talking about the basics of Elasticsearch API. We are going to walk through its structure, commands, tools, and get it up and running using standard settings. We will also create a simple Windows Form application in order to demonstrate a CRUD operation, showing some of Elasticsearch’s nice features all along the way and explore the integration between Elasticsearch and .NET.
Background
If you are interested in this article, I assume you have had some experience with Lucene or, at least, heard about it. It’s clearly a hot topic in the industry lately.
But, if you have never heard about it, or you’re in doubt, I’d suggest have a look here on Code Project. There are plenty of nice articles about it. Since Lucene is the highlight technology of Elasticsearch, it’s quite important to understand how it works before playing with Elastic.
I have been working with Lucene for one year and my personal experience using Elastic started a couple of months ago, when our company decided to migrate our BI’s core from “pure” Lucene to Elastic. My main source of information comes from its official website.
What is Elasticsearch Anyway?
As I mentioned previously, Elastic runs on top of a Lucene storage. Among other things, it allows us to save significant legwork creating standard features, for instance: indexing, querying, aggregating, and the distribution of the physical index files across servers.
For those who have used several frameworks or even have created your own set of classes in order to deal with "pure" Lucene, this is exciting news. It's really a productive API.
Getting Started
First, you will need to install and take care of a couple of settings:
1) Dependencies
Luckily just one, Elasticsearch requires a recent version of Java. You should install the latest version from the official Java website.
2) API
You can download the latest version of Elasticsearch from its website.
3) Config
Before starting Elastic server, you must change these settings on the [Installation Path]\config\elasticsearch.yml file:
- Uncomment it and choose a name without spaces:
cluster.name: new_name
- Uncomment it and choose a name without spaces:
node.name: new_node_name
- Uncomment it and type “true” as a value:
bootstrap.mlockall: true
- Uncomment it and type “127.0.0.1” as a value:
network.host: 127.0.0.1
- These two settings aren’t there by default, you can paste them right in the end of the file:
script.inline: on
script.engine.groovy.inline.aggs: on
4) Run It!
Getting the server up and running is simple as:
- Open the Command Prompt as administrator.
- Go the folder where you have installed Elastic.
- Go to bin folder.
- Type elasticsearch.bat and press Enter:
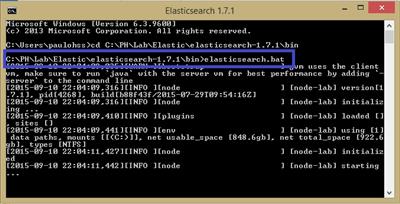
You can check if it is alive by testing the following URL in your browser:
http://localhost:9200/_cluster/health?pretty.
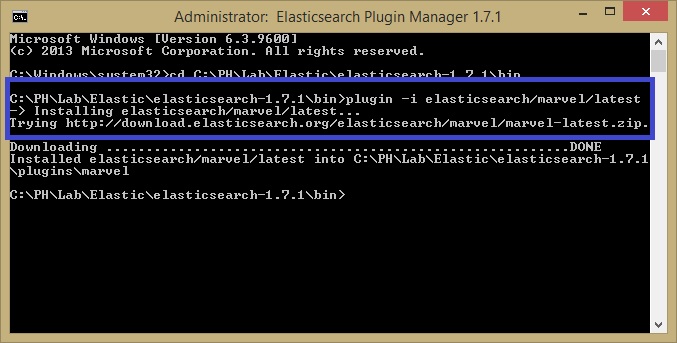
5) IDE for Quering
In order to test your brand new storage, you definitely need a good IDE. Fortunately, Elastic.org provides it.
I’ve been testing others IDEs, but Marvel and Sense are the best by far. This step should be done after you get Elastic server running and the installation command is:
[Installation Path]\bin> plugin -i elasticsearch/marvel/latest
Then, you are able to access these tools via browser:
Marvel (health monitor):
http://localhost:9200/_plugin/marvel/kibana/index.html#/dashboard/file/marvel.overview.json
Sense (IDE for querying):
http://localhost:9200/_plugin/marvel/sense/index.html
Writing Elastic Commands
Well, if you have survived the installation session, the fun part starts now!
As you can realise by this stage, Elastic is a RESTFul API thus its commands are totally based on Json. Good news since it’s largely used in the industry nowadays.
Roughly speaking, what I’m showing here is a parallel with what we would create in a relational database. Taking it into account, let’s start with our "create database" and "create table" statements.
Mapping
Mapping is the way that we will tell Elastic how to create our "tables". Throughout mapping, you will define the structure of your document, type of the fields, etc.
We will be working with the hypothetical (not too creative though!) entity “Customer”. So, the command you have to write in the Sense IDE is:
PUT crud_sample

{

  "mappings": {

    "Customer_Info" : {

      "properties": {

        "_id":{

          "type": "long"

        },

        "name":{

          "type": "string",

          "index" : "not_analyzed"

        },

        "age":{

          "type": "integer"

        },

        "birthday":{

          "type": "date",

          "format": "basic_date"

        },

        "hasChildren":{

          "type": "boolean"

        },

        "enrollmentFee":{

          "type": "double"

        }

      }

    }

  }

}
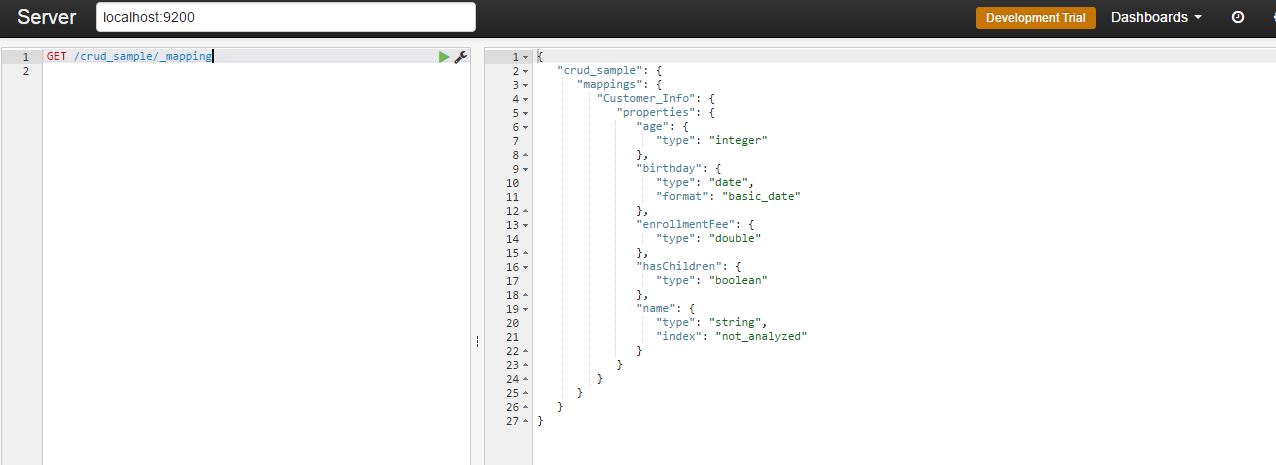
You can test if the mapping is fine with this command:
GET /crud_sample/_mapping
As a result, you should get:
Let’s say we have forgotten to create a field. Not a problem, you can add it by:
PUT /crud_sample/_mapping/Customer_Info

{

  "properties" : {

    "opinion" : {

      "type" : "string",

      "index" : "not_analyzed"

    }

  }

}
You can check how it went using the previous command.
Inserting a Row
Insert a new line (indexing is the correct term) is quite straightforward:
PUT /crud_sample/Customer_Info/1

{

  "age" : 32,

  "birthday": "19830120",

  "enrollmentFee": 175.25,

  "hasChildren": false,

  "name": "PH",

  "opinion": "It's Ok, I guess..."

}
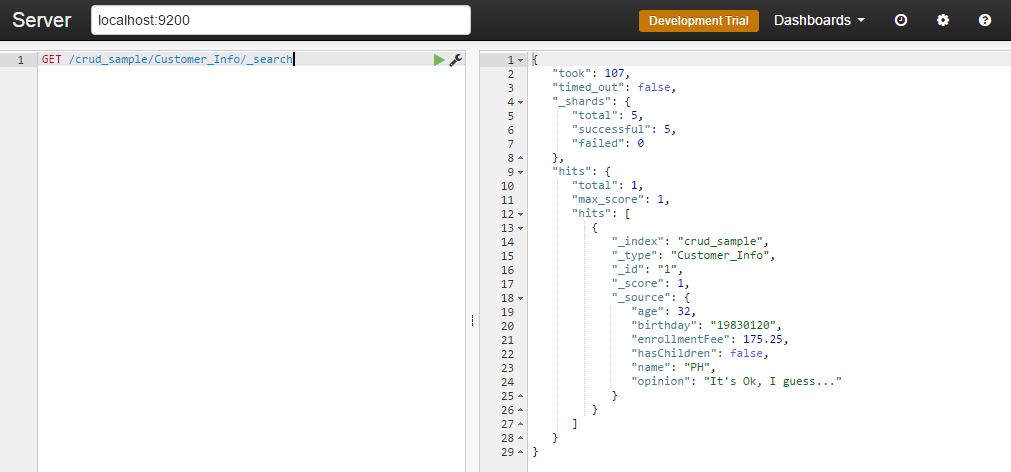
You can check it through this command:
GET /crud_sample/Customer_Info/_search
Nevertheless, inserting line by line could be a bit painful. Fortunately, we can use a bulk load, like this:
POST /crud_sample/Customer_Info/_bulk

{"index": { "_id": 1 }}

{"age" : 32, "birthday": "19830120", "enrollmentFee": 175.25,

  "hasChildren": false, "name": "PH", "opinion": "It's cool, I guess..." }

{"index": { "_id": 2 }}

{"age" : 32, "birthday": "19830215", "enrollmentFee": 175.25,

  "hasChildren": true, "name": "Marcel", "opinion": "It's very nice!" }

{"index": { "_id": 3 }}

{"age" : 62, "birthday": "19530215", "enrollmentFee": 205.25,

  "hasChildren": false, "name": "Mayra", "opinion": "I'm too old for that!" }

{"index": { "_id": 4 }}

{"age" : 32, "birthday": "19830101", "enrollmentFee": 100.10,

  "hasChildren": false, "name": "Juan", "opinion": "¿Qué tal estás?" }

{"index": { "_id": 5 }}

{"age" : 30, "birthday": "19850101", "enrollmentFee": 100.10,

  "hasChildren": true, "name": "Cezar", "opinion": "Just came for the food..." }

{"index": { "_id": 6 }}

{"age" : 42, "birthday": "19730101", "enrollmentFee": 50.00,

  "hasChildren": true, "name": "Vanda", "opinion": "Where am I again?" }

{"index": { "_id": 7 }}

{"age" : 42, "birthday": "19730101", "enrollmentFee": 65.00,

  "hasChildren": false, "name": "Nice", "opinion": "What were u saying again?" }

{"index": { "_id": 8 }}

{"age" : 22, "birthday": "19930101", "enrollmentFee": 150.10,

  "hasChildren": false, "name": "Telks", "opinion": "Can we go out now?" }

{"index": { "_id": 9 }}

{"age" : 32, "birthday": "19830120", "enrollmentFee": 175.25,

  "hasChildren": false, "name": "Rafael", "opinion": "Should be fine..." }
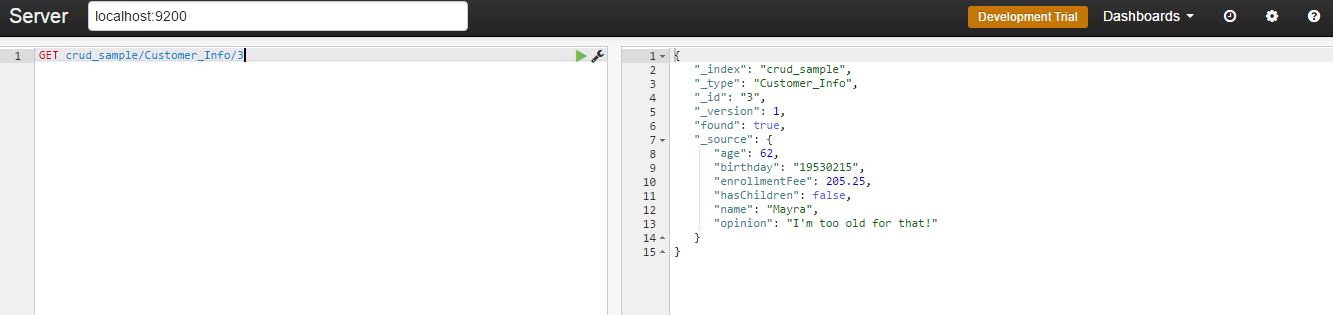
Now if you run the search statement, you will see 9 hits, which is pretty much all we have gotten so far. But if you want to check one particular customer, you just need to add its ID at the end of the URL:
GET crud_sample/Customer_Info/3
Updating
Elastic is clever enough to understand if you are adding a new doc or updating it by the “id” provided in the statement. For instance, imagine that you need to change the “opinion” of the customer number 3:
POST /crud_sample/Customer_Info/3/_update

{

  "doc": {

    "opinion": "I'm really too old for it."

  }

}
Deleting
You must be as careful with these commands as you would be dealing with any database. The main options here are:
Delete the whole storage:
delete crud_sample
Delete a specific customer:
delete crud_sample/Customer_Info/1
Querying
Elastic is extremely resourceful when it comes to querying. I will cover the basics ones for our CRUD app.
Before running the following query samples, it might be interesting if you add some extra rows/doc.
Finding Exact Values
GET /crud_sample/Customer_Info/_search

{

   "query" : {

       "filtered" : {

           "query" : {

               "match_all" : {}

           },

           "filter" : {

               "term" : {

                   "opinion" : "It's cool, I guess..."

               }

           }

       }

   }

}
You should get as a response the doc where the "opinion" matches with the query:

Combining Boolean Filters
GET /crud_sample/Customer_Info/_search

{

    "query" : {

        "filtered" : {

            "filter" : {

                "bool" : {

                    "must" : {

                        "term" : {"hasChildren" : false}

                    },

                    "must_not": [

                        { "term": { "name": "PH"  }},

                        { "term": { "name": "Felix"  }}

                    ],

                    "should" : [

                        { "term" : {"age" : 30}},

                        { "term" : {"age" : 31}},

                        { "term" : {"age" : 32}}

                    ]

                }

            }

        }

    }

}
Note that we are combining three clauses here:
"must": Query must appear in matching documents.
"must_not": Query must NOT appear in the matching documents.
"should": Query should appear in the matching documents, but is not mandatory.
Finding Multiple Exact Values
GET /crud_sample/Customer_Info/_search

{

    "query" : {

        "filtered" : {

            "filter" : {

                "terms" : {

                    "age" : [22, 62]

                }

            }

        }

    }

}
As you can see above, Elastic allows to inform multiple values for the same field.
Ranges Queries
In this example, we are getting all docs with the enrollment fee between 10 and 100:
GET /crud_sample/Customer_Info/_search

{

    "query" : {

        "filtered" : {

            "filter" : {

                "range" : {

                    "enrollmentFee" : {

                        "gte" : 10,

                        "lt"  : 100

                    }

                }

            }

        }

    }

}
Now, using a date range for birthdays:
GET /crud_sample/Customer_Info/_search

{

    "query" : {

        "filtered" : {

            "filter" : {

                "range" : {

                    "birthday" : {

                        "gt" : "19820101",

                        "lt" : "19840101"

                    }

                }

            }

        }

    }

}
And combining both, date and number fields:
GET /crud_sample/Customer_Info/_search

{

    "query" : {

        "filtered" : {

            "filter" : {

                "bool": {

                    "must": [

                        {"range": {"enrollmentFee": { "gte": 100, "lte": 200 }}},

                        {"range": {"birthday": { "gte": "19850101" }}}

                    ]

                }

            }

        }

    }

}
Aggregations
For big data analysis, aggregation is the icing on the cake. After all steps that a BI project demands, that is the moment where you start making sense from a huge amount of data.
Aggregations enable you to calculate and summarize data about the current query on-the-fly.
They can be used for all sorts of tasks, for instance: dynamic counting, average, min and max values, percentile, among others.
Roughly comparing, a count aggregation for our entity Customer in a SQL server would be:
Select Count(id) From customer
Let’s work out some sample with our indexes:
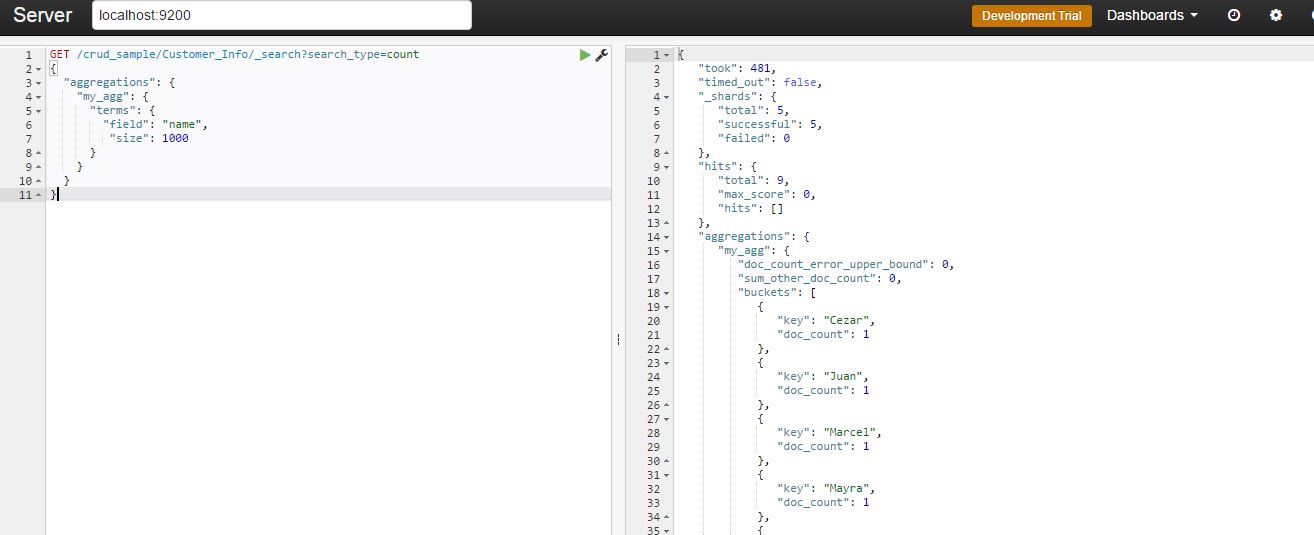
Counting Names
GET /crud_sample/Customer_Info/_search?search_type=count

{

    "aggregations": {

        "my_agg": {

            "terms": {

                "field": "name",

                "size": 1000

            }

        }

    }

}
You should get as a response:
Getting the Min Enrollment Fee
GET /crud_sample/Customer_Info/_search?search_type=count

{

    "aggs" : {

        "min_price" : { "min" : { "field" : "enrollmentFee" } }

    }

}
The syntax is quite similar, basically the aggregation keyword will change. In this case, we are using "min".
Getting the Average Age
GET /crud_sample/Customer_Info/_search?search_type=count

{

    "aggs" : {

        "avg_grade" : { "avg" : { "field" : "age" } }

    }

}
Now, calculating the average...
Getting a Multi-Value Aggregation
GET /crud_sample/Customer_Info/_search?search_type=count

{

    "aggs" : {

        "grades_stats" : { "extended_stats" : { "field" : "enrollmentFee" } }

    }

}
This is a useful resource, running it you will get multiple aggregations.
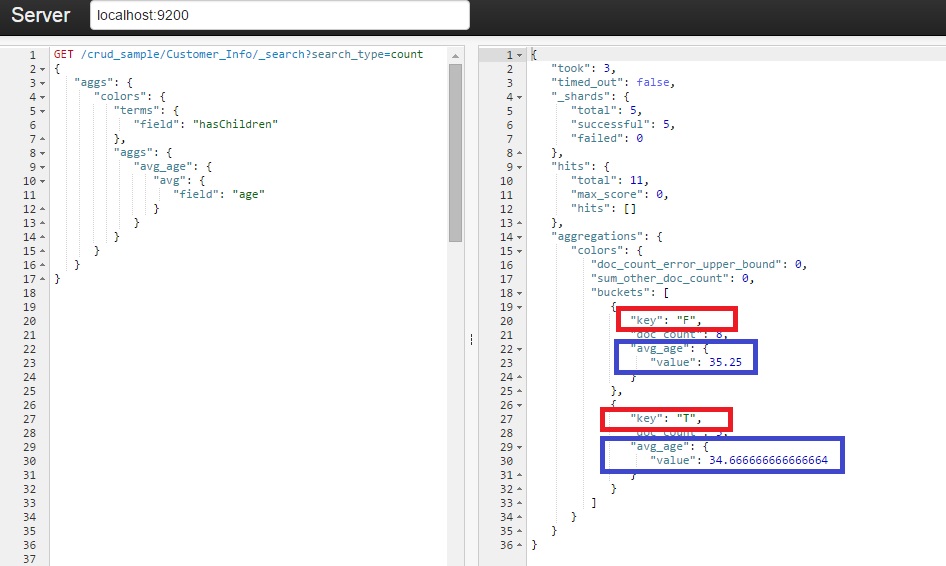
Nested Aggregation
GET /crud_sample/Customer_Info/_search?search_type=count

{

    "aggs": {

        "colors": {

            "terms": {

                "field": "hasChildren"

            },

            "aggs": {

                "avg_age": {

                    "avg": {

                        "field": "age"

                    }

                }

            }

        }

    }

}
And at last, the nested aggregation. This is very interesting, the statement above is grouping the aggregation by the field 'hasChildren' and, inside its values (True or False) you will find the average age:
We learned how to setup, config, and run a bunch of Elastic statements. Now it’s time to translate it into a C# fully operational CRUD app. Let’s get it done.
Creating a Demo App
First step, create a new Windows Form solution. It is available for download here, and it looks like this:
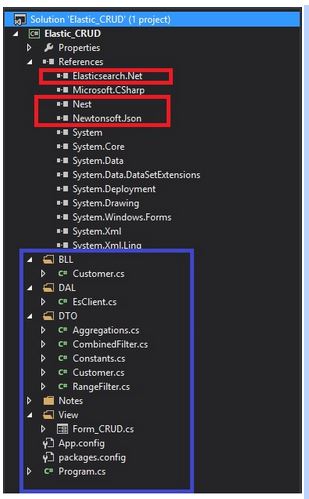
The references highlighted in red are the most important and you can get them via NuGet. As the names suggest, NEST and Elasticsearch DLLs are the .NET abstraction for Elasticsearch.
At the time that I wrote this article, the official documentation was visibly outdated. Either way, you can access it at http://nest.azurewebsites.net/.
All blue area is how I have decided to organize the project. Pretty standard: BLL stands for the Business Rules, DAL for the Data Access Layer, DTO contains the Entities and View holds our Windows Form.
Connecting with Elastic via NEST
Following the abstraction I have shown, our data access layer is as simple as:
namespace Elastic_CRUD.DAL

{

    /// Elastic client

    public class EsClient

    {

        /// URI

        private const string ES_URI = "http://localhost:9200";

        /// Elastic settings

        private ConnectionSettings _settings;

        /// Current instantiated client

        public ElasticClient Current { get; set; }

        /// Constructor

        public EsClient()

        {

            var node = new Uri(ES_URI);

            _settings = new ConnectionSettings(node);

            _settings.SetDefaultIndex(DTO.Constants.DEFAULT_INDEX);

            _settings.MapDefaultTypeNames(m => m.Add(typeof(DTO.Customer),

                                          DTO.Constants.DEFAULT_INDEX_TYPE));

            Current = new ElasticClient(_settings);

            Current.Map(m => m.MapFromAttributes());

        }

    }

}
The property called ‘’Current” is the abstraction of the Elastic REST client. All CRUD commands will be done via it. Another important part here is the “Settings”, I have grouped all the config keys into a simple class:
/// System constant values

public static class Constants

{

    /// Elastic index name

    public const string DEFAULT_INDEX = "crud_sample";

    /// Elastic type of a given index

    public const string DEFAULT_INDEX_TYPE = "Customer_Info";

    /// Basic date format

    public const string BASIC_DATE = "yyyyMMdd";

}
As you can see, all the names refer to the storage that we have created in the first part of this article.
Group 1 (Index, Update and Delete)
We are going to replicate the Elastic statements that we have learned previously into this WinForm app. In order to organize it, I end up with one tab for each group of features, thus five of them:
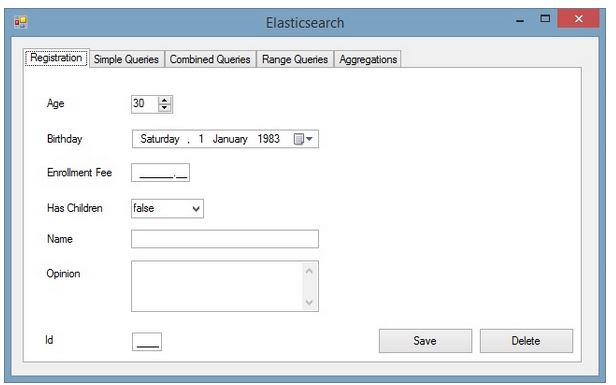
The first tab, as you can see, will be responsible for adding, updating and deleting a customer. Given that, the customer entity is a very important part and it must be properly mapped using NEST decoration, as shown below:
/// Customer entity

[ElasticType(Name = "Customer_Info")]

public class Customer

{

    /// _id field

    [ElasticProperty(Name="_id", NumericType = NumberType.Long)]

    public int Id { get; set; }

    /// name field

    [ElasticProperty(Name = "name", Index = FieldIndexOption.NotAnalyzed)]

    public string Name { get; set; }

    /// age field

    [ElasticProperty(Name = "age", NumericType = NumberType.Integer)]

    public int Age { get; set; }

    /// birthday field

    [ElasticProperty(Name = "birthday", Type = FieldType.Date, DateFormat = "basic_date")]

    public string Birthday { get; set; }

    /// haschildren field

    [ElasticProperty(Name = "hasChildren")]

    public bool HasChildren { get; set; }

    /// enrollmentFee field

    [ElasticProperty(Name = "enrollmentFee", NumericType = NumberType.Double)]

    public double EnrollmentFee { get; set; }

    /// option field

    [ElasticProperty(Name = "opinion", Index = FieldIndexOption.NotAnalyzed)]

    public string Opinion { get; set; }

}
Now that we already have the REST connection and our customer entity fully mapped, it’s time for writing some logic. Adding or updating a record should use almost the same logic. Elastic is clever enough to decide if it’s either a new record or an update, by checking the existence of the given ID.
/// Inserting or Updating a doc

public bool Index(DTO.Customer customer)

{

    var response = _EsClientDAL.Current.Index

                   (customer, c => c.Type(DTO.Constants.DEFAULT_INDEX_TYPE));

    if (response.Created == false && response.ServerError != null)

        throw new Exception(response.ServerError.Error);

    else

        return true;

}
The method responsible for that in the API is called "Index()", as when saving a doc into a Lucene storage, the correct term is “indexing”.
Note that we are using our constant index type (“Customer_Info”) in order to inform NEST where the customer will be added/updated. This index type, roughly speaking, is our table in the Elastic’s world.
Another thing that will be present in the NEST usage is the lambda notation, nearly all NEST API’s methods works through it. Nowadays, using lambda is far from being breaking news, but it’s not as straightforward as regular C# notation is.
If over the reading here, you feel like the syntax is confusing, I strongly suggest you to have a quick search here in the Code Project community, there are plenty of tutorials about how to use Lambda.
Deleting is the simplest one:
/// Deleting a row

public bool Delete(string id)

{

    return _EsClientDAL.Current

                       .Delete(new Nest.DeleteRequest(DTO.Constants.DEFAULT_INDEX,

                                                      DTO.Constants.DEFAULT_INDEX_TYPE,

                                                      id.Trim())).Found;

}
Quite similar to the “Index()” method, but here it is just required to inform the customer id. And, of course, call "Delete()" method.
Group 2 (Standard Queries)
As I have mentioned previously, Elastic is really resourceful when it comes to querying, thus it’s not possible to cover all advanced ones here. However, after playing with the following samples, you will be able to understand its basics, hence start writing your own user cases later on.
The second tab holds three queries:
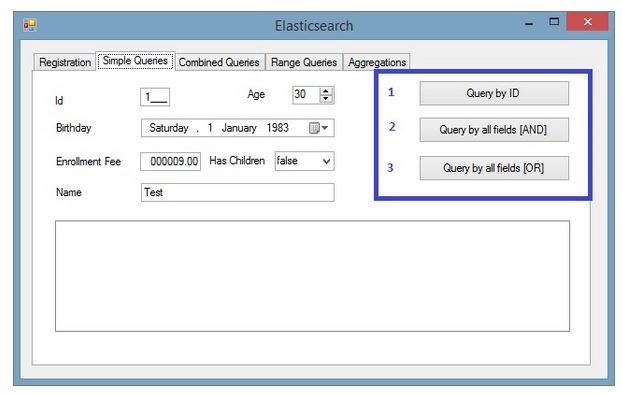
- Search by the ID: It basically uses a valid ID and only taking it into account:
/// Querying by ID

    public List QueryById(string id)

    {

        QueryContainer queryById = new TermQuery() { Field = "_id", Value = id.Trim() };

        var hits = _EsClientDAL.Current

                               .Search(s => s.Query(q => q.MatchAll() && queryById))

                               .Hits;

        List typedList = hits.Select(hit => ConvertHitToCustumer(hit)).ToList();


        return typedList;

    }


    /// Anonymous method to translate from a Hit to our customer DTO

    private DTO.Customer ConvertHitToCustumer(IHit hit)

    {

        Func<IHit<DTO.Customer=>, DTO.Customer=> func = (x) =>

        {

            hit.Source.Id = Convert.ToInt32(hit.Id);

            return hit.Source;

        };


        return func.Invoke(hit);

    }
Let’s take it slow here.
First, it’s necessary to create a NEST QueryContainer object, informing the field we want to use as search criteria. In this case, the customer id.
This query object will be used as the parameter by the Search() method in order to get the Hits (resultset returned from Elastic).
The last step is to convert the Hits into our known Customer entity via ConvertHitToCustomer method.
I could have done all of it in one single method, but I have decided to split it up instead. The reason is to demonstrate that you guys have several options to organize your code, other than putting it all together in an unreadable Lambda statement.
- Querying using all fields, with the “AND” operator to combine them:
/// Querying by all fields with 'AND' operator

    public List QueryByAllFieldsUsingAnd(DTO.Customer costumer)

    {

        IQueryContainer query = CreateSimpleQueryUsingAnd(costumer);

        var hits = _EsClientDAL.Current

                               .Search(s => s.Query(query))

                               .Hits;

        List typedList = hits.Select(hit => ConvertHitToCustumer(hit)).ToList();


        return typedList;

    }


    /// Create a query using all fields with 'AND' operator

    private IQueryContainer CreateSimpleQueryUsingAnd(DTO.Customer customer)

    {

        QueryContainer queryContainer = null;

        queryContainer &= new TermQuery() { Field = "_id", Value = customer.Id };

        queryContainer &= new TermQuery() { Field = "name", Value = customer.Name };

        queryContainer &= new TermQuery() { Field = "age", Value = customer.Age };

        queryContainer &= new TermQuery() { Field = "birthday", Value = customer.Birthday };

        queryContainer &= new TermQuery() { Field = "hasChildren", Value= customer.HasChildren };

        queryContainer &= new TermQuery() { Field = "enrollmentFee", Value=customer.EnrollmentFee };


        return queryContainer;

    }
Same idea behind the ID search, but now our query object was created by the CreateSimpleQueryUsingAnd method. It receives a customer entity and converts it into a NEST QueryContainer object.
Note that we are concatenating all fields using the “&=” NEST custom operator, which represents the “AND”.
- It follows the previous example, but combining the fields with OR “|=” operator instead.
/// Querying by all fields with 'OR' operator

    public List QueryByAllFieldsUsingOr(DTO.Customer costumer)

    {

        IQueryContainer query = CreateSimpleQueryUsingOr(costumer);

        var hits = _EsClientDAL.Current

                               .Search(s => s.Query(query))

                               .Hits;


        List typedList = hits.Select(hit => ConvertHitToCustumer(hit)).ToList();


        return typedList;

    }


    /// Create a query using all fields with 'AND' operator

    private IQueryContainer CreateSimpleQueryUsingOr(DTO.Customer customer)

    {

        QueryContainer queryContainer = null;

        queryContainer |= new TermQuery() { Field = "_id", Value = customer.Id };

        queryContainer |= new TermQuery() { Field = "name", Value = customer.Name };

        queryContainer |= new TermQuery() { Field = "age", Value = customer.Age };

        queryContainer |= new TermQuery() { Field = "birthday", Value = customer.Birthday };

        queryContainer |= new TermQuery() { Field = "hasChildren", Value = customer.HasChildren };

        queryContainer |= new TermQuery() { Field = "enrollmentFee", Value = customer.EnrollmentFee };


        return queryContainer;

    }
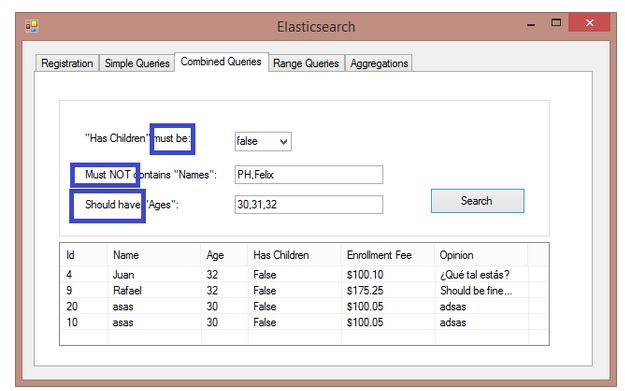
Group 3 (Combining Queries)
The third tab shows how to combine filters using bool query. The available clauses here are “must”, “must not” and “should”. Although it may look strange at first sight, it’s not far from the others dbs:
- must: The clause (query) must appear in matching documents.
- must_not: The clause (query) must not appear in the matching documents.
- should: The clause (query) should appear in the matching document. In a boolean query with no "must" clauses, one or more should clauses must match a document. The minimum number of should clauses to match can be set using the minimum_should_match parameter.
Translating it into our C# app, we will get:
/// Querying combining fields

public List QueryUsingCombinations(DTO.CombinedFilter filter)

{

    // Build Elastic "Should" filtering object for "Ages":

    FilterContainer[] agesFiltering = new FilterContainer[filter.Ages.Count];

    for (int i = 0; i < filter.Ages.Count; i++)

    {

        FilterDescriptor clause = new FilterDescriptor();

        agesFiltering[i] = clause.Term("age", int.Parse(filter.Ages[i]));

    }

    // Build Elastic "Must Not" filtering object for "Names":

    FilterContainer[] nameFiltering = new FilterContainer[filter.Names.Count];

    for (int i = 0; i < filter.Names.Count; i++)

    {

        FilterDescriptor clause = new FilterDescriptor();

        nameFiltering[i] = clause.Term("name", filter.Names[i]);

    }

    // Run the combined query:

    var hits = _EsClientDAL.Current.Search(s => s

                           .Query(q => q

                               .Filtered(fq => fq

                               .Query(qq => qq.MatchAll())

                               .Filter(ff => ff

                                   .Bool(b => b

                                       .Must(m1 => m1.Term("hasChildren", filter.HasChildren))

                                       .MustNot(nameFiltering)

                                       .Should(agesFiltering)

                                   )

                               )

                           )

                       )

                   ).Hits;


    // Translate the hits and return the list

    List typedList = hits.Select(hit ==> ConvertHitToCustumer(hit)).ToList();


    return typedList;

}
Here, you can see the first loop creating the "should" filters collection for the given "ages", and the next one in turn building the "must not clause" list for the "names" provided.
The "must" clause will be applied just upon the “hasChildren” field, so no need for a collection here.
With all filter objects filled up, it's just a matter of passing it all as parameter to the lambda Search() method.
Group 4 (Range Queries)
In the fourth tab, we will be talking about the range query (very same idea as the 'between', 'greater than', 'less than' etc. operators from SQL).
In order to reproduce that, we will be combining two range queries, highlighted as follows:
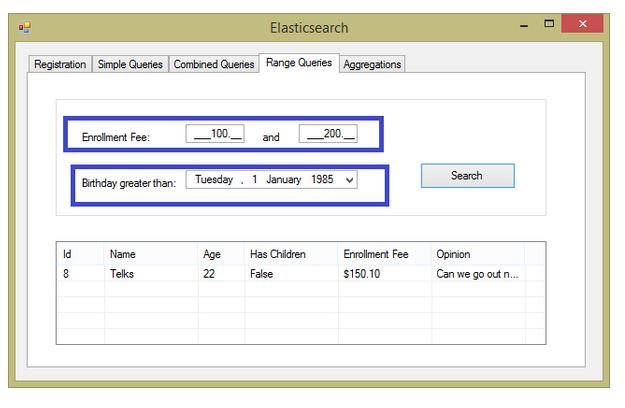
Our BLL has a method to compose this query and run it:
/// Querying using ranges

public List QueryUsingRanges(DTO.RangeFilter filter)

{

    FilterContainer[] ranges = new FilterContainer[2];


    // Build Elastic range filtering object for "Enrollment Fee":

    FilterDescriptor clause1 = new FilterDescriptor();

    ranges[0] = clause1.Range(r => r.OnField(f =>

                              f.EnrollmentFee).Greater(filter.EnrollmentFeeStart)

                                              .Lower(filter.EnrollmentFeeEnd));


    // Build Elastic range filtering object for "Birthday":

    FilterDescriptor clause2 = new FilterDescriptor();

    ranges[1] = clause2.Range(r => r.OnField(f => f.Birthday)

                                    .Greater(filter.Birthday.ToString

                                    (DTO.Constants.BASIC_DATE)));


    // Run the combined query:

    var hits = _EsClientDAL.Current

                           .Search(s => s

                           .Query(q => q

                               .Filtered(fq => fq

                               .Query(qq => qq.MatchAll())

                               .Filter(ff => ff

                                   .Bool(b => b

                                       .Must(ranges)

                                   )

                               )

                           )

                       )

                   ).Hits;


    // Translate the hits and return the list

    List typedList = hits.Select(hit => ConvertHitToCustumer(hit)).ToList();


    return typedList;

}
Detailing the method, it will be creating a FilterContainer object with two items:
First one holds the "EnrollmentFee" range, applying the "Great" and "Lower" operators upon it. The second will cover values greater than whatever the user supplies for the "Birthday" field.
Note that we need to stick with the date format used since the conception of this storage (see the first article).
With all set, just send it as parameter to the Search().
Group 5 (Aggregations)
At last, the fifth tab shows the coolest feature (in my opinion), the aggregations.
As I have stated in my previous article, this functionality is specially useful to quantify data, thus make sense of it.
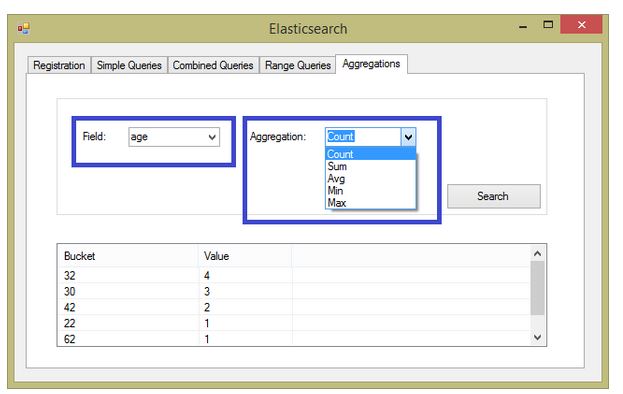
The first combobox holds all available fields and the second one the aggregations options. For the sake of simplicity, I'm showing here the most popular aggregations:
Sum
private void ExecuteSumAggregation

(DTO.Aggregations filter, Dictionary list, string agg_nickname)

{

    var response = _EsClientDAL.Current

                               .Search(s => s

                                   .Aggregations(a => a

                                       .Sum(agg_nickname, st => st

                                           .Field(filter.Field)

                                       )

                                   )

                               );


    list.Add(filter.Field + " Sum", response.Aggs.Sum(agg_nickname).Value.Value);

}
Average
private void ExecuteAvgAggregation

(DTO.Aggregations filter, Dictionary list, string agg_nickname)

{

    var response = _EsClientDAL.Current

                               .Search(s => s

                                   .Aggregations(a => a

                                       .Average(agg_nickname, st => st

                                           .Field(filter.Field)

                                       )

                                   )

                               );


    list.Add(filter.Field + " Average", response.Aggs.Average(agg_nickname).Value.Value);

}
Count
private void ExecuteCountAggregation

(DTO.Aggregations filter, Dictionary list, string agg_nickname)

{

    var response = _EsClientDAL.Current

                               .Search(s => s

                                   .Aggregations(a => a

                                       .Terms(agg_nickname, st => st

                                           .Field(filter.Field)

                                           .Size(int.MaxValue)

                                           .ExecutionHint(TermsAggregationExecutionHint.GlobalOrdinals)

                                       )

                                   )

                               );


    foreach (var item in response.Aggs.Terms(agg_nickname).Items)

    {

        list.Add(item.Key, item.DocCount);

    }

}
Min/Max
private void ExecuteMaxAggregation

(DTO.Aggregations filter, Dictionary list, string agg_nickname)

{

    var response = _EsClientDAL.Current

                               .Search(s => s

                                   .Aggregations(a => a

                                       .Max(agg_nickname, st => st   // Replace ‘.Max’ for ‘.Min’ to get the min value

                                           .Field(filter.Field)

                                       )

                                   )

                               );


    list.Add(filter.Field + " Max", response.Aggs.Sum(agg_nickname).Value.Value);

}
Conclusion
As most developers are used to relational databases, work with a non-relational storage may be challenging, even strange. At least, it has been true for me.
I have been working with most of the known relational databases in several projects, and its concepts, standards are really stamped into my mind.
So, being in touch with this emerging storage technology is transforming my perception which I may assume, is happening worldwide with others IT professionals.
Over time, you may realise that it really opens a large range of solutions to be designed.