Introduction
In Part 1 of the “Asynchronous programming with async and await in C#” series, we examined some of the theory behind async / await. In Part 2, we discussed about how async / await pattern looks under the hood and we demystified the concepts behind it. In Part 3, we took a closer look at the different return types for async methods.
In today’s final Part 4, we will delve into various best practices we should aim to follow whenever we use the async / await pattern in C#.
Embrace async all the way
As you start working with async methods, you will quickly realize that the asynchronous nature of the code starts spreading up and down your hierarchy of method calls. You may be tempted to “stop” this by blocking in your code using Task.Result or Task.Wait, converting just a small part of the application and wrapping it in a synchronous API call. Unfortunately, this is a recipe for creating hard to track deadlocks.
The best solution to this problem is to allow async code to grow naturally through the codebase. If you follow this solution, you’ll see async code expand to its entry point, usually an event handler or a controller action.
If a method is async, make sure there is an await
As we already saw in a previous part of the series, whenever the compiler finds an async method, it turns the method into a state machine. If your code does not have an await in its body, the compiler will generate a warning, but the state machine will be created nevertheless. This will result in adding unnecessary overhead for an operation that will never yield.
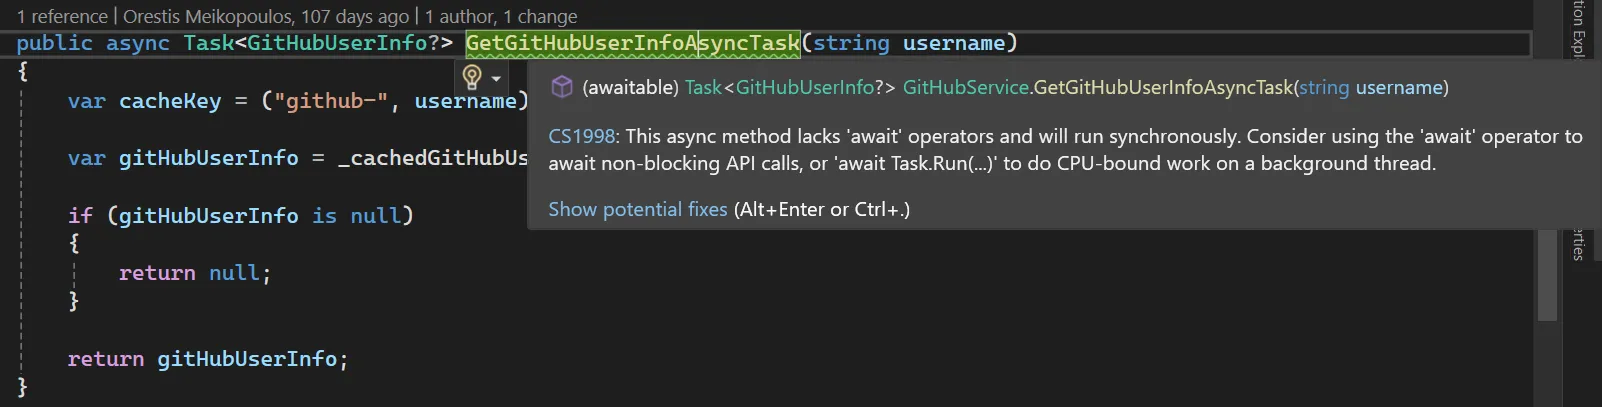
Compiler warning for async method that does not use await inside its body
Avoid async void
Using void as a return type for an async method is a BIG no-no. As a rule of thumb, consider using async Task instead of async void, whenever possible.
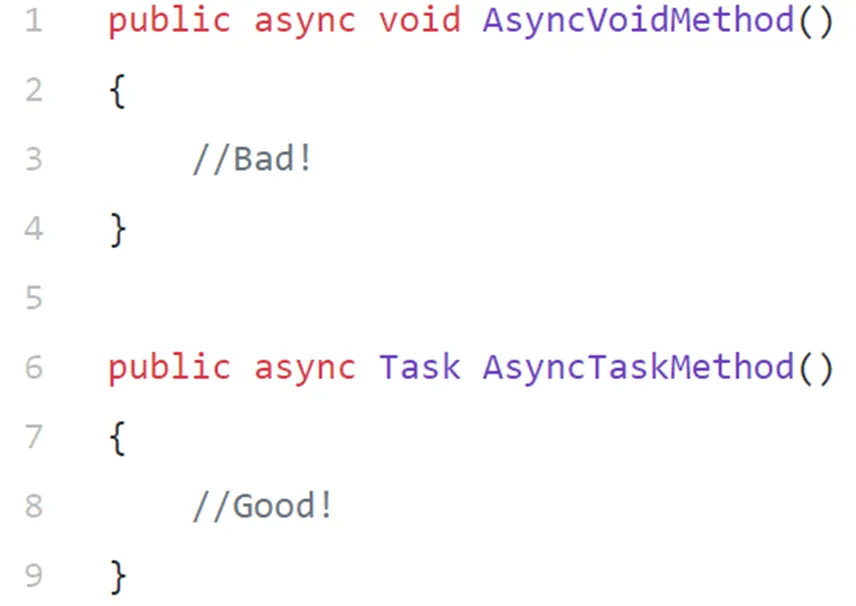
Do not use void as the return type for an async method
There are several reasons behind this practice. First and foremost, exceptions thrown in an async void method can’t be caught outside of that method. On the other hand, whenever an exception is thrown out of an async Task or async Task<T> method, that exception is captured and placed on the Task object.
With async void methods, there is no Task object, so any exceptions thrown out of an async void method will be raised directly on the SynchronizationContext that was active when the async void method started, pottentially causing bad side effects if the caller isn’t expecting them to be async.
void ThisWillNotCatchTheException()

{

    try

    {

        VoidMethodThrowsExceptionAsync();

    }

    catch (Exception ex)

    {

        //The below line will never be reached

        Console.WriteLine(ex);

    }

}


async void VoidMethodThrowsExceptionAsync()

{

    await Task.Delay(100);


    throw new Exception("Hmmm, something went wrong!");

}


async Task ThisWillCatchTheExceptionAsync()

{

    try

    {

        await TaskMethodThrowsExceptionAsync();

    }

    catch (Exception ex)

    {

        //The below line will actually be reached

        Console.WriteLine(ex);

    }

}


async Task TaskMethodThrowsExceptionAsync()

{

    await Task.Delay(100);


    throw new Exception("Hmmm, something went wrong!");

}
Prefer async/await over directly returning Task
There are benefits to using return await and marking the method as async, instead of directly returning the Task and not use the async keyword on the method, as we can see in the below image.
First of all, asynchronous and synchronous exceptions are normalized to always be asynchronous. Also, the code will be easier to modify (e.g., we can add a using block if needed) and to debug. Finally, exceptions thrown will be automatically wrapped in the returned Task instead of surprising the caller with an actual exception.
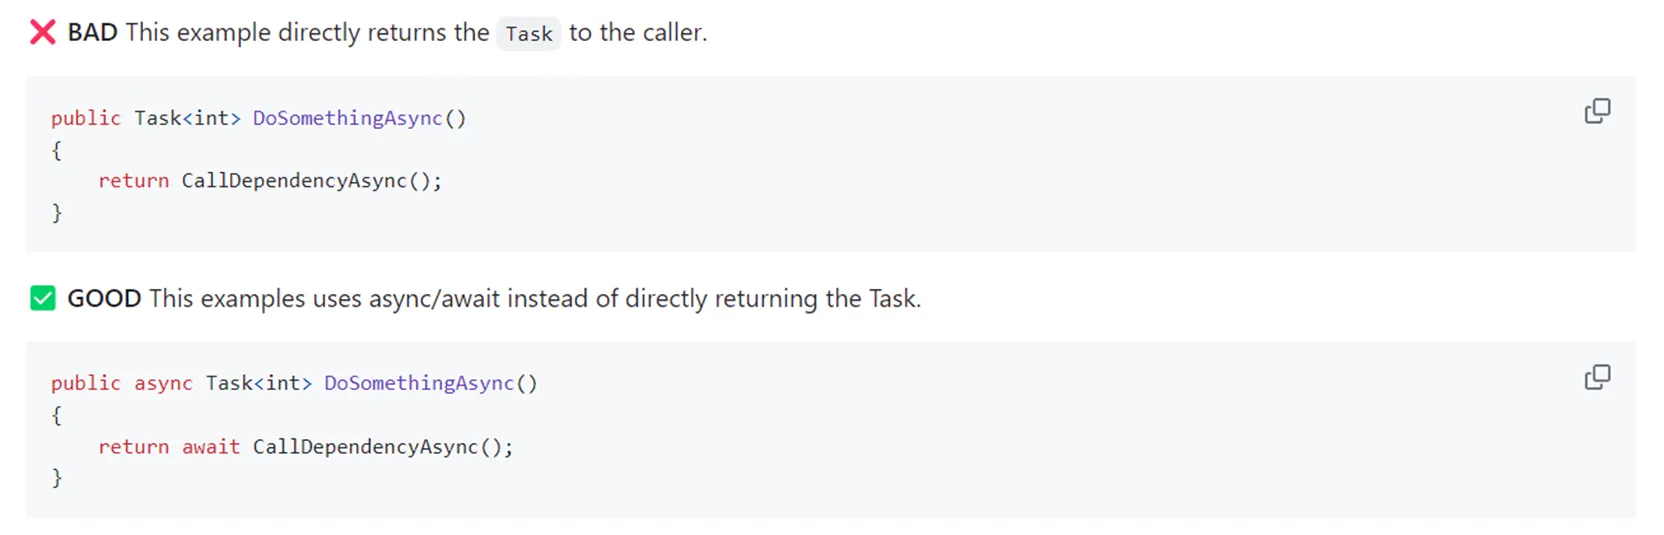
Prefer async/await over directly returning Task
Don’t wrap return Task inside try / catch or using block
Continuing from the previous best practice, if we choose to not return await, but return a Task<T> instead, the return happens right away. If the code is inside a try/catch block, the exception will not be caught. Similarly, if the code is inside a using block, it will dispose the object right away. So, if we need to wrap our async code in a try / catch or using block, we should aim to use return await instead, as we can see in the code sample below:
Task<string> ReturnTaskExceptionNotCaughtAsync()

{

    try

    {

        //Bad idea...

        return GetDataThrowsExceptionAsync();

    }

    catch (Exception ex)

    {

        //The below line will never be reached

        Console.WriteLine(ex.Message);


        throw;

    }

}


async Task<string> ReturnTaskExceptionCaughtAsync()

{

    try

    {

        //Good idea...

        return await GetDataThrowsExceptionAsync();

    }

    catch (Exception ex)

    {

        //The below line will be reached

        Console.WriteLine(ex.Message);


        throw;

    }

}


async Task<string> GetDataThrowsExceptionAsync()

{

    await Task.Delay(100);

    throw null;

}
Avoid using .Wait() or .Result
There are very few ways to use Task.Result and Task.Wait correctly, so the general advice is to completely avoid using them in our code. Let’s examine why that is the case, by taking a look at the two main problems they introduce:
Sync over async
Using Task.Result or Task.Wait, which actually blocks the current thread on waiting for an asynchronous operation to complete is MUCH worse than calling a truly synchronous API. This phenomenon is dubbed “sync over async” and here is what happens at a very high level:
An asynchronous operation is kicked off and the calling thread is blocked waiting for that operation to complete. When the asynchronous operation completes, it unblocks the code waiting on that operation. This takes place on another thread. The result is that we need to use two threads instead of one to complete synchronous operations. This usually leads to thread-pool starvation and results in service outages.
Deadlocks
The SynchronizationContext is an abstraction that gives application models a chance to control where asynchronous continuations run. ASP.NET (non-core), WPF and Windows Forms each have an implementation that will result in a deadlock if Task.Wait or Task.Result is used on the main thread.
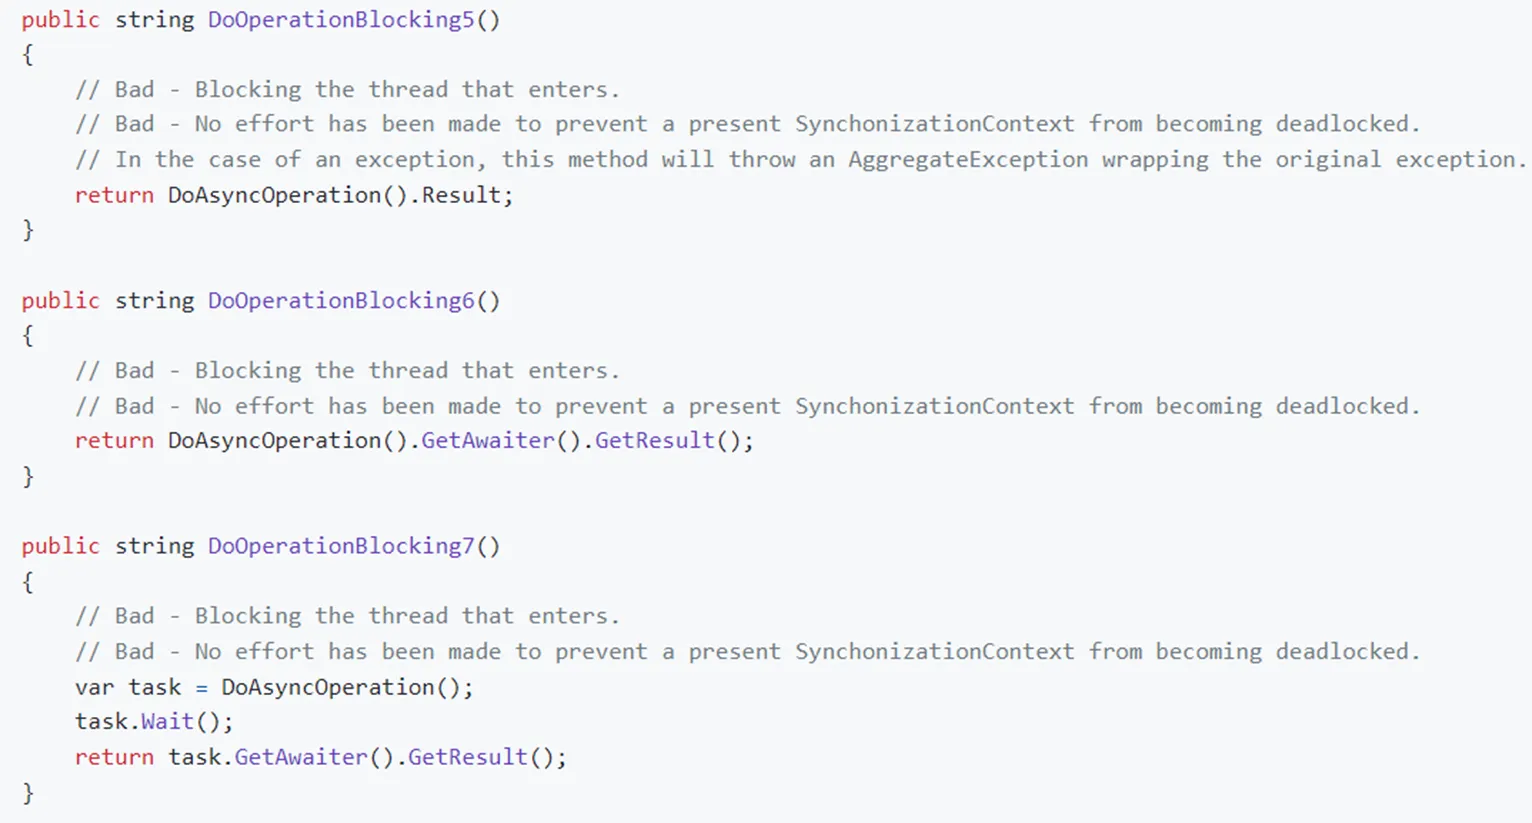
This behavior has led to a bunch of “clever” code snippets that show the “right” way to block waiting for a Task, as we can see in the below images. But, the hard truth is, there’s no good way to block waiting for a Task to complete.
Note: ASP.NET Core does not have a SynchronizationContext and is not prone to the deadlock problem (more on that later).
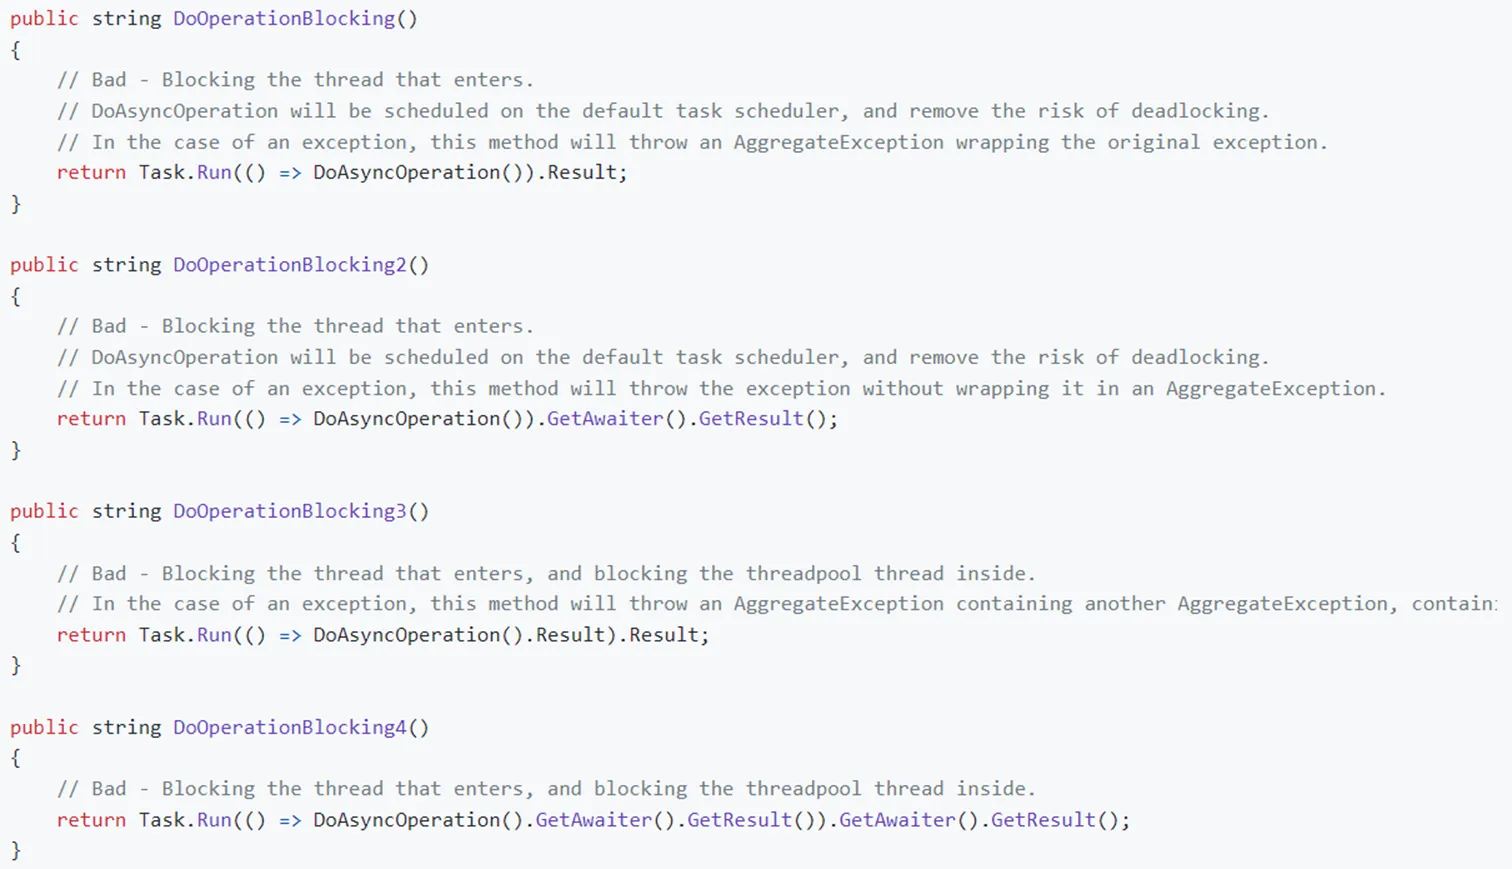
The examples of this image are, in one way or another, trying to avoid the deadlock situation but still succumb to “sync over async” problems
The examples of this image are, in one way or another, trying to avoid the deadlock situation but still succumb to “sync over async” problems
Add the Async suffix to any async method name
This is the convention used in .NET to differentiate synchronous and asynchronous methods more easily. Exception to this practice are:
- Event handlers
- Controller action methods
But those should not be explicitly called by our code anyway.
Async library methods should consider using Task.ConfigureAwait(false) to boost performance
As we have already mentioned several times during this series, .NET framework has the notion of “synchronization context”, which, long story short, represents a way to “get back to where you were before”.
Whenever a Task is awaited, it captures the current synchronization context before awaiting. Upon Task completion, the .Post() method of the synchronization context is invoked to resume where it was before. This is useful to get back to the UI thread or to resume back to the same ASP.NET HttpContext, etc.
But when should we use .ConfigureAwait(false)? Actually, it mainly depends on whether we are we implementing application-level code or general purpose library code.
When writing applications, we generally want the default behavior. So, if an app model / environment (e.g., Windows Forms, WPF, ASP.NET Framework MVC, etc.) publishes a custom SynchronizationContext, there’s almost certainly a really good reason it does. It is essentially providing a way for any code that cares about the synchronization context to interact with the app model / environment appropriately. So, if we are writing an event handler in a Windows Forms app, writing a unit test in xunit, writing some code in an ASP.NET Framework MVC app that depends on HttpContext.Current, we would want to use that SynchronizationContext, if it exists.
On the other hand, when writing library code, we rarely need to go back to the context where we were before. So, when .ConfigureAwait(false) is used, the code no longer tries to resume where it was before and, if possible, the code completes in the thread that completed the task, thus avoiding a context switch. This behavior is especially important when the library method is called many times, as it slightly boosts performance, responsiveness and can help avoid deadlocks as well.

Using .ConfigureAwait(false) in general purpose library code
But what about ASP.NET Core? As it turns out, in ASP.NET Core, there is no SynchronizationContext, so in theory, you don’t need to worry about using ConfigureAwait(false) at all. However, that is not entirely true. The actual question is whether certain environments publish their own SynchronizationContext.
In particular, whereas the classic ASP.NET on .NET Framework has its own SynchronizationContext, in contrast ASP.NET Core does not. That means that code running in an ASP.NET Core app, by default, won’t see a custom SynchronizationContext, which lessens the need for ConfigureAwait(false) running in such an environment.
But, that doesn’t mean there will never be a custom SynchronizationContext present. If some user code or other library code your ASP.NET Core app is using, sets a custom context and calls your code, then even in ASP.NET Core the awaits may see a non-default context that would lead you to want to use ConfigureAwait(false).
But once again, if you are writing library code that could be potentially reused in other applications (i.e: UI App, Legacy ASP.NET, Xamarin Forms), it remains a best practice.
Cancelling async Tasks
.NET provides the CancellationToken class with the ability to cancel execution of the Task. The way this works, is that the async method receives a CancellationToken, which is then shared by the caller code and the async method, thus providing a mechanism to signal cancellation.
In the most common case, cancellation follows the following flow:
- The caller creates a
CancellationTokenSource object.
- The caller calls a cancelable async API or operation and passes the
CancellationToken from the CancellationTokenSource object (CancellationTokenSource.Token).
- The caller requests cancellation using the
CancellationTokenSource.Cancel() method.
- Task cancels itself, using the
CancellationToken.ThrowIfCancellationRequested() method
Let’s observe the CancellationToken flow mechanism in action, by using the following code sample:
class Program

{

    async Task Main()

    {

        var cts = new CancellationTokenSource();


        var thread = new Thread(() =>

        {

            if (Console.ReadKey().KeyChar == 'x')

            {

                cts.Cancel();

            }

        });

        thread.Start();


        try

        {

            await MockMethodAsync(cts.Token);

        }

        catch (OperationCanceledException ex)

        {

            Console.WriteLine(ex);

        }

    }


    async Task MockMethodAsync(CancellationToken ct)

    {

        for (var i = 0; i < 100; i++)

        {

            //Simulate an async call that takes some time to complete

            await Task.Delay(1000, ct);


            Console.WriteLine("Doing some async operation...");


            //Check if cancellation has been requested

            ct.ThrowIfCancellationRequested();

        }

    }

}
As we can see in the MockMethodAsync method above, for this mechanism to work, we will need to write code to check for the cancellation being requested at regular intervals. For example, this could be done on every iteration of our code, or at natural stopping point in the business logic. Ideally, once cancellation has been requested, an async Task should cancel as quickly as possible.
Generally, we should consider using cancellation for all methods that may take a long time to complete. Cancellation is cooperative in .NET and this essentially means that everything in the call-chain must be explicitly passed the CancellationToken for it to work well, so we need to explicitly pass the token into other APIs that also accept a token if we want cancellation to be most effective.
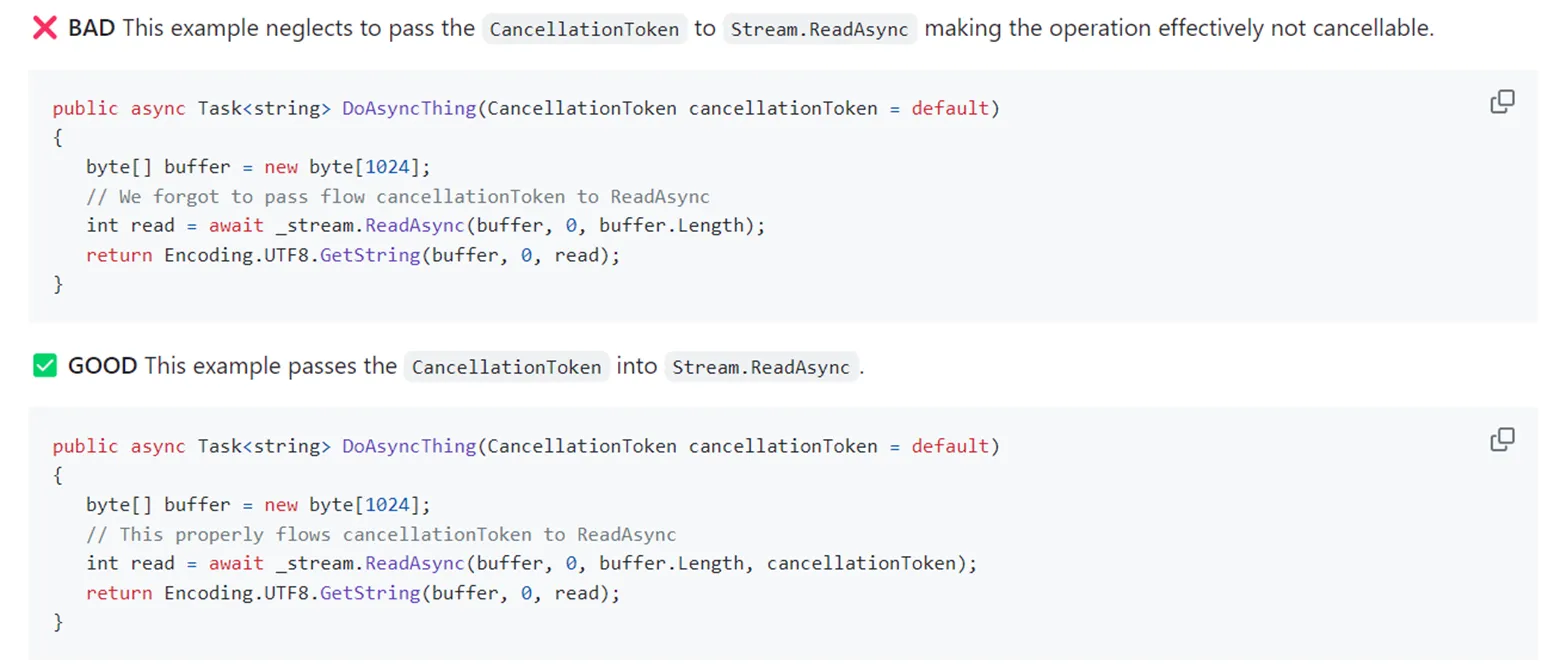
Using cancellation for all methods that may take a long time to complete
Waiting a period of time
If we need to wait for a period of time, for example, to retry checking if a resource becomes available, we should make sure to use await Task.Delay(n) and never use Thread.Sleep(n) in this scenario.
Awaiting completion of multiple async Tasks
Tasks can be combined using static methods provided by the Task class, such as Task.WhenAll and Task.WhenAny. These methods allow you to perform parallel operations, wait for multiple tasks to complete, or continue execution when the first task is completed:
Task.WhenAll: Awaits the completion of all tasks in a given collection and returns a single task containing the results of each completed task. This is useful for performing multiple asynchronous operations concurrently and processing their results when all are completed.Task.WhenAny: Awaits the completion of any task in a given collection and returns the first completed task. This is useful when you have multiple tasks that perform similar operations, and you only need the result of the first one to complete.
Let’s examine the Task.WhenAll command in more depth by using a real-world example. Suppose, we have the below GitHubService class, which contains a method that accepts a GitHub username and calls the GitHub public users API to gain information about that user:
public class GitHubService

{

    private static readonly HttpClient HttpClient = new()

    {

        BaseAddress = new Uri("https://api.github.com/"),

    };


    static GitHubService()

    {

        HttpClient.DefaultRequestHeaders.Add(HeaderNames.Accept, "application/vnd.github.v3+json");

        HttpClient.DefaultRequestHeaders.Add(HeaderNames.UserAgent, $"Medium-Story-{Environment.MachineName}");

    }


    public async Task<GitHubUserInfo?> GetGitHubUserInfoAsyncTask(string username)

    {

        var response = await HttpClient.GetAsync($"/users/{username}");


        if (response.StatusCode == HttpStatusCode.OK)

        {

            return await response.Content.ReadFromJsonAsync<GitHubUserInfo>();

        }


        return default;

    }

}


public record GitHubUserInfo([property: JsonPropertyName("login")] string Username,

    [property: JsonPropertyName("html_url")] string ProfileUrl,

    [property: JsonPropertyName("name")] string Name,

    [property: JsonPropertyName("company")] string Company);
Suppose we have an API endpoint, which accepts a list of GitHub usernames and we would like to call the GitHub API for all of our inputs. One way to do this was to simply iterate over this list and call the GetGitHubUserInfoAsyncTask method for each of them, like we can see below. For simplicity, we will use a simple Console program and we will simulate the list of users by having four different calls to the GitHub API:
class Program

{

    static async Task Main(string[] args)

    {

        var ghSrv = new GitHubService();


        var gitHubUserInfos = new List<GitHubUserInfo?>();


        gitHubUserInfos.Add(await ghSrv.GetGitHubUserInfoAsyncTask("ormikopo1988"));

        gitHubUserInfos.Add(await ghSrv.GetGitHubUserInfoAsyncTask("demo"));

        gitHubUserInfos.Add(await ghSrv.GetGitHubUserInfoAsyncTask("doe"));

        gitHubUserInfos.Add(await ghSrv.GetGitHubUserInfoAsyncTask("string"));


        foreach (var gitHubUserInfo in gitHubUserInfos)

        {

            if (gitHubUserInfo is not null)

            {

                Console.WriteLine($"{gitHubUserInfo.Name} [{gitHubUserInfo.Username}]: {gitHubUserInfo.ProfileUrl}");

            }

        }

    }

}
Here, we are executing the tasks for fetching the GitHub user details in sequence using asynchronous programming. Hence, in this case, each task execution step waits for the previous step to finish without blocking the thread.
Typically, we do such sequential execution in a workflow where each task execution step is dependent on the previous one, unlike the above steps. However, here we are anyway doing it to demonstrate later the performance improvement that we can achieve by executing these tasks in parallel.
So, since the tasks for fetching the different GitHub username details, are independent of each other, it is easy to execute them in parallel to improve the overall performance of the workflow:
class Program

{

    async Task Main(string[] args)

    {

        var ghSrv = new GitHubService();


        var gitHubUserInfosTask = Task.WhenAll(

            ghSrv.GetGitHubUserInfoAsyncTask("ormikopo1988"),

            ghSrv.GetGitHubUserInfoAsyncTask("demo"),

            ghSrv.GetGitHubUserInfoAsyncTask("doe"),

            ghSrv.GetGitHubUserInfoAsyncTask("string")

        );


        for (var i = 0; i < 10000; i++)

        {

            Console.WriteLine("Doing some synchronous work.");

        }


        var gitHubUserInfos = await gitHubUserInfosTask;


        foreach (var gitHubUserInfo in gitHubUserInfos)

        {

            if (gitHubUserInfo is not null)

            {

                Console.WriteLine($"{gitHubUserInfo.Name} [{gitHubUserInfo.Username}]: {gitHubUserInfo.ProfileUrl}");

            }

        }

    }

}
Here, we are not awaiting the Task instances from any of the requested GitHub usernames sequentially, which means that these methods will now return the Task instances instead of the result and will execute in parallel. However, we need to wait for all four tasks to complete their execution before the consolidation of the result. This is achieved by using the WhenAll method from Task Parallel Library.
The Task.WhenAll method creates a Task that will be complete when all the supplied tasks have been completed. Once all four tasks are complete, we await the individual Task instances to derive the result from them.
Note also here, that before actually awaiting the gitHubUserInfosTask to get back the result and continue the code execution flow, we can also execute other synchronous code, like the for loop we can see in the above code sample.
Utilize ValueTask and ValueTask<T>
ValueTask is available from .NET Standard 2.1 and onwards. For previous .NET versions it is available in the System.Threading.Tasks.Extensions nuget package.
As a general rule of thump, we should try to utilize the ValueTask construct anytime a method:
- Might not hit
await most of the times.
- The result that you
await will most of the times be available immediately, thus the method will complete synchronously.
In a future story, we will examine a real-world detailed code example, for when we should consider using ValueTask and the perfomance gains we can take from utilizing it.
Prefer Task.FromResult over Task.Run for pre-computed or trivially computed data
For pre-computed results, there’s no need to call Task.Run, because this will end up queuing a work item to the thread pool, although it will immediately complete with the pre-computed value. Instead, we should use Task.FromResult, to create a task wrapping the already computed value.
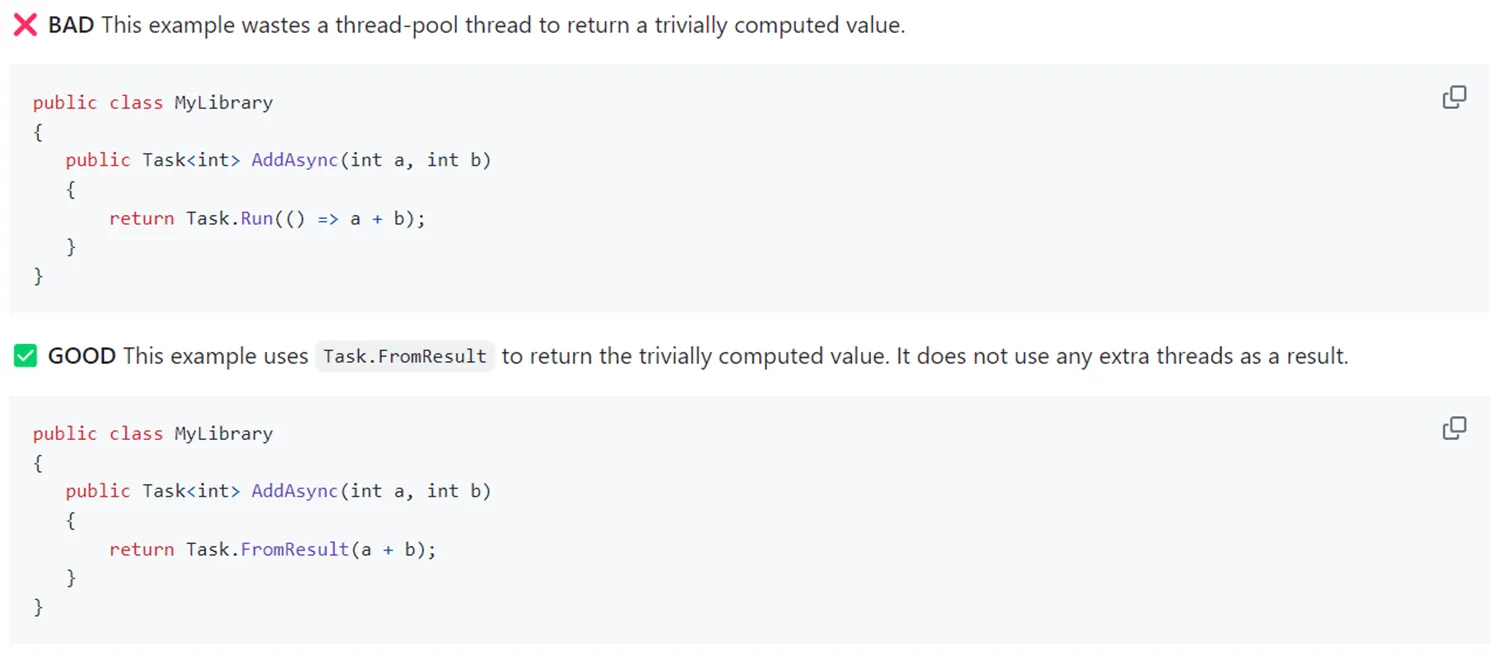
Prefer Task.FromResult over Task.Run for pre-computed or trivially computed data
You can find the code for the above examples here.
Conclusion
Congratulations on completing the “Asynchronous Programming with async and await in C#” series! Throughout this four-part journey, we explored the theory behind async/await, demystified the underlying concepts, delved into various return types for async methods, and finally, discussed best practices to follow when using the async/await pattern in C#.
By following these best practices, you’ll not only write more efficient and maintainable asynchronous code but also minimize the risk of common pitfalls such as deadlocks and unexpected behavior. As you continue your journey with asynchronous programming in C#, remember that the key lies in understanding the principles, and adhering to established best practices.