In this guide, we will learn how to implement Advanced Pagination in ASP.NET Core WebApi with ease. Pagination is one of the most important concepts while building RESTful APIs. You would have seen several public APIs implementing this feature for better user experience and security. We will go in detail and try to build an ASP.NET Core 3.1 WebApi that implements advanced pagination.
The source code for this tutorial is on my Github repo.
What we will be building
Before getting started let’s analyze what we are going to build. This helps you understand our potential requirements and the scope of this Article before hand.
We will build a simple API endpoint that just returns a list of all Customers. But we will make it much cooler and more usable in practical cases by adding a pagination layer to the data. We will add the current page number, page size, the link to the first, last, next, and the previous pages to our API response.
We would be requesting https://localhost:44312/api/customer?**pageNumber=3&pageSize=10** and get a paged response with 10 customer details on page 3. This is what you will be learning in the article.
Seems cool? Let’s start.
What is paging / pagination? Why is it important?
Imagine you have an endpoint in your API that could potentially return millions of records with a single request. Let’s say there are 100s of users that are going to exploit this endpoint by requesting all the data in a single go at the same time. This would nearly kill your server and lead to several issues including security.
An ideal API endpoint would allow it’s consumers to get only a specific number of records in one go. In this way, we are not giving load to our Database Server, the CPU on which the API is hosted, or the network bandwidth. This is a highly crucial feature for any API. especially the public APIs.
Paging or Pagination in a method in which you get paged response. This means that you request with a page number and page size, and the ASP.NET Core WebApi returns exactly what you asked for, nothing more.
By implementing Pagination in your APIs, your Front end Developers would have a really comfortable time in building UIs that do not lag. Such APIs are good for integration by other consumers (MVC, React.js Applications) as the data already comes paginated.
Setting up the ASP.NET Core 3.1 Web API project
For this tutorial, we will work on an ASP.NET Core 3.1 WebAPI along with Entity Framework Core that includes a Customer Controller which returns all the data and data by customer id.
I will skip forward and reach the part where I have a controller that is able to return all the customers (../api/customer/) and also return a customer by id (../api/customer/{id}).
I will be using Visual Studio 2019 Comunity as my IDE. For data access, I am going with Entity Framework Core - Code First Approach using SQL Server Local Db. You can read about implementing EF Core on your APIs here.
Here is my Customer model at Models/Customer.
public class Customer

{

    public int Id { get; set; }

    public string FirstName { get; set; }

    public string LastName { get; set; }

    public string Contact { get; set; }

    public string Email { get; set; }

}
After doing all the required migrations and updating my database, I am still missing out on a crucial part. The Customer data :D I usually use generatedata.com to generate sample data for quick demonstrations. It generates SQL insert snippets / Xls / CSV formatted data collection. Here is how to use this handy utility.
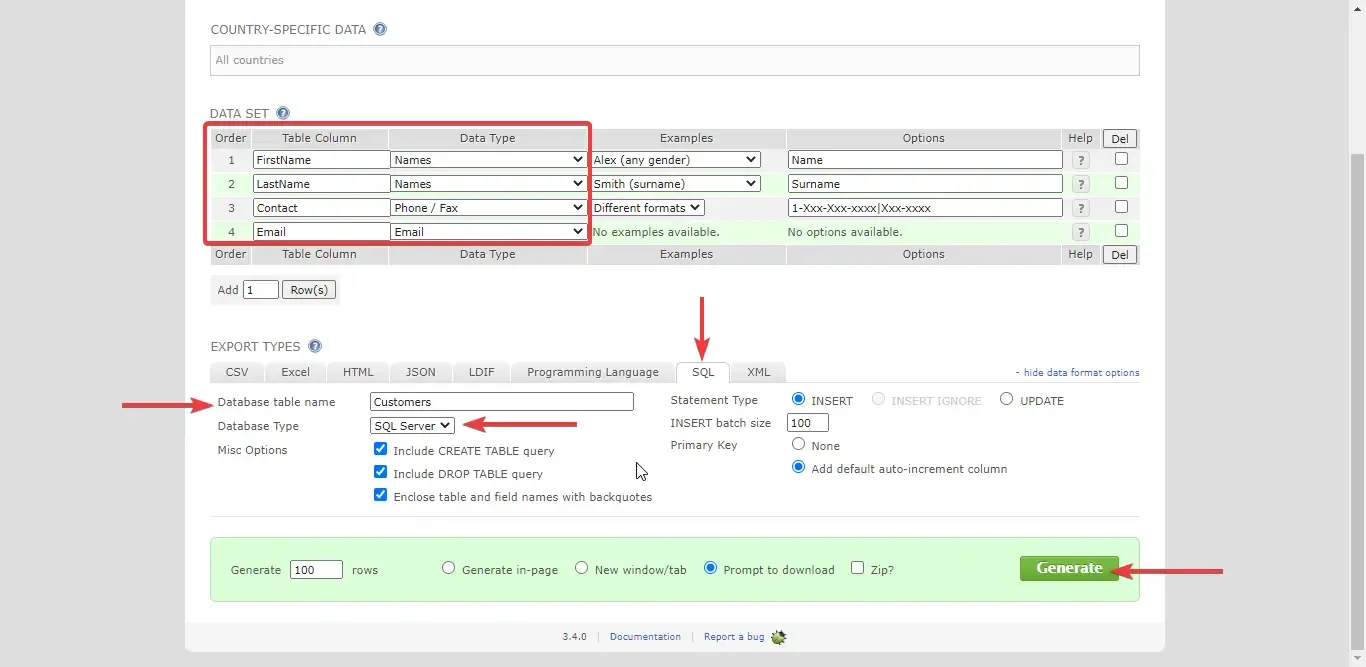
After inserting the data into the customer’s table, let’s run the application. I will be using Chrome Browser to test the data, as it is quite enough for our scenario.
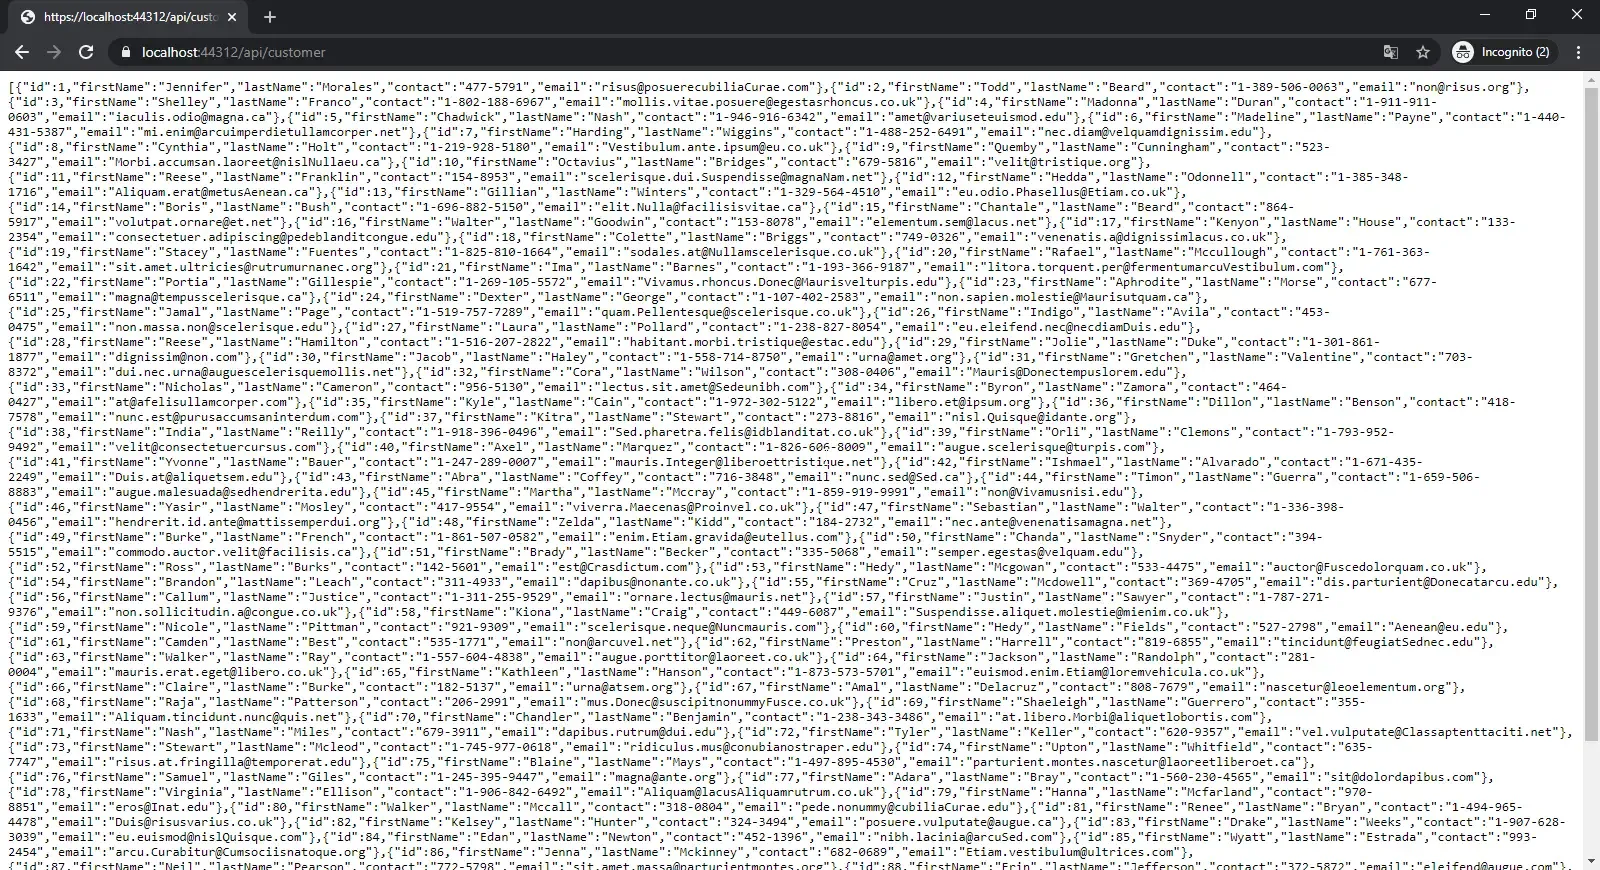
Let’s make this out much more pretty by installing a chrome extension, JSON Formatter. What this extension does is simple. It makes your JSON outputs neat and readable. Get the extension here.
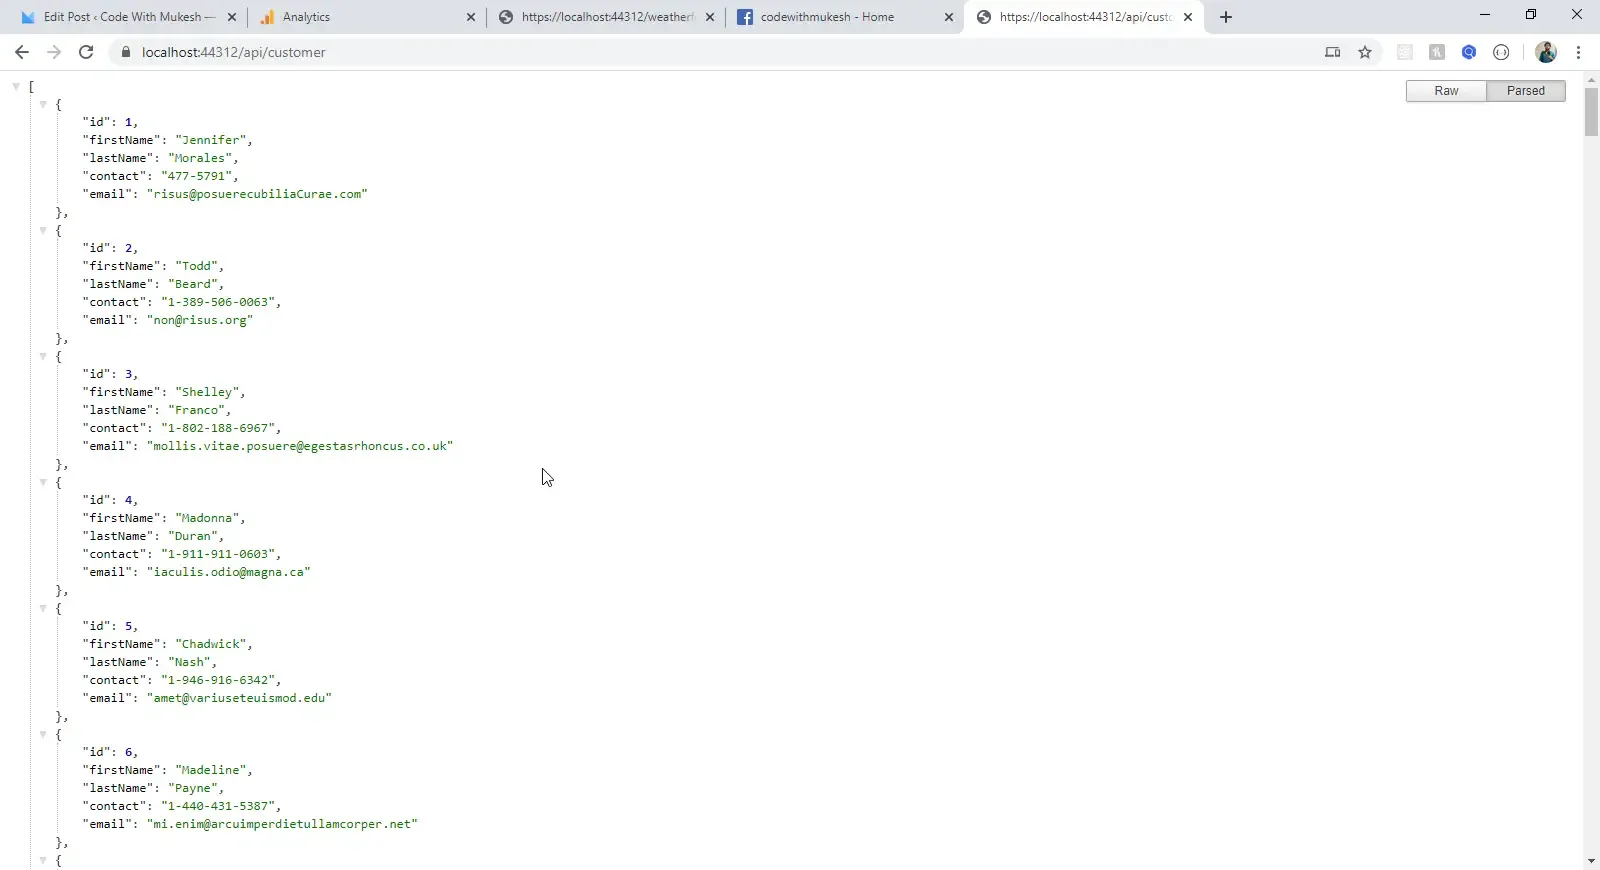
You can see that we are getting all the data from this endpoint. This is exactly what we spoke about earlier. We will transform this endpoint into a paginated one. Let’s begin.
Getting started with pagination in ASP.NET Core Web API
Wrappers for API endpoints
It’s always a good practice to add wrappers to your API response. What is a wrapper? Instead of just returning the data in the response, you have a possibility to return other parameters like error messages, response status, page number, data, page size, and so on. You get the point. So, instead of just returning List<Customer>, we will return Response<List<Customer>>. This would give us more flexibility and data to work with, Right?
Create a new class, Wrappers/Response.cs
public class Response<T>

{

    public Response()

    {

    }


    public Response(T data)

    {

        Succeeded = true;

        Message = string.Empty;

        Errors = null;

        Data = data;

    }


    public T Data { get; set; }

    public bool Succeeded { get; set; }

    public string[] Errors { get; set; }

    public string Message { get; set; }

}
This is a pretty straight forward wrapper class. It can show you the status, the messages or error if any, and the data itself (T). This is how you would ideally want to expose your API endpoints. Let’s modify our CustomerController/GetById method.
[HttpGet("{id}")]

public async Task<IActionResult> GetById(int id)

{

    var customer = await context.Customers.Where(a => a.Id == id).FirstOrDefaultAsync();

    return Ok(new Response<Customer>(customer));

}
Line 4 gets the customer record from our DB for a particular ID.
Line 5 Returns a new wrapper class with customer data.
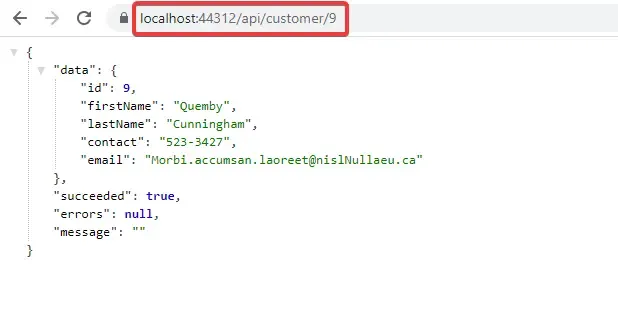
You can see how useful this kind of approach is. Response.cs will be our base class. Now, from our API, we have 2 possibilities of responses, paged data (List of Customers) or a single record with no paged data (Customer by Id).
We will extend the base class by adding pagination properties. Create another class, Wrappers/PagedResponse.cs
public class PagedResponse<T> : Response<T>

{

    public int PageNumber { get; set; }

    public int PageSize { get; set; }

    public Uri FirstPage { get; set; }

    public Uri LastPage { get; set; }

    public int TotalPages { get; set; }

    public int TotalRecords { get; set; }

    public Uri NextPage { get; set; }

    public Uri PreviousPage { get; set; }


    public PagedResponse(T data, int pageNumber, int pageSize)

    {

        this.PageNumber = pageNumber;

        this.PageSize = pageSize;

        this.Data = data;

        this.Message = null;

        this.Succeeded = true;

        this.Errors = null;

    }

}
That’s quite a lot of properties to work with. We have page size, number, Uris of the first page, last page, total page count, and much more. Let’s start working on our Customer Controller.
Customer Controller - GetAll
[HttpGet]

public async Task<IActionResult> GetAll()

{

    var response = await context.Customer.ToListAsync();

    return Ok(response);

}
This is what our CustomerController looked like. We will be modifying this method to accommodate pagination. For starters, we would ideally need the required page parameters on the query string of the request, so that request would like https://localhost:44312/api/customer?**pageNumber=3&pageSize=10**. We will call this model as PaginationFilter.
Pagination filter
Create a new class , Filter/PaginationFilter.cs
public class PaginationFilter

{

    public int PageNumber { get; set; }

    public int PageSize { get; set; }


    public PaginationFilter()

    {

        this.PageNumber = 1;

        this.PageSize = 10;

    }


    public PaginationFilter(int pageNumber, int pageSize)

    {

        this.PageNumber = pageNumber < 1 ? 1 : pageNumber;

        this.PageSize = pageSize > 10 ? 10 : pageSize;

    }

}
Line 12 states that the minimum page number is always set to 1. Line 13 - For this demonstration, we will set our filter such that the maximum page size a user can request for is 10. If he/she requests a page size of 1000, it would default back to 10.
Let’s add this filter to our controller method.
[HttpGet]

public async Task<IActionResult> GetAll([FromQuery] PaginationFilter filter)

{

    var validFilter = new PaginationFilter(filter.PageNumber, filter.PageSize);

    var response = await context.Customer.ToListAsync();

    return Ok(response);

}
Line 2 - Read the Query string on the request for page filter properties.
Line 3 - Validates the filter to a valid filter object (defaulting back to the allowed values). Ps, you would probably want to use a mapper here. But this current approach is fine for our guide.
Paging with Entity Framework Core
This is the core function of the entire implementation, the actual paging. It’s pretty easy with EFCore. Instead of querying the entire list of data from the source. EFCore makes it dead easy to query just a particular set of records, ideal for paging. Here is how you would achieve it.
var pagedData = await context.Customers

               .Skip((validFilter.PageNumber - 1) * validFilter.PageSize)

               .Take(validFilter.PageSize)

               .ToListAsync();
Line 1 accesses the Customer Table.
Line 2 Skips a certain set of records, by the page number * page size.
Line 3 Takes only the required amount of data, set by page size.
Modify the controller as below.
[HttpGet]

public async Task<IActionResult> GetAll([FromQuery] PaginationFilter filter)

{

    var validFilter = new PaginationFilter(filter.PageNumber, filter.PageSize);

    var pagedData = await context.Customers

        .Skip((validFilter.PageNumber - 1) * validFilter.PageSize)

        .Take(validFilter.PageSize)

        .ToListAsync();

    var totalRecords = await context.Customers.CountAsync();

    return Ok(new PagedResponse<List<Customer>>(pagedData, validFilter.PageNumber, validFilter.PageSize));

}
Line 9 - We will be counting the total records for further use.
Line 10 - Wraps the paged data in our PagedResponse Wrapper.
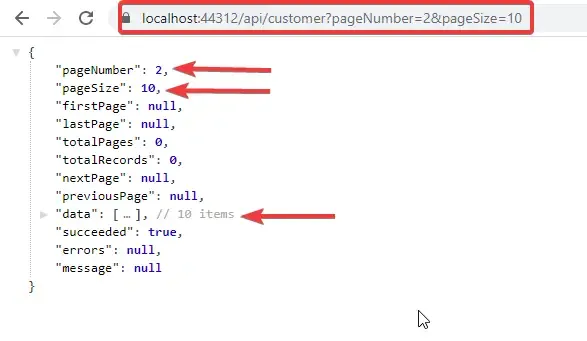
That’s great! We have already implemented basic paging in our ASP.NET Core API. Let’s try to request with a page size larger than 10.
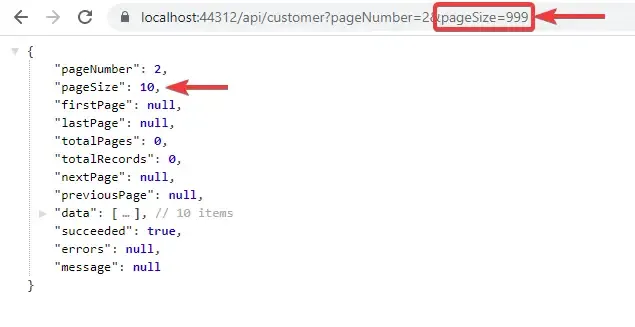
It gets defaulted to 10 :D Now, let’s start adding some advanced features like URL of the next page and so on.
Generating pagination URLs
What are pagination URLs ?
Pagination URLs help the consumer to navigate through the available API Endpoint data with so much ease. Links of the First Page, Last Page, Next page and Previous page are usually the Pagination URLs. Here is a sample response.
"firstPage": "https://localhost:44312/api/customer?pageNumber=1&pageSize=10",

"lastPage": "https://localhost:44312/api/customer?pageNumber=10&pageSize=10",

"nextPage": "https://localhost:44312/api/customer?pageNumber=3&pageSize=10",

"previousPage": "https://localhost:44312/api/customer?pageNumber=1&pageSize=10",
To implement this in our project, we will need a service that has a single responsibility, to build URLs based on the pagination filter passed. Let’s call it UriService.
Create a new Interface, Services/IUriService.cs
public interface IUriService

{

    public Uri GetPageUri(PaginationFilter filter, string route);

}
In this interface, we have a function definition that takes in the pagination Filter and a route string (api/customer). PS, we will have to dynamically build this route string, as we are building it in a way that it can be used by any controller (Product, Invoice, Suppliers, etc etc) and on any host (localhost, api.com, etc). Clean and Efficient Coding is what you have to concentrate on! :D
Add a concrete class, Services/UriServics.cs to implement the above interface.
public class UriService : IUriService

{

    private readonly string _baseUri;

    public UriService(string baseUri)

    {

        _baseUri = baseUri;

    }

    public Uri GetPageUri(PaginationFilter filter, string route)

    {

        var _enpointUri = new Uri(string.Concat(_baseUri, route));

        var modifiedUri = QueryHelpers.AddQueryString(_enpointUri.ToString(), "pageNumber", filter.PageNumber.ToString());

        modifiedUri = QueryHelpers.AddQueryString(modifiedUri, "pageSize", filter.PageSize.ToString());

        return new Uri(modifiedUri);

    }

}
Line 3 - We will be getting the base URL (localhost , api.com , etc) in this string via Dependency Injection from the startup class. I will show it later in this article.
Line 10 - Makes a new Uri from base uri and route string. ( api.com + /api/customer = api.com/api/customer )
Line 11 - Using the QueryHelpers class (built-in), we add a new query string, “pageNumber” to our Uri. (api.com/api/customer?pageNumber={i}) Line 12 - Similarly, we add another query string, “pageSize”.
Configuring the service to get the base URL
public void ConfigureServices(IServiceCollection services)

{

    services.AddDbContext<ApplicationDbContext>(options =>

        options.UseSqlServer(

            Configuration.GetConnectionString("DefaultConnection"),

            b => b.MigrationsAssembly(typeof(ApplicationDbContext).Assembly.FullName)));

    services.AddHttpContextAccessor();

    services.AddSingleton<IUriService>(o =>

    {

        var accessor = o.GetRequiredService<IHttpContextAccessor>();

        var request = accessor.HttpContext.Request;

        var uri = string.Concat(request.Scheme, "://", request.Host.ToUriComponent());

        return new UriService(uri);

    });

    services.AddControllers();

}
Here we get the base URL of the application (https://www.api.com) from the HTTP Request and Context.
Now that our Service class is done, Let’s use this in a helper class to generate required endpoint links.
Pagination Helper
Given the fact that our Controller code is quite increasing by time, Let’s add a new Pagination Helper class so that we can segregate the code much better.
Add a new class, Helpers/PaginationHelper.cs. In this class, we will have a static function that will take in parameters and return a new PagedResponse<List<T>> where T can be any class. Code Reusability, Remember?
public static PagedResponse<List<T>> CreatePagedReponse<T>(List<T> pagedData, PaginationFilter validFilter, int totalRecords, IUriService uriService, string route)

{

    var respose = new PagedResponse<List<T>>(pagedData, validFilter.PageNumber, validFilter.PageSize);

    var totalPages = ((double)totalRecords / (double)validFilter.PageSize);

    int roundedTotalPages = Convert.ToInt32(Math.Ceiling(totalPages));

    respose.NextPage =

        validFilter.PageNumber >= 1 && validFilter.PageNumber < roundedTotalPages

        ? uriService.GetPageUri(new PaginationFilter(validFilter.PageNumber + 1, validFilter.PageSize), route)

        : null;

    respose.PreviousPage =

        validFilter.PageNumber - 1 >= 1 && validFilter.PageNumber <= roundedTotalPages

        ? uriService.GetPageUri(new PaginationFilter(validFilter.PageNumber - 1, validFilter.PageSize), route)

        : null;

    respose.FirstPage = uriService.GetPageUri(new PaginationFilter(1, validFilter.PageSize), route);

    respose.LastPage = uriService.GetPageUri(new PaginationFilter(roundedTotalPages, validFilter.PageSize), route);

    respose.TotalPages = roundedTotalPages;

    respose.TotalRecords = totalRecords;

    return respose;

}
Line 3 - takes in the paged data from EFCore, filter, total record count, URI service object, and route string of the controller. (/api/customer/)
Line 5 - Initializes the Response Object with required params.
Line 6-7 Some basic math functions to calculate the total pages. (total records / pageSize)
Line 8 - We have to generate the next page URL only if a next page exists right? We check if the requested page number is less than the total pages and generate the URI for the next page. if the requested page number is equal to or greater than the total number of available pages, we simply return null.
Line 12 - Similarly, we generate the URL for the previous page.
Line 16-17 - We generate URLs for the First and Last page by using our URIService.
Line 18-19 - Setting the total page and total records to the response object.
Line 20 - Returns the response object.
Now let’s make the last couple of changes to our Controller. We will initially have to inject the IUriService to the constructor of CustomerController.
private readonly ApplicationDbContext context;

private readonly IUriService uriService;


public CustomerController(ApplicationDbContext context, IUriService uriService)

{

    this.context = context;

    this.uriService = uriService;

}


[HttpGet]

public async Task<IActionResult> GetAll([FromQuery] PaginationFilter filter)

{

    var route = Request.Path.Value;

    var validFilter = new PaginationFilter(filter.PageNumber, filter.PageSize);

    var pagedData = await context.Customers

        .Skip((validFilter.PageNumber - 1) * validFilter.PageSize)

        .Take(validFilter.PageSize)

        .ToListAsync();

    var totalRecords = await context.Customers.CountAsync();

    var pagedReponse = PaginationHelper.CreatePagedReponse<Customer>(pagedData, validFilter, totalRecords, uriService, route);

    return Ok(pagedReponse);

}
Line 6 - Injecting the IUriService object to the constructor.
Line 11 - I have mentioned that we need to get the route of the current controller action method (api/customer). Request.Path.Value does it for you. It is this string that we are going to pass to our helper class method. I guess there can be better ways to generate the route of the current request. Let me know about it in the comments section.
Line 18 - Calls the Helper class with required params.
Line 19 - Returns the Paginated Response.
That’s it with the development! :D Let’s build our application and run it.
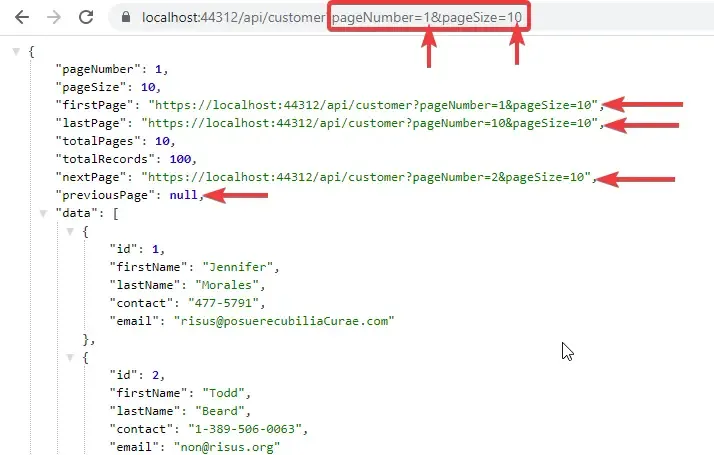
We have requested the first page, ie page number = 1, i.e the Previous page URL is null, as we expected. Let’s go to the last page of this endpoint and check. With the JSONFormatter extension for chrome, it’s easy to navigate through this data. Just click on the Pagination URL and it works!
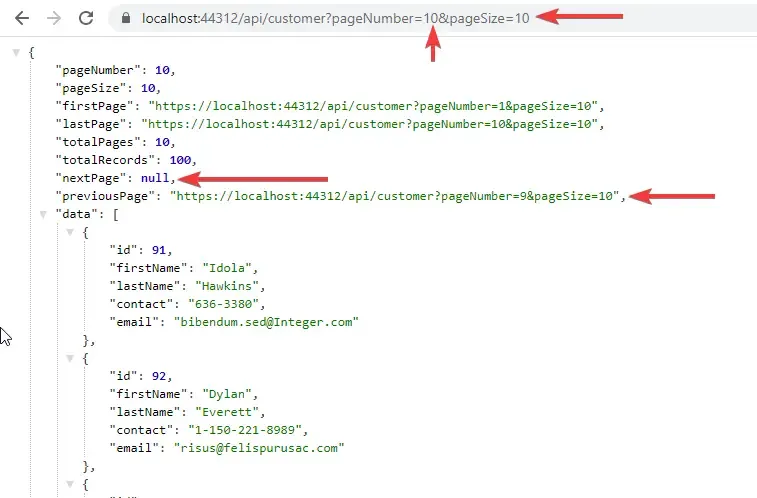
There you go! You can see that the next page is null because we are on the last page. We have built quite an awesome feature into our ASP.NET Core 3.1 API, haven’t we? You should probably implement Pagination in literally all the APIs you are going to work with.
Summary
In this highly detailed guide, we learned how to implement Pagination in ASP.NET Core WebApi. Right from the basics of Pagination like the page number and page size, to the Advanced concepts like Pagination URLs, we have covered everything. You can find the source code of this entire demonstration over at my Github. Do follow me over there as well! I hope you all enjoyed this article.