DAPR is an abbreviation for Distributed APplication Runtime. As the name implies, it’s useful for container-based, distributed architectures. It makes life easier when it comes to:
- Service Discovery. When you deploy multiple instances of your application, then how do you find them? This is where DAPR comes to the rescue.
- It makes your app cloud-agnostic. That’s very convenient if, for example, you use Azure ServiceBus in production but want to use RabbitMQ locally.
- It’s a language-agnostic solution. So you can write parts of your application in Go, others in C#, others in Java, and others in Node.js.
How does it work?
DAPR works with so-called “sidecars”. For each service you have, you need to run a DAPR sidecar beside it. They will locate and communicate with other DAPR sidecars in the network.
A DAPR sidecar has a Rest-API and a gRPC API. Your application invokes them. They relay the requests to wherever they need to go. To invoke the sidecar’s APIs, there’s a DAPR NuGet Package you can install.
This is what a DAPR landscape might look like:
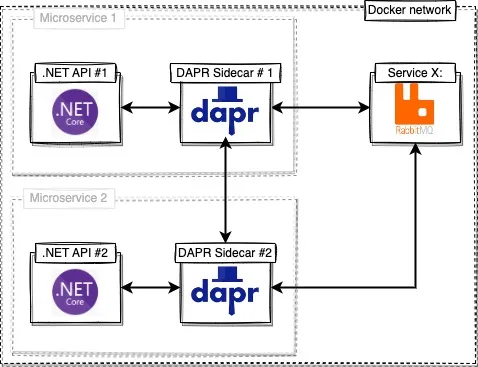
Figure 1: DAPR and the sidecar pattern
Service-to-service communication with DAPR and .NET
DAPR is useful in a couple of scenarios. A common one is service-to-service communication in a distributed environment.
If you want to implement service-to-service communication with DAPR you need to understand how a request from API #1 (see picture) ends up being processed by API #2.
DAPR supports communication via gRPC and via HTTP(s). You can configure it in whatever way you like. But it is important to realize what knobs and buttons DAPR has. When you invoke a request (via DAPR) from .NET API #1 to .NET API #2, this is what happens:

Figure 2: The protocols
Note there’s an important difference between communication between API to sidecar and sidecar to API.
- In this example, traffic from the API to the sidecar uses gRPC.
- Traffic from the sidecar to the API uses HTTPS.
Just defining what protocol a sidecar has to use doesn’t cut it. DAPR is meant to be used on a bigger scale. A realistic scenario will contain several APIs and services, and thus various DAPR sidecars will run in the cluster. Somehow they need to be able to find each other. This is a more realistic scenario:
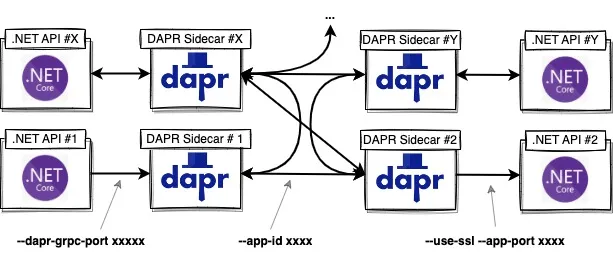
Figure 3: What to configure to make it work
To make communication between different services work, you’ll need to tell DAPR:
- How to communicate with the sidecar:
--dapr-grpc-port xxxxx
- How the sidecar should communicate with your app:
--use-ssl --app-port xxxx
- What name the service is referred to by other services, in other words: how to find each other:
--app-id xxxxxx
Getting started
Conceptually, that’s pretty much all you need to understand. To get it working, you need to do the following:
- Step 1: Install the DAPR CLI and initialize DAPR.
- Step 2: Create a
dotnet new webapi.
- Step 3: Use the
Dapr.AspNetCore NuGet package to interact with the sidecar.
- (Step 4: Test it locally).
- Step 5 Deploy to Azure Container Apps.
- Step 5.1 Containerize your apps and push them to your container registry.
- Step 5.2 Create container apps for each of them.
- Step 5.2 Enable and configure DAPR on the container apps.
- That’s it... Have fun!
Prerequisites
- You need to have Docker installed on your machine.
- You need to have .NET 6 installed on your machine.
- Azure Container Apps set-up in Azure.
- You need an Azure Container Registry in your subscription.
Step 1: Install the DAPR CLI and initialize DAPR
Use your favorite package manager to install the DAPR CLI on your machine. Are you using Windows?
winget install Dapr.CLI

dapr init
or MacOs:
brew install dapr/tap/dapr-cli

dapr init
Now, when you type ‘dapr’ in your console, you’ll get the following response:
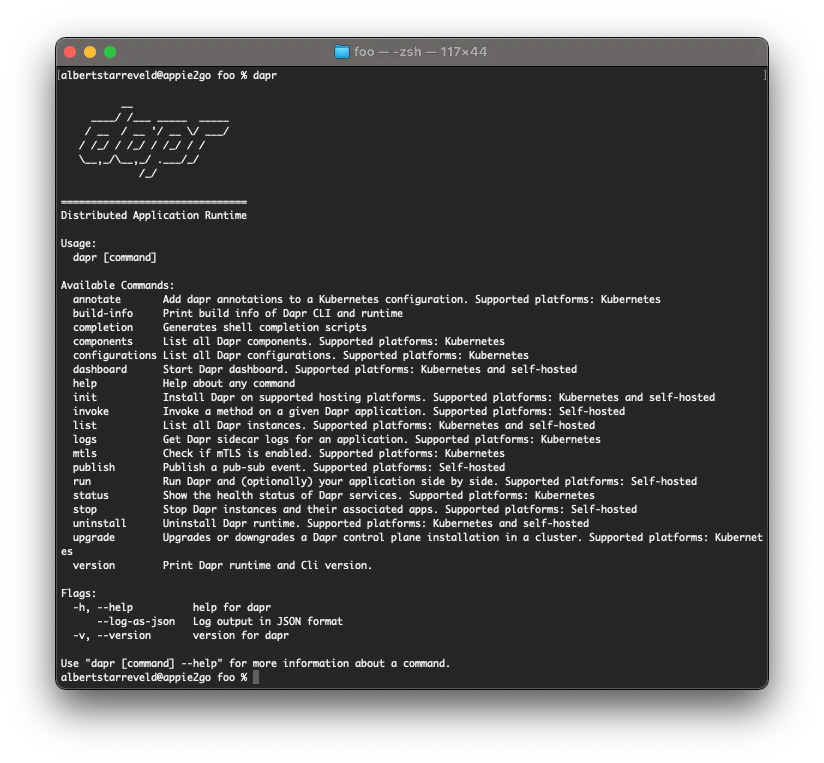
Figure 2: DAPR CLI
And when you open your Docker dashboard you’ll see three containers spun up:
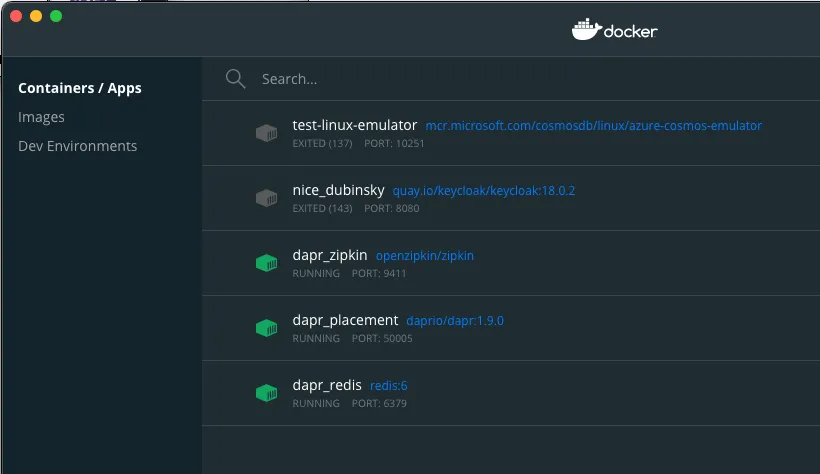
Figure 3: The containers the DAPR CLI spun up
Step 2: Create an API
mkdir appIdApi1

cd appIdApi1dot


net new webapi
Step 3: Use the DAPR NuGet packages to interact with the sidecar
First, add the Dapr.AspNetCore NuGet package to your project:
dotnet add package Dapr.AspNetCore
And use it to invoke another DAPR service:
using var client = new DaprClientBuilder().Build();


var result = client.CreateInvokeMethodRequest(HttpMethod.Get, "appIdApi2", $"foo/{bar}");

using var response = await client.InvokeMethodWithResponseAsync(result);


switch (response.StatusCode)

{

    case HttpStatusCode.NotFound: return false;

    case HttpStatusCode.OK: return true;

    default:

        var body = await response.Content.ReadAsStringAsync();

        throw new ApplicationException("Unable to execute service-to-service request", new Exception(body));

}
Step 4: Test it locally
This is probably the hardest part…
After you’ve installed and initialized DAPR locally, all there is to it is to pull up a console. Navigate to the location of the *.csproj of .NET API #1 and run the following command:
dapr run --app-id appIdApi1 --app-ssl --app-port 7183 --dapr-grpc-

port 60001 dotnet run
Why you should run the command with these parameters is explained in figure 3. Why magic app-port 7183? In my case, port 7183 is the port that is defined in launchsettings.json. It’s the HTTP-port you would normally use to test your API using dotnet run.
For .NET API #2, execute the following command:
dapr run --app-id appIdApi2 --app-ssl --app-port 7299 --dapr-grpc-

port 60002 dotnet run
The command line will show you where to invoke/test your API:
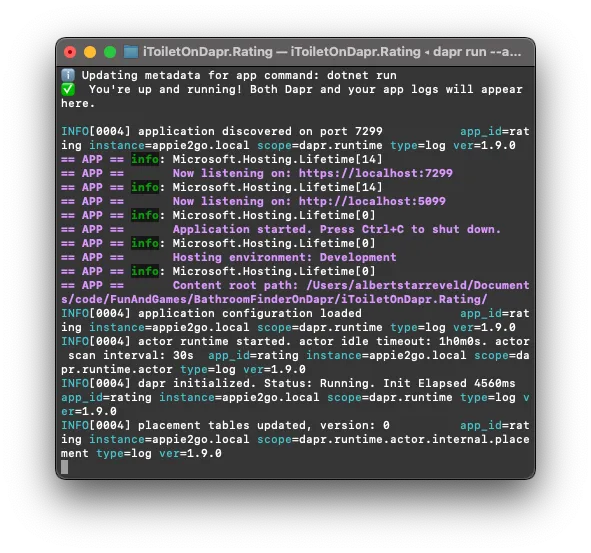
Figure 4: The ports DAPR uses
In this case, you can test the API via https://localhost:7299/swagger/index.html
Step 5: Deploy to Azure Container Apps
To deploy your application to Azure Container Apps, you’ll need to do a couple of things:
- Containerize your APIs and upload them to the container registry.
- Create Container Apps for all of them.
- Enable and configure DAPR on Azure container apps.
Step 5.1: Containerize the APIs and push them to the container registry
To containerize an API, create a Dockerfile next to your .csproj file. The simplest possible Dockerfile might look like this:
FROM mcr.microsoft.com/dotnet/aspnet:6.0 AS base

WORKDIR /app

EXPOSE 80

EXPOSE 443


FROM mcr.microsoft.com/dotnet/sdk:6.0 AS build

WORKDIR /src

COPY ["dotnetapi1.csproj", "."]

RUN dotnet restore "dotnetapi1.csproj"

COPY . .

WORKDIR "/src"

RUN dotnet build "dotnetapi1.csproj" -c Release -o /app/build


FROM build AS publish

RUN dotnet publish "dotnetapi1.csproj" -c Release -o /app/publish


FROM base AS final

WORKDIR /app

COPY --from=publish /app/publish .

ENTRYPOINT ["dotnet", "dotnetapi1.dll"]
Next, you need to build the image and push it to the repository. Open a console or a terminal and navigate to the location of the .csproj file. Type:
# build the docker image

docker build -t dotnetapi1:1.0 .


# link the image to the repository in the container registry

# (if the repository doesn't exist, docker will create it for you)

docker tag dotnetapi1:1.0 yourcontainerregistry.azurecr.io/dotnetapi


# log in

docker login yourcontainerregistry.azurecr.io


# push to registry/repository

docker push yourcontainerregistry.azurecr.io/dotnetapi
Repeat this step for all APIs (obviously...).
5.2 Create a Container App
Assuming you already have an Azure Container Apps Environment, go to Azure Container Apps and create a new Container App:
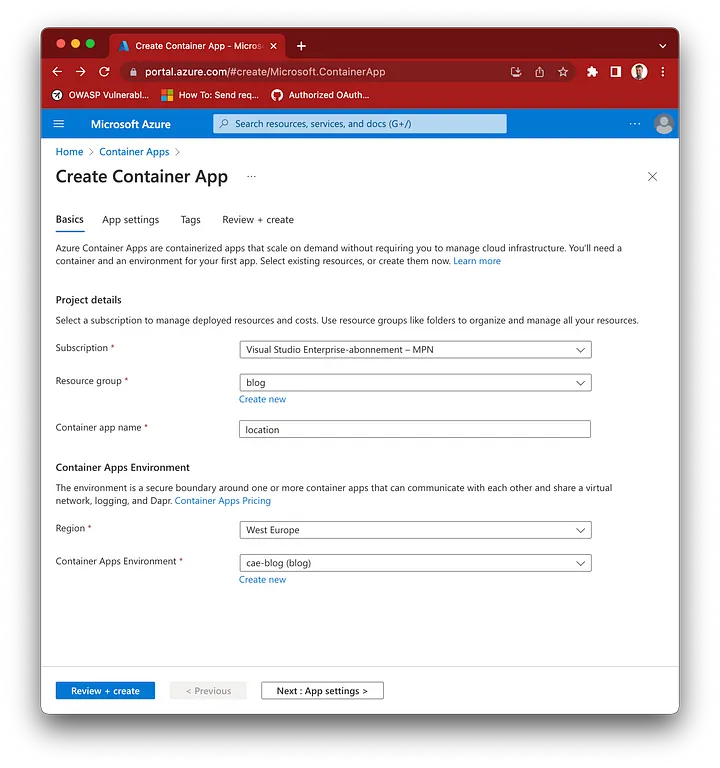
Figure 5: Create a new container instance
After the deployment is complete, go to the resource. In the menu pane on the left, go to “Application” > “Revision management”. Next, click “Create and deploy new revision.”. Delete the default simple-hello-world revision and create your own. Select the docker image from your Azure Container Registry:
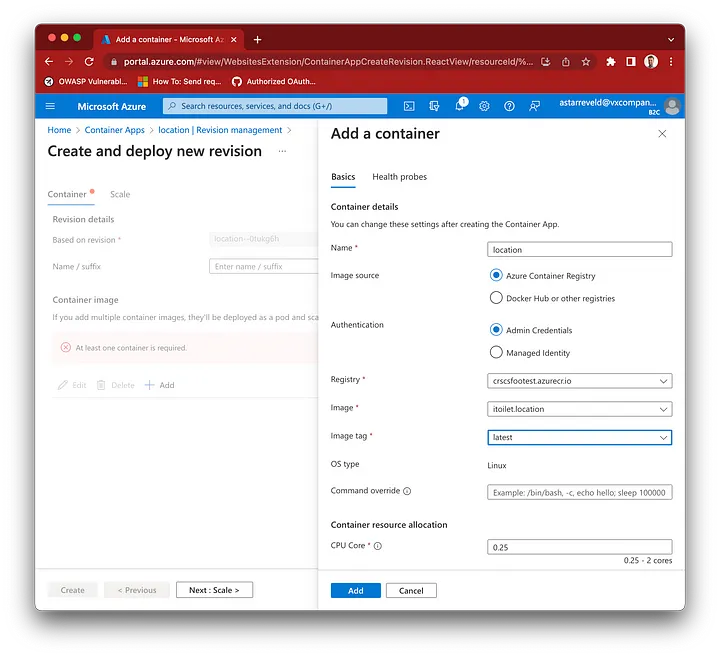
Figure 6: Create a new revision
Now, under settings, go to the DAPR. Here’s what you need to do to configure it:
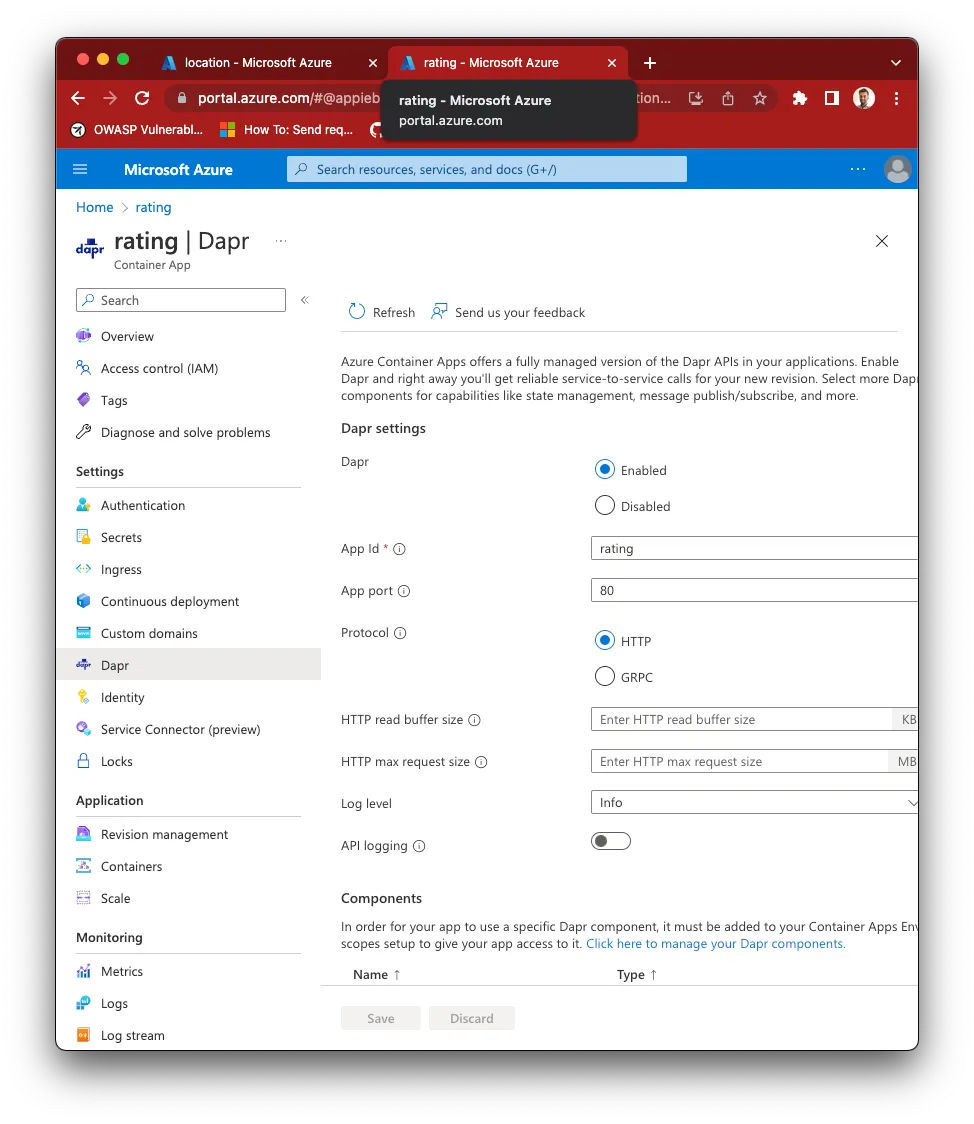
Figure 7: Configure DAPR
5.3 That’s all there is to it, really…
When you’ve completed these steps, you should be able to invoke another service using DAPR.
Check out the full sample app on GitHub. It’s a nonsense app that you can use to locate free toilets. There are two services: the locations service and the rating service. Ratings can only be created if the toilet location exists. This is what it uses DAPR for.
This app demonstrates how you can put this blog into practice.
Check it out here: https://github.com/appie2go/iToiletOnDapr
Useful links: