In this article, we will learn about Using Entity Framework Core and Dapper in ASP.NET Core together in the same application. Another major point of discussion will be Transactions. By the end of the article, we will have an application that works with both Entity Framework Core and Dapper alongside each other, but also intelligent enough to rollback data whenever there is an exception with the process.
We will also take a look at ThrowR, a simple Library for .NET Core that can make your code clean and readable by eliminating the use of IF Clauses unnecessarily. Let’s get started!
Dapper vs Entity Framework Core
Dapper is literally much faster than Entity Framework Core considering the fact that there are no bells and whistles in Dapper. It is a straight forward Micro ORM that has minimal features as well. It is always up to the developer to choose between these 2 Awesome Data Access Technologies. This does not mean that Entity Framework Core is any slower. With every update, the performance seems to be improving as well. Dapper is heaven for those who still like to work with RAW Queries rather than LINQ with EFCore.
Now, Entity Framework Core has tons of features included along with performance improvements as well. So that question is, Why choose between Dapper and Entity Framework Core when you can use both and take maximum advantage, yeah?
Dapper is super awesome to handle complex queries that sport multiple joins and some real long business logic. Entity Framework Core is great for class generation, object tracking, mapping to multiple nested classes, and quite a lot more. So it’s usually Performance and Features when talking about these 2 ORMs.
Requirement
We will design a simple ASP.NET Core WebAPI for an Imaginary Company. This company has a policy that says every other Employee has to be linked to a unique Department. To be more clear, every time you add a new employee via the API endpoint, you have to create a new Department Record as well. A very imaginary requirement, yeah? 😀 Along with this, we will have 2 other endpoints that return all Employees and Employee by Id.
Expanding on the details, we will have to ensure the newly added Department does not already exist. You will get a grasp of this once you get to see the Domain Entities.
To demonstrate the usage of Dapper, Entity Framework Core, and both combined, we will implement them each in the 3 Endpoints. For the GetAll Endpoints, we will use Dapper. The GetById Endpoint would use Entity Framework Core with Eager Loading to display the Department Details as well. And finally, the POST Endpoint would take advantage of both these awesome Data Access Technologies and Cleanly Demonstrate Transactions in ASP.NET Core.
Along the way, we will get introduced to few Libraries for ASP.NET Core that could probably save you some development time as well.
Important Aspect to Handle – Transactions
Now, according to our requirement, we need both Entity Framework Core and Dapper to work alongside each other. This is quite easy to achieve actually. But the important detail to take care of is that we need to ensure that both Entity Framework Core and Dapper should participate in the same DB Transaction so that the overall process can be robust.
For example, a particular Write Operation can involve multiple entities and tables. This in turn can have operations that are easy to be handled by Entity Framework Core, and let’s say a bunch of complex Queries that are meant to be executed by Dapper. In such cases, we must make sure that it should be possible to rollback the SQL Execute operation when any operation/query fails. Makes sense? This is the aspect that can introduce a small complexity to our system design.
If we are not considering this, the overall process would be so straightforward. Let me put the idea into steps.
- 1. Configure Entity Framework Core.
- 2. Configure Dapper. You can achieve this by using the same connection string that is being used by EFCore as well. (Obviously, from appsettings.json)
- 3. Register the services into the Container and start using the Context / Dapper as required.
But we will go for a more complex and futureproof mechanism that will handle really everything including Rollbacks and Transactions. Get it?
Using Entity Framework Core and Dapper in ASP.NET Core
Setting up the Solution and Projects
We will follow an Onion Architecture as usual to form a clean separation of concerns. Firstly, Open up Visual Studio 2019 and Create a new Blank Solution. Here we will add 4 new Projects namely Domain, Persistence and WebApi. The Domain and the Persistence Projects are .NET Core Class Library while the WebApi is an ASP.NET Core 3.1 Web Application with the API Template selected.
The Domain Project will consist only of the Core Domain Entities and Interfaces. The Persistence Layer should have the Implementation of the Interfaces, Services and everything related to Entity Framework Core and Dapper. Finally, the WebApi Project would have the API Endpoints.
Please note that this is a very minimal implementation of Onion / Hexagonal Architecture. For a much more detailed tutorial on the Architecture, refer to this article – Onion Architecture In ASP.NET Core With CQRS – Detailed
Building on the details that you learned from the above-mentioned article, here is a complete implementation of Clean Architecture in ASP.NET Core WebAPI available as a Boilerplate Template to get you started in no time – ASP.NET Core WebAPI – Clean Architecture (Open Source Project)
Now, let’s start installing all the required packages for each project.
Packages for Domain Project
It’s quite clear that Domain Project should NEVER depend on anything else. But since we are combing both the Domain and Application layer into a single entity, and for the reason to keep things simple, let’s install these 2 packages over to the Domain Project.
Install-Package CoreEssentials.Abstractions

Install-Package Microsoft.EntityFrameworkCore
CoreEssentials.Abstractions is a package that has a few Abstract classes like BaseEntity and AuditableBaseEntity which can help you reduce development time by a bit. This is a part of my DotNetCore NuGet Package collection. You can find the entire source code of all the packages here.
Packages for Persistence Project
As mentioned earlier, everything related to the Infrastructure / Persistence of the Solution will be placed in this Project. Go ahead and install the following packages to the Persistence Project.
Install-Package Dapper

Install-Package Microsoft.EntityFrameworkCore.Design

Install-Package Microsoft.EntityFrameworkCore.SqlServer

Install-Package Microsoft.EntityFrameworkCore.Relational

Install-Package System.Data.SqlClient
Packages for the WebApi Project
Finally, add these packages to the WebAPI Project.
Install-Package CoreEssentials.ThrowR

Install-Package Microsoft.EntityFrameworkCore.Tools
CoreEssentials.ThrowR is yet another part of the DotNetCore NuGet Package Family. It is basically a small helper class that can reduce your null-checks and other validations to just 1 line of code throwing the required exception as needed. We will talk about it later in the article.
Adding the Domain Entities
Navigate to the Domain Project and create a new Folder Entities and add these 2 classes to it, Employee and Department. Note that it is necessary to use the CoreEssentials.Abstractions reference in order to use the BaseEntity Abstract class.
using CoreEssentials.Abstractions;

namespace Domain.Entities

{

    public class Department : BaseEntity

    {

        public string Name { get; set; }

        public string Description { get; set; }

    }

}
using CoreEssentials.Abstractions;

namespace Domain.Entities

{

    public class Employee : BaseEntity

    {

        public string Name { get; set; }

        public string Email { get; set; }

        public int DepartmentId { get; set; }

        public Department Department { get; set; }

    }

}
Designing the Interfaces
Again, within the Domain Project add another folder, Interfaces. Here are using the concept of Dependency Inversion, so that the system does not care about the implementation and is only responsible for providing the Contract on what it actually wants. With this approach, it is easier to design clean and simple systems that are very ideal for Testing as well. In this way, The Core of the Solution does not depend on anything like Entity Framework or Dapper, rather it makes it easy for us to switch to different technologies as well.
Let’s add our first Interface, IApplicationDbContext.cs which is meant to be implemented at the Persistence Layer using Entity Framework Core.
public interface IApplicationDbContext

{

    public IDbConnection Connection { get; }

    DatabaseFacade Database { get; }

    public DbSet<Employee> Employees { get; set; }

    public DbSet<Department> Departments { get; set; }

    Task<int> SaveChangesAsync(CancellationToken cancellationToken);

}
Here you can see that we are using 2 new properties, IDbConnection and DbFacade . This is just a direct access to the Database which will be used by Dapper later. Remember, we spoke about making both EFCore and Dapper work alongside with each other?
Next, let’s add 2 more interfaces that are specifically meant for Read and Write. The Read Interface will have the contracts to only run Queries against the database. while the Write Interface will be full blown package.
Note that we are also using IDbTransaction which will come in handy when we start dealing with Transactions later in this article.
public interface IApplicationReadDbConnection

{

    Task<IReadOnlyList<T>> QueryAsync<T>(string sql, object param = null, IDbTransaction transaction = null, CancellationToken cancellationToken = default);

    Task<T> QueryFirstOrDefaultAsync<T>(string sql, object param = null, IDbTransaction transaction = null, CancellationToken cancellationToken = default);

    Task<T> QuerySingleAsync<T>(string sql, object param = null, IDbTransaction transaction = null, CancellationToken cancellationToken = default);

}
public interface IApplicationWriteDbConnection : IApplicationReadDbConnection

{

    Task<int> ExecuteAsync(string sql, object param = null, IDbTransaction transaction = null, CancellationToken cancellationToken = default);

}
That’s almost everything we need to do with the Domain Project. Let’s start the implementations now.
Setting up EntityFrameworkCore
In the Persistence Project let’s add a new Folder Contexts, and add in the ApplicationDbContext.cs file.
public class ApplicationDbContext : DbContext, IApplicationDbContext

{

    public ApplicationDbContext(DbContextOptions<ApplicationDbContext> options) : base(options)

    {

    }

    public DbSet<Employee> Employees { get; set; }

    public DbSet<Department> Departments { get; set; }

    public IDbConnection Connection => Database.GetDbConnection();

}
You can see that, at Line 8 (public IDbConnection) we are extracting the Connection object from Entity Framework Core instance.
To learn about Entity Framework Core in detail, please refer to the following article – Entity Framework Core in ASP.NET Core 3.1 – Getting Started
Setting up Dapper
Now, in the Persistence project add another folder and name it Connections. Both are Read and Write Interfaces will be implemented here. Add the following classes.
public class ApplicationReadDbConnection : IApplicationReadDbConnection, IDisposable

{

    private readonly IDbConnection connection;

    public ApplicationReadDbConnection(IConfiguration configuration)

    {

        connection = new SqlConnection(configuration.GetConnectionString("DefaultConnection"));

    }

    public async Task<IReadOnlyList<T>> QueryAsync<T>(string sql, object param = null, IDbTransaction transaction = null, CancellationToken cancellationToken = default)

    {

        return (await connection.QueryAsync<T>(sql, param, transaction)).AsList();

    }

    public async Task<T> QueryFirstOrDefaultAsync<T>(string sql, object param = null, IDbTransaction transaction = null, CancellationToken cancellationToken = default)

    {

        return await connection.QueryFirstOrDefaultAsync<T>(sql, param, transaction);

    }

    public async Task<T> QuerySingleAsync<T>(string sql, object param = null, IDbTransaction transaction = null, CancellationToken cancellationToken = default)

    {

        return await connection.QuerySingleAsync<T>(sql, param, transaction);

    }

    public void Dispose()

    {

        connection.Dispose();

    }

}
Make sure that you are implementing the IDisposible interface too.
At the constructor you can see that we are initializing a new Connection using the connection string from our appSettings.json. Note that in this implementation, there is no link with any DBContext object (Entity Framework Core) because it really doesn’t make sense to share the connections between Entity Framework Core and Dapper when you are reading the data.
The use case of sharing the connection comes into picture when there is data write involved. Let’s see how it is implemented.
public class ApplicationWriteDbConnection : IApplicationWriteDbConnection

{

    private readonly IApplicationDbContext context;

    public ApplicationWriteDbConnection(IApplicationDbContext context)

    {

        this.context = context;

    }

    public async Task<int> ExecuteAsync(string sql, object param = null, IDbTransaction transaction = null, CancellationToken cancellationToken = default)

    {

        return await context.Connection.ExecuteAsync(sql, param, transaction);

    }

    public async Task<IReadOnlyList<T>> QueryAsync<T>(string sql, object param = null, IDbTransaction transaction = null, CancellationToken cancellationToken = default)

    {

        return (await context.Connection.QueryAsync<T>(sql, param, transaction)).AsList();

    }

    public async Task<T> QueryFirstOrDefaultAsync<T>(string sql, object param = null, IDbTransaction transaction = null, CancellationToken cancellationToken = default)

    {

        return await context.Connection.QueryFirstOrDefaultAsync<T>(sql, param, transaction);

    }

    public async Task<T> QuerySingleAsync<T>(string sql, object param = null, IDbTransaction transaction = null, CancellationToken cancellationToken = default)

    {

        return await context.Connection.QuerySingleAsync<T>(sql, param, transaction);

    }

}
In the write implemented, we really have a full blown Connection implementation with both Read and Write Functionalities. You could avoid the Read Functionality as well. But it depends on your preference.
You can see that we are injecting the IApplicationDbContext which belong to the Entity Framework into the Constructor. This is how we can share the connection and transaction. Using the context’s connection, we perform the read and write operations using Dapper. Pretty cool, yeah?
In the Read implementation we were directly working with IDbConnection object that we initialized in the constructor using the connection string. While, here in the Write implementation we are re-using the context object to execute queries and commands with the help of Dapper.
To learn about Dapper in detail, please refer to the following article – Dapper in ASP.NET Core with Repository Pattern – Detailed
Adding the Connection String
Open up your appsettings.json and add your connection string.
"ConnectionStrings": {

    "DefaultConnection": "Data Source=LAPTOP-7CS9KHVQ;Initial Catalog=demoDb;Integrated Security=True;MultipleActiveResultSets=True"

},
Registering the Services
Finally, let’s register these interfaces and classes into the service container of our ASP.NET Core Web Application. Open your Startup.cs in the WebAPI Project and modify your ConfigureServices as follows.
public void ConfigureServices(IServiceCollection services)

{

    services.AddDbContext<ApplicationDbContext>(options =>

        options.UseSqlServer(Configuration.GetConnectionString("DefaultConnection"))

    );

    services.AddScoped<IApplicationDbContext>(provider => provider.GetService<ApplicationDbContext>());

    services.AddScoped<IApplicationWriteDbConnection, ApplicationWriteDbConnection>();

    services.AddScoped<IApplicationReadDbConnection, ApplicationReadDbConnection>();

    services.AddControllers();

}
Adding Migrations and Updating the Database
Right click the WebAPI Project and ensure that it is set as the Startup Project of the solution. Next open up the Package Manager Console and set the default project to Infrastrcture from the dropdown menu.
Enter in the following to add the migrations and to update the database with the Employee and Department Tables.
add-migration initial

update-database
Wiring up with the Controller
As we have taken care of all the heavy lifting, let’s build our controller with the 3 mentioned endpoints. Add a new Controller under the Controllers folder and name it Employee Controller.
Let’s inject all the 3 interfaces we had created earlier to the Constructor of the Controller. Ideally you would be using a Service Layer or CQRS Pattern to do this. But again, to keep things simple, we will declare the Injections here.
If you are interested to learn about CQRS Implementation in ASP.NET Core with MediatR library, refer to this detailed article – CQRS with MediatR in ASP.NET Core 3.1 – Ultimate Guide
public EmployeeController(IApplicationDbContext dbContext, IApplicationReadDbConnection readDbConnection, IApplicationWriteDbConnection writeDbConnection)

{

    _dbContext = dbContext;

    _readDbConnection = readDbConnection;

    _writeDbConnection = writeDbConnection;

}

public IApplicationDbContext _dbContext { get; }

public IApplicationReadDbConnection _readDbConnection { get; }

public IApplicationWriteDbConnection _writeDbConnection { get; }
Let’s get started with the endpoints as per as our requirements.
Get All Employees
First is a simple endpoint that is going to return all the available Employee from the database. We will use Dapper for this, hence we will make use of the _readDbConnection, makes sense?
[HttpGet]

public async Task<IActionResult> GetAllEmployees()

{

    var query = $"SELECT * FROM Employees";

    var employees = await _readDbConnection.QueryAsync<Employee>(query);

    return Ok(employees);

}
Before executing, let me add some dummy data to our tables.
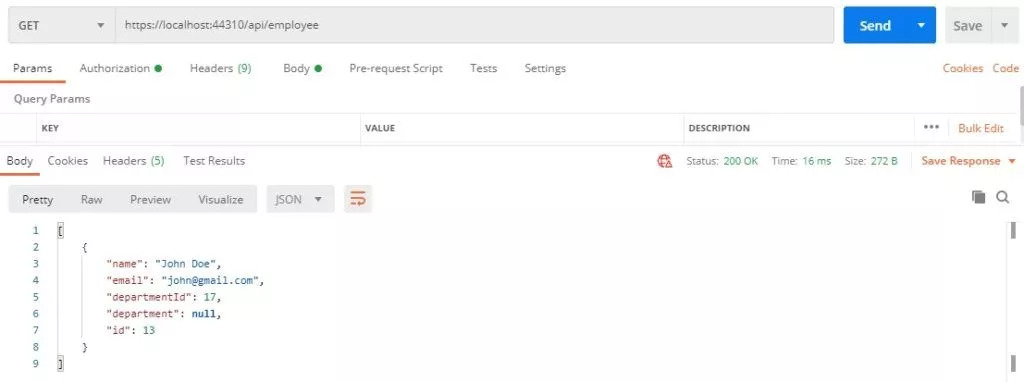
Once data is added, let’s run our application and open up POSTMAN. Send a GET request to the api/employee endpoint. This would return the list of available employees from the database. Remember this is by Dapper. The Query execution time is always meant to be much better than other ORMs. But the main point to note is that dapper ideally returns the data at a flat level. It is not powerful enough to fill the child nested objects. You can see that the Department is NULL.
That being said, you can still achieve this by Dapper but by adding a lot more code than you ideally would., probably by multiple queries. This is the Margin where you have to choose between Dapper and Entity Framework Core. EFCore on the other hand can pull this off with really no extra code. We will see about it in the next Endpoint.
Get Employee By Id
Let’s add an endpoint that can return a Employee based on the Id. We will make use of the _dbContext object for this endpoint. We are also introducing Eager Loading by Entity Framework Core that can fill in the nested child object with ease.
[HttpGet("{id}")]

public async Task<IActionResult> GetAllEmployeesById(int id)

{

    var employees = await _dbContext.Employees.Include(a => a.Department).Where(a => a.Id == id).ToListAsync();

    return Ok(employees);

}
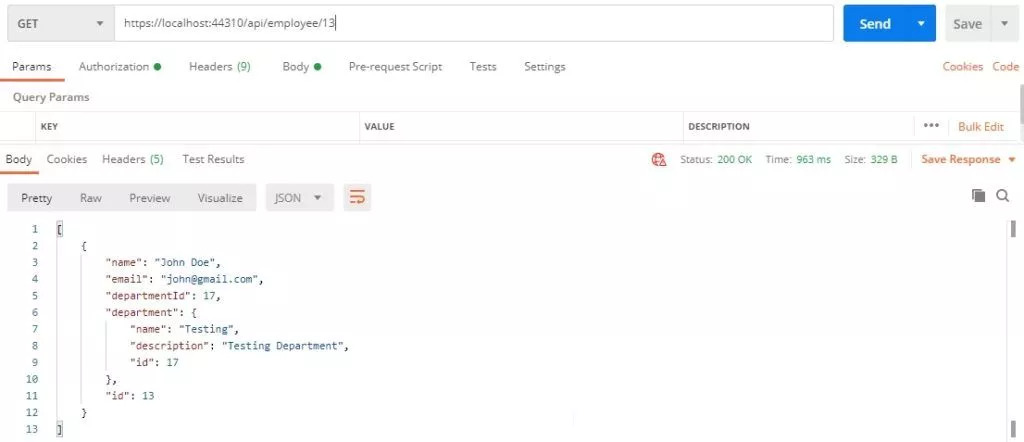
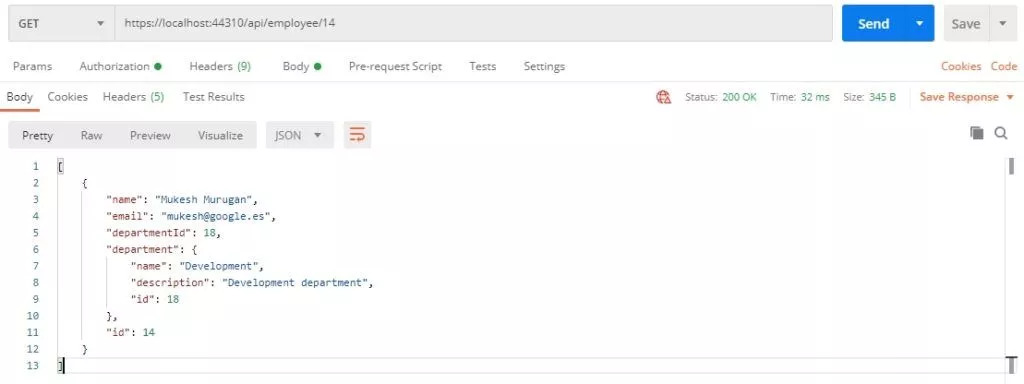
Now you can see that we are getting the Department details as well.
Create Employee and Department in One Go
Finally , let’s work on a bit more complex endpoint. Here is the formulated algortihm as per the requirement.
- Accept a DTO Class that contains data of the New Employee and the New Department as parameters
- Make sure that you are using the Same Transaction and Dapper / Entity Framework Core
- Check if the Department name already exists. Throw an exception if the department exists.
- Insert the department details into the Department Table.
- Return the Department ID
- Insert the Employee details into the Employees table along with the generated department Id.
- Return the employee Id and commit the transaction
- If any of the above operations fail or throw exceptions, rollback the transaction and make sure the db is not affected.
So that’s about the requirement in detail. Let’s add the DTO Classes. In the WebAPI Project add a new folder, DTOs and add in the following classes.
public class DepartmentDto

{

    [Required]

    public string Name { get; set; }

    public string Description { get; set; }

}
public class EmployeeDto

{

    [Required]

    public string Name { get; set; }

    [Required]

    public string Email { get; set; }

    [Required]

    public DepartmentDto Department { get; set; }

}
Next, in the Employee Controller add in the following.
Make sure that you reference the CoreEssentials.ThrowR package.
using CoreEssentials.ThrowR;

[HttpPost]

public async Task<IActionResult> AddNewEmployeeWithDepartment(EmployeeDto employeeDto)

{

    _dbContext.Connection.Open();

    using (var transaction = _dbContext.Connection.BeginTransaction())

    {

        try

        {

            _dbContext.Database.UseTransaction(transaction as DbTransaction);

            //Check if Department Exists (By Name)

            bool DepartmentExists = await _dbContext.Departments.AnyAsync(a => a.Name == employeeDto.Department.Name);

            Throw.Exception.IfTrue(DepartmentExists, "Department Already Exists");

            //Add Department

            var addDepartmentQuery = $"INSERT INTO Departments(Name,Description) VALUES('{employeeDto.Department.Name}','{employeeDto.Department.Description}');SELECT CAST(SCOPE_IDENTITY() as int)";

            var departmentId = await _writeDbConnection.QuerySingleAsync<int>(addDepartmentQuery, transaction: transaction);

            //Check if Department Id is not Zero.

            Throw.Exception.IfZero(departmentId, "Department Id");

            //Add Employee

            var employee = new Employee

            {

                DepartmentId = departmentId,

                Name = employeeDto.Name,

                Email = employeeDto.Email

            };

            await _dbContext.Employees.AddAsync(employee);

            await _dbContext.SaveChangesAsync(default);

            //Commmit

            transaction.Commit();

            //Return EmployeeId

            return Ok(employee.Id);

        }

        catch (Exception)

        {

            transaction.Rollback();

            throw;

        }

        finally

        {

            _dbContext.Connection.Close();

        }

    }

}
So the idea is simple. Open a Connection, Create a transaction object. Use this transaction across Entity framework core and dapper. If any operations fail, rollback the transactions to ensure that there is not faulty data. If there are no exceptions, commit the transaction and finally close the connection.
Line 6 – Opens the connection
Line 7 – Create / Starts the Transaction via the _dbContext object.
Line 11 – Assign this transaction object to the Database.
Line 13 – Check if the entered department exists.
Introducing ThrowR – One Line Exception Thrower
CoreEssentials.ThrowR is a simple helper class that brings some neatness to the picture and probably saves you 1 or 2 lines of code every time you need to check an object for null or probably anything. This is a part of the CoreEssentials family of packages. You can see inline 14 how much sense the entire line makes.
As the line reads, it literally means that it would throw an exception if the bool value is true with a message “Department Already Exists”. There are quite a lot of other extensions as well that can help you over the course of development. Feel free to check out the Repository over at Github and add contributions. Here is the link to the Repository – https://github.com/iammukeshm/CoreEssentials
You can install the package as well to your projects using the following command or probably check out the NuGet package page here – https://www.nuget.org/packages/CoreEssentials.ThrowR/
Install-Package CoreEssentials.ThrowR
Line 16,17 – Execute an Insert Query using the _writeDbConnection (Dapper) and returns back the added Id. Note that we are using the transaction object here as well.
Line 18 – Throws an exception if the Department Id is 0, again using the ThrowR Library.
Line 21 – Now that we have a valid Department Id, let’s create an Employee object and fill it with the required data.
Line 27 – Adds the object to the dbContext instance.
Line 28 – Finally save the changes.
Line 30 Commit the transaction. Once the control hits this line, it means that there we no exceptions encountered and it is safe to commit the transaction.
Line 32- Returns the newly generated Employee Id.
Line 36 – If there was any exception, all the database change would be rolled back inorder to maintain clean data. This is the actual use of transactions.
Line 41 – Finally close the connections.
With the explanation clear, let’s actually see the code in action. The following will be my Request on POSTMAN to the POST Endpoint of the Employee Controller.
{

    "name": "Mukesh Murugan",

    "email": "mukesh@google.es",

    "department": {

        "name" : "Development",

        "description" : "Development department"

    }

}
Now, we already know that the Department with the Name Developement does not exist in the database. Let’s Send the request.
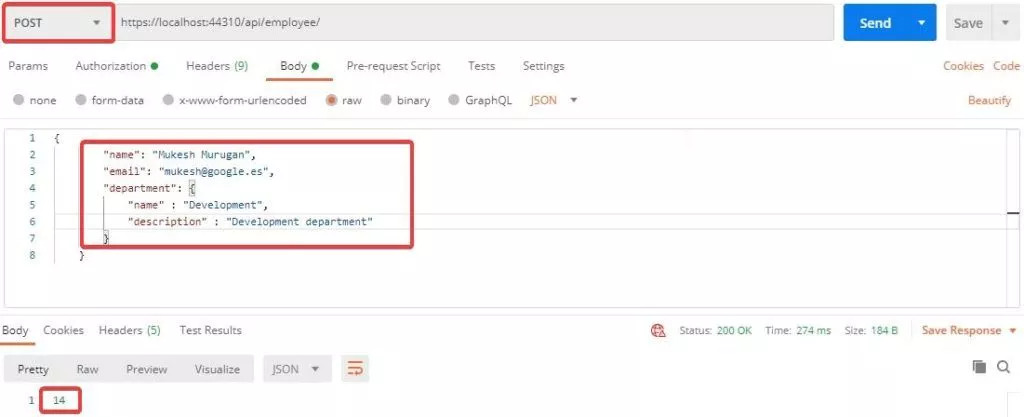
You can see the the operation is completed and returns the ID of the newly added employee. Let’s check our GetById Endpoint using this ID.
You can see that the record is created in both the Employee and the Department table as we needed. So that’s really how easy it is to use Entity Framework Core and Dapper in the same ASP.NET Core Application within the same transaction.
Now what happens when we send the POST Request again with the same request body?
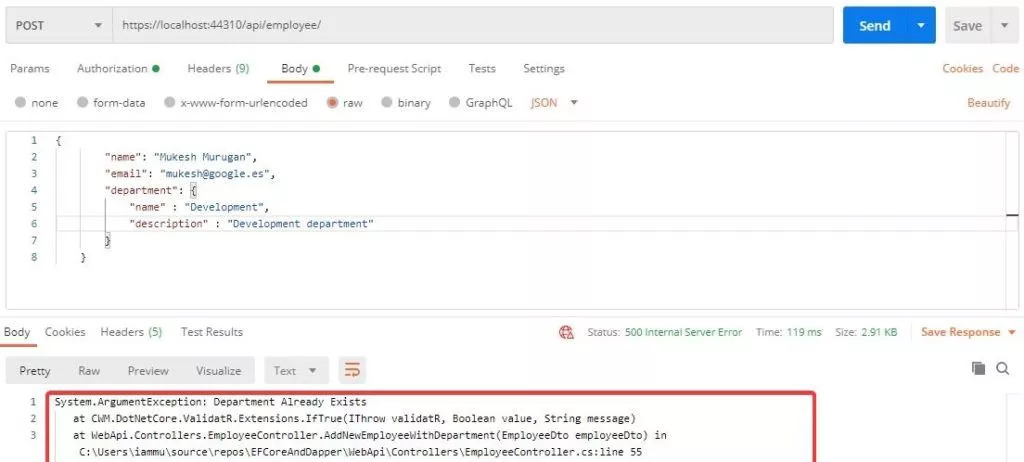
As expected, the ThrowR library throws an exception telling that the Department already exists. Moving forwards I believe this library can be put into so much use along with keeping the code clean and much more readable. It basically replaces all the NULL Checks and the boring IF Clauses., right?
That’s a wrap for this article. I hope that it cleared quite a lot of doubts and opened up a powerful approach to Using Entity Framework Core and Dapper in ASP.NET Core taking care of Transactions.
Summary
In this detailed article, we learned about a really simple and powerful approach to take advantage of the two most powerful ORMs for ASP.NET Core, that is Entity Framework COre and Dapper. Additionally, we talked about Transactions and built an application that can make use of both the ORMs keeping transactions if mind. As a result, we have an application that is intelligent enough to roll back the changes if at all any exceptions occur in the process.
And Finally, we took advantage of the ThrowR library that keeps your code clean and readable by reducing the number of lines you spend for NULL checks and literally any other checks based on objects. You can find the entire source code of the implementation here.
Leave behind your valuable queries, suggestions in the comment section below. Also, if you think that you learned something new from this article, do not forget to share this within your developer community. Happy Coding!