The new Blazor WebAssembly 3.2.0 includes support to client side authentication, which makes relatively simple to implement OpenID Connect and OAuth2 in your single page application. In other words, it means that we can finally build applications with the most recent industry standards in terms of security, enabling complex authentication scenarios and integrating them with the most widely used identity providers out there.
Speaking of identity providers, the most popular in the .NET Core sphere is definitely Identity Server 4, an open source product which is certified by the OpenID Foundation and works like a breeze with ASP.NET Core.
In this article we are going to implement the scenario depicted in the image below:
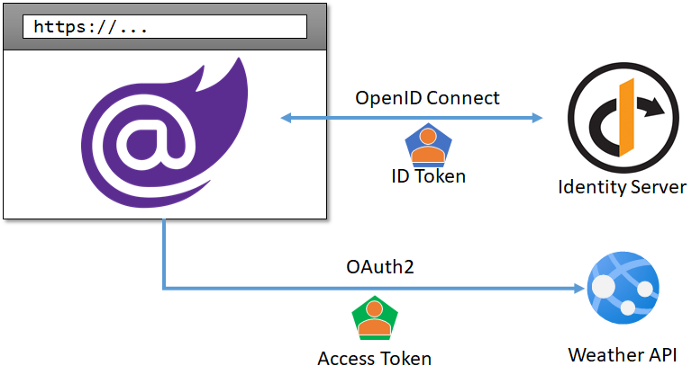
In a nutshell, we will:
- Create a secure Blazor WebAssembly application with a protected page.
- Add the capability to log the user in using Identity Server 4 as our identity provider, and display some basic info of the user.
- Request an Access Token on behalf of the user and use it to call a secured ASP.NET Core Web API endpoint.
We are not going to delve into the details of Identity Server and the nuances of its configuration and capabilities, however it’s fair to say that there’s plenty of documentation for those of us who want to know more about the functionalities we are going to use.
As a first step, let’s create an empty solution in Visual Studio and add an Identity Server 4 project to it.
Step 1: Setup Identity Server
For the sake of this article, we are going to use one of the pre-configured templates of Identity Server 4. As a first step, we need to install those templates through PowerShell:
dotnet new -i IdentityServer4.Templates
Once we have this in place, we can simply create a new project by running the following commands:
# Create an empty solution

dotnet new sln -n BlazorSecurityDemo


# Create a new IS4 quickstart project

dotnet new is4aspid -n IdentityProvider


# Add the project to the solution

dotnet sln add IdentityProvider
This will create an Identity Server website with some basic configuration, whose identity store is based on ASP.NET Core Identity, which is more than enough for what we want to demonstrate.
The next step consists in customising the configuration in the Config.cs file. More specifically, we can empty the list of Clients the template creates for us, and replace it with the one for our upcoming Blazor application:
public static IEnumerable<Client> Clients =>

    new Client[]

    {

        new Client

        {

            ClientId = "blazor",

            AllowedGrantTypes = GrantTypes.Code,

            RequirePkce = true,

            RequireClientSecret = false,

            AllowedCorsOrigins = { "https://localhost:5001" },

            AllowedScopes = { "openid", "profile" },

            RedirectUris = { "https://localhost:5001/authentication/login-callback" },

            PostLogoutRedirectUris = { "https://localhost:5001/" },

            Enabled = true

        },

    };
This is basically where we register the client application in Identity Server. In our specific case, we have configured a few interesting options:
- The ClientId is the unique name for the application, which we’ve set to blazor.
- We are going to use the Authorization Code grant type and require PKCE.
- Since the client application will run on localhost:5001, we’ve whitelisted this URL in CORS and set up the allowed redirect URLs for the login callback and after the logout.
- We are enabling openid and profile as scopes, in order to allow the execution of the OpenID Connect flow and retrieve the profile of the user in the ID Token.
Before we move on, the last thing to do is setting Identity Server to start on https rather than http as default, by modifying the launchSettings.json file and setting the protocol accordingly:
{

    ...

      "SelfHost": {

        "commandName": "Project",

        "launchBrowser": true,

        "environmentVariables": {

          "ASPNETCORE_ENVIRONMENT": "Development"

        },

        "applicationUrl": "https://localhost:5000"

      }

   }

}
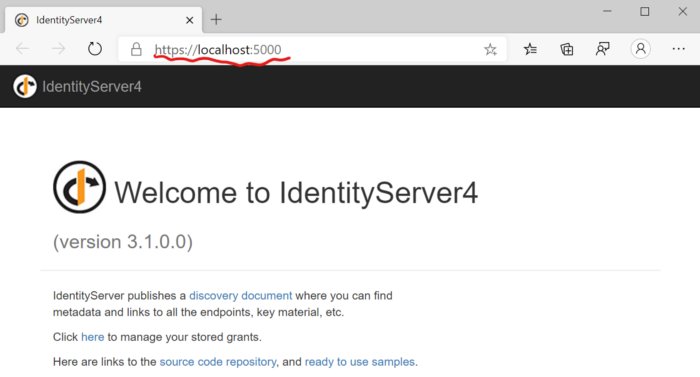
If we’ve done all the steps correctly, we should be able to press Ctrl-F5 from Visual Studio and see something similar to the screenshot below:
We’re now ready to start using this from a Blazor SPA!
Step 2: Create a Blazor WebAssembly application
When we create a new Blazor WebAssembly project, we have the possibility of choosing Individual User Accounts as authentication type.
# Create a Blazor Wasm application with Individual User accounts

dotnet new blazorwasm -au individual -n BlazorClient


# Add the project to the solution

dotnet sln add BlazorClient
This setting of the template will add a placeholder for the OpenID Connect configuration in the Program.cs file:
public static async Task Main(string[] args)

{

    ...

    builder.Services.AddOidcAuthentication(options =>

    {

        options.ProviderOptions.Authority = "...";

        options.ProviderOptions.ClientId = "...";

    });

    ...

}
Note: new Preview5 feature
At this point we can set the parameters needed to talk to Identity Server. We can do it via code, but obviously the best way is by using a configuration file. Therefore we can create an appsettings.json as the one below:
{

  "oidc": {

    "Authority": "https://localhost:5000/",

    "ClientId": "blazor",

    "DefaultScopes": [

      "openid",

      "profile"

    ],

    "PostLogoutRedirectUri": "/",

    "ResponseType": "code"

  }

}
Then, we can bind this file to the OpenID configuration:
builder.Services.AddOidcAuthentication(options =>

{

    builder.Configuration.Bind("oidc", options.ProviderOptions);

});
What do these parameters mean? Let’s analyse them one by one:
- Authority is the URL of Identity Server, this is used both for redirecting purposes but also to verify the signature of the tokens and the identity which issued them.
- ClientId is the unique identifier of the client registration we set in the previous step.
- DefaultScopes are the scope we want to request during the login flow. More specifically, here we are using openid , to indicate that we want to perform an authentication using OpenID Connect, and profile, in order to retrieve some basic info of the user, such as his name.
- ResponseType is the grant type we are using, which is — again — AuthorizationCode.
- PostLogoutRedirectUri is quite self-explanatory, and it’s basically where we want to be redirected once we logout.
I see you being so eager to press F5 and run this 😉 but before you do, just remember to remove http://localhost:5000 from the Blazor launch settings file, or it will clash with the port used by Identity Server:
"BlazorClient": {

  "commandName": "Project",

  "launchBrowser": true,

  "inspectUri": "...",

  "applicationUrl": "https://localhost:5001",

  "environmentVariables": {

    "ASPNETCORE_ENVIRONMENT": "Development"

  }

}
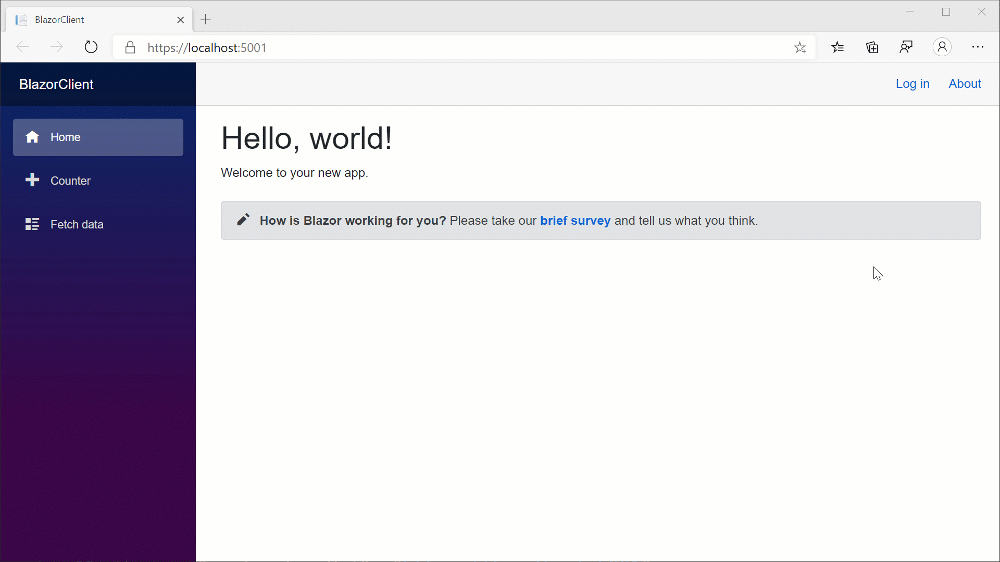
Now it’s time to finally run the solution! By launching the two projects all together, we should be able to see the Blazor website, click onto the Log in button to trigger the OpenID Connect flow with Identity Server, give the consent to the application and finally see our username appearing at the top of the page!
Let’s talk about scopes and claims
Those pre-configured scopes we have selected represent the set of claims we want to retrieve in the ID Token.
We can customise this logic at any time by simply adding definitions for new IdentityResources in Identity Server. For example, if we wanted to include the email address, we could modify the settings in the Config.cs file in this way:
public static IEnumerable<IdentityResource> Ids =>

    new IdentityResource[]

    {

        new IdentityResources.OpenId(),

        new IdentityResources.Profile(),

        new IdentityResources.Email()

    };


public static IEnumerable<Client> Clients =>

    new Client[]

    {

        new Client

        {

            ClientId = "blazor",

            AllowedScopes = { "openid", "profile", "email" },

            ...

        },

    };
Thanks to this, we may now add this new email scope to the default ones in the Blazor client application.
{

    "DefaultScopes": [

        "openid",

        "profile",

        "email"

    ],

}
The result will be that the ID Token will now include also the set of claims associated to this scope, which we will be able to access through the current ClaimsPrincipal.
The easiest way to access the ClaimsPrincipal — and thus the data about the current user — is by using a component called AuthorizeView. For example, we can create a page similar to this to display all the user’s claims:
@page "/claims"


<AuthorizeView>

    <Authorized>

        <h2>Hello @context.User.Identity.Name,

            here's the list of your claims:</h2>

        <ul>

            @foreach (var claim in context.User.Claims)

            {

                <li><b>@claim.Type</b>: @claim.Value</li>

            }

        </ul>

    </Authorized>

    <NotAuthorized>

        <p>I'm sorry, I can't display anything until you log in</p>

    </NotAuthorized>
</AuthorizeView>
AuthorizeView has a couple of interesting capabilities:
- we can define sub templates to display when the user is either Authorized or NotAuthorized — there’s also a third template for when the authorisation is in progress.
- we can access a context object which contains the current AuthenticationState toghether with the ClaimsPrincipal.
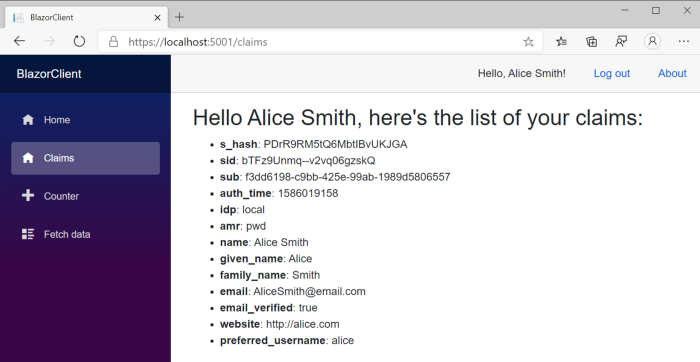
After logging in, the page we’ve just created will display all the user claims like in the pic below:
Step 3: Let’s create a protected Web API
Authenticating a user in a single page web application isn’t that powerful until you start using his or her identity to make a call to a protected API endpoint. Let’s see how we can plug this other feature into the system that we’re building.
First and foremost, we need to configure a new ApiResource in Identity Server and grant our client the permission to request a token for it. Let’s head to the Config class we’ve seen before and make some changes to create a new scope and add it to the allowed ones for Blazor:
public static IEnumerable<ApiResource> Apis =>

    new ApiResource[]

    {

        new ApiResource("weatherapi", "The Weather API")

    };


public static IEnumerable<Client> Clients =>

    new Client[]

    {

        new Client

        {

            ClientId = "blazor",

            ...

            AllowedScopes = { "openid", "profile", "email", "weatherapi" }

        }

    };
Then it’s time to add a Web API project to the solution:
# Create a new Web API project

dotnet new webapi -n WeatherApi


# Add JwtBearer authentication package

dotnet add WeatherApi package Microsoft.AspNetCore.Authentication.JwtBearer


# Add it to the solution

dotnet sln add WeatherApi
This API at the moment has no security whatsoever around it, so we need to modify to the Startup class and configure it to require a JWT bearer token in the header:
public void ConfigureServices(IServiceCollection services)

{

    services.AddControllers();

    services.AddAuthentication(JwtBearerDefaults.AuthenticationScheme)

        .AddJwtBearer(options =>

        {

            options.Authority = "https://localhost:5000";

            options.Audience = "weatherapi";

        });

}


public void Configure(...)

{

    ...

    app.UseAuthentication();

    app.UseAuthorization();


    app.UseEndpoints(endpoints =>

    {

        endpoints.MapControllers();

    });

}
For the sake of this example, we are going to use the WeatherForecastController that comes preconfigured in the Web API template. We just need to add the [Authorize] attribute to protect it against anonymous access:
[Authorize]

[ApiController]

[Route("[controller]")]

public class WeatherForecastController : ControllerBase

{
For the sake of consistency, we should also modify the launchSettings.json file as usual, this time using port 5002:
"WeatherApi": {

  "commandName": "Project",

  "launchBrowser": true,

  "launchUrl": "weatherforecast",

  "applicationUrl": "https://localhost:5002",

  "environmentVariables": {

    "ASPNETCORE_ENVIRONMENT": "Development"

  }

}
Now that all is set, it’s finally time to call this endpoint from our client application.
Step 4: Invoking the API from Blazor
We are almost there, the only step left is to modify our client, so we can acquire a token for the API and call its endpoint.
Note: new Preview5 feature
Blazor provides a service called IAccessTokenProvider which is delegated to handle token requests to the Identity Provider. However, we don’t have to use it directly, because Preview 5 introduces an Http Message Handler that makes the task of acquiring a token and automatically passing it as an http authorization header.
After adding a reference to the Microsoft.Extension.Http NuGet package, we can use IHttpClientFactory to register a named HttpClient for our API:
// We register a named HttpClient here for the API

builder.Services.AddHttpClient("api")

    .AddHttpMessageHandler(sp =>

    {

        var handler = sp.GetService<AuthorizationMessageHandler>()

            .ConfigureHandler(

                authorizedUrls: new[] { "https://localhost:5002" },

                scopes: new[] { "weatherapi" });


        return handler;

    });
The code above defines a client called “api” which internally uses the AuthorizationMessageHandler. We have to configure it by passing two parameters:
- the base url which requires an Access Token (which is the weather api one, in our case),
- the set of scopes needed for the api call.
Once we have that in place, we can then register it as the default HttpClient instance in the IoC container:
// we use the api client as default HttpClient

builder.Services.AddScoped(

    sp => sp.GetService<IHttpClientFactory>().CreateClient("api"));
Obviously, since the API requires the weatherapi scope, we also need to add it to the default scopes in appsettings.json:
{

  "DefaultScopes": [

    "openid",

    "profile",

    "email",

    "weatherapi"

  ],

}
Believe it or not, these settings are all that we need in order to securely interact with the API: no other code is required anywhere else in the application.
If we now go to FetchData.razor, the only change that perhaps we want to make is adding the [Authorize] attribute to signal the routing we want an authenticated user:
@page "/fetchdata"

@inject HttpClient Http

@attribute [Authorize]
Apart from that, the code which calls the API is just a GET request via HttpClient:
protected override async Task OnInitializedAsync()

{

    forecasts = await Http.GetJsonAsync<WeatherForecast[]>("https://localhost:5002/WeatherForecast");

}
Under the hood, the AuthorizationMessageHandler will make sure we have the right access token for this resource and, if not, this will initiate the OAuth 2 flow to acquire it from Identity Server.
The OAuth2 protocol supports the concept of Incremental Consent, which allows us to gradually add scopes to our requests and, if consent has not been given, prompts the user to grant it.
As of Preview 5, however, Blazor doesn’t support this, so the only viable option at the moment is to request all the scopes the application requires upfront in the default scopes, as we’ve done in the appsettings.json file.
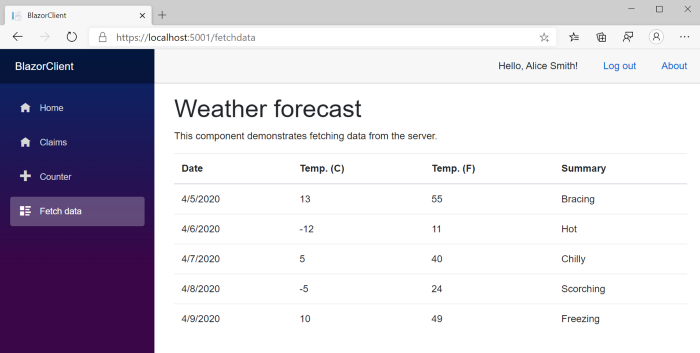
If we’ve done all the bits correctly, we will finally see our randomised weather forecasts coming through when visiting the page:
In a next article, I’ll dig a bit deeper on how the methods we’ve used work under the hood, however there are a couple of key points we need to pay attention when dealing with tokens:
- Acquired tokens should be cached in the browser, in order to not overwhelm the identity provider of requests (and to speed up things on the client side as well).
- Tokens do expire over time, and therefore cached ones need to be invalidated and refreshed.
The good news is that Blazor deals with all these aspects for us (well, it’s actually a library called oidc-client-js doing it 😉), so we don’t have to worry at all about them, just keep requesting them every time we need to make a call and they will be picked from the cache if they are valid, or refreshed if they’re not.
Conclusions
It was our first touch point with security in Blazor WebAssembly, however we should be proud of what we managed to achieve!
We’ve protected our application by integrating it with Identity Server and configured the OpenID Connect protocol to authenticate users. We’ve also briefly introduced the concept of scopes and seen how they affect the claims we receive from the identity provider.
Then we’ve moved one step forward by requesting an access token and using it to call a protected Web API by for it and passing it in the header of the HTTP call.
I’ve tried to describe all the steps in detail, however, if you don’t want to type, the full source code is available at this repository in GitHub: https://github.com/cradle77/BlazorSecurityDemo