Introduction
Creating a CRUD (Create, Read, Update, Delete) API in .NET 8 with an In-memory collection is a common scenario in web development. In this article, we’ll walk through building a complete .NET 8 Web API with a real-world use case.
Prerequisites
Visual Studio or Visual Studio Code (with .NET 8 SDK installed).
What is an API?
- API stands for Application Programming Interface.
- It defines the rules that you must follow to communicate with other software systems.
- Developers expose APIs so that other applications can communicate with their applications programmatically.
What is RESTful API?
- RESTful API is an interface that two computer systems use to exchange information securely over the internet.
- Most business applications have to communicate with other internal and third-party applications to perform various tasks.
CRUD Operations?
CRUD stands for “Create, Read, Update, and Delete”
.Net 8 WEB API
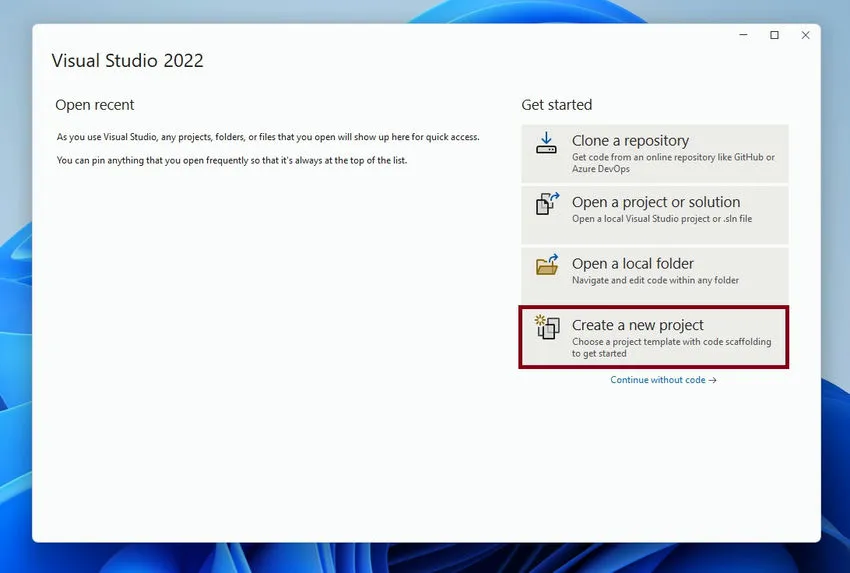
Step 1. Open a visual studio and click on “Create a new project”.
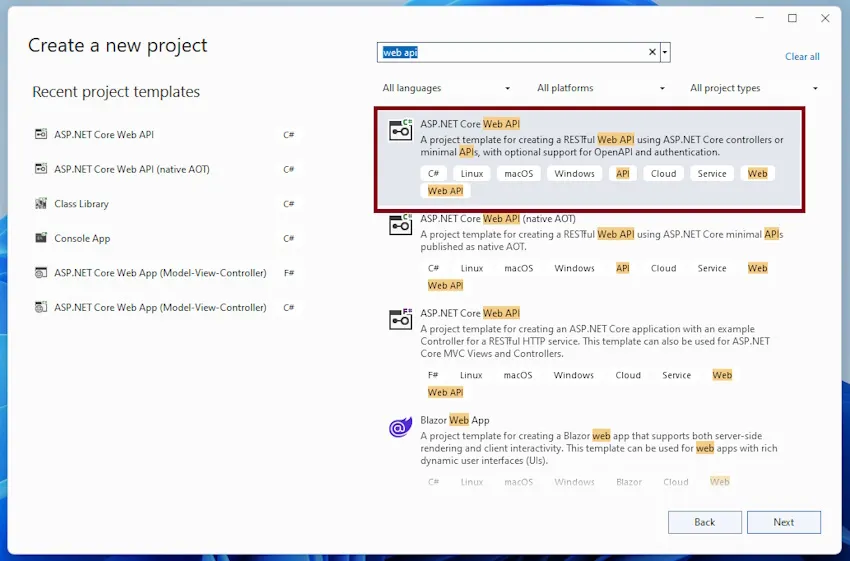
Step 2. Select the “ASP .NET Core Web API” template and click on the “Next” button.
Step 3. Enter the “Project Name” & select the “Location” and click the “Next” button.

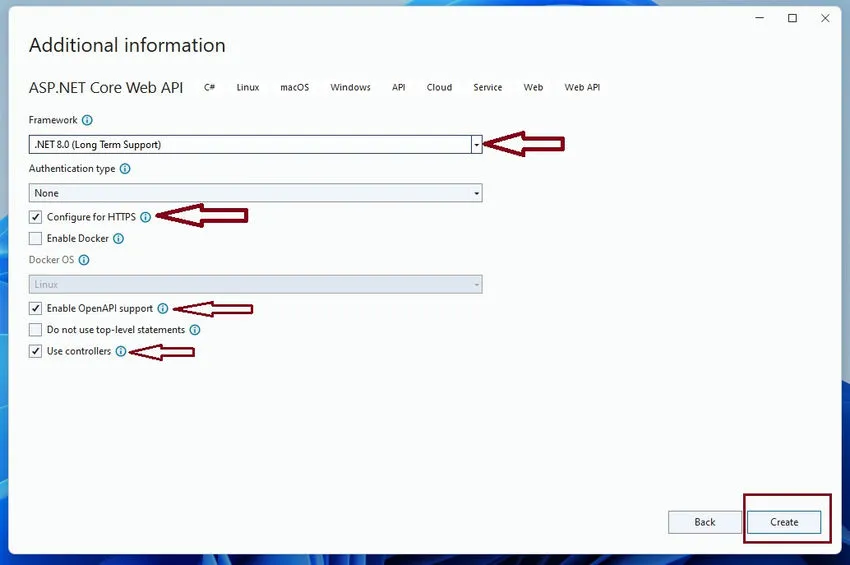
Step 4
- Select Framework 6.0 or greater. I am selecting .Net 8.0 (Long-Term Support)
- “Configuration for HTTPS” should be checked — It will run our application in HTTPS protocol.
- “Enable Open API Support” should be checked — It will configure Swagger for you.
- “Use Controller” should be checked — It will help to create a controller-based API.
- Click on “Next” to proceed.
It will generate a web API scaffolding with a predefined WeatherForecastController API.
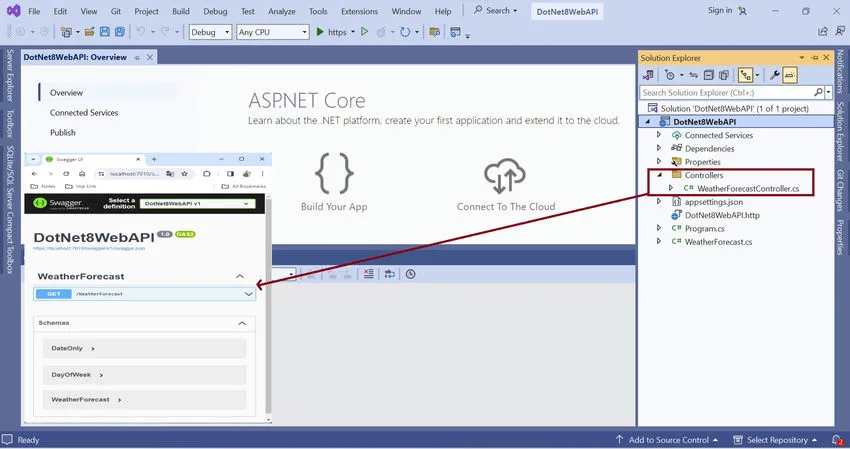
Step 5. Let’s delete the existing WeatherForecast Controller and add a new OurHeroController to this project.
- Right-click on the Controller folder ( go to Open Solution Explorer and select Controller folder).
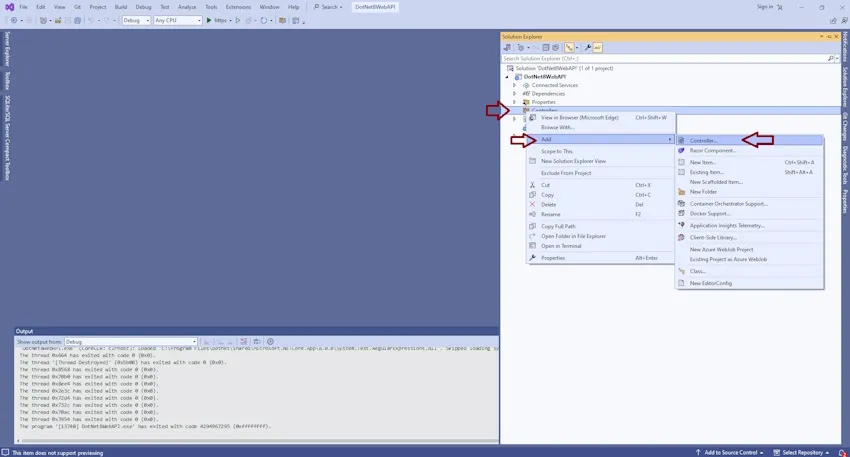
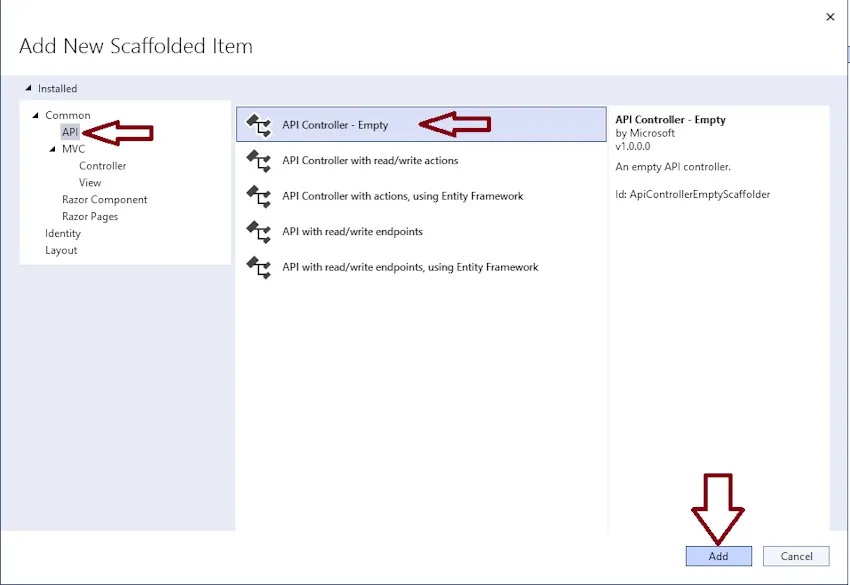
Select API -> “API Controller — Empty” and click on the “Add” button.
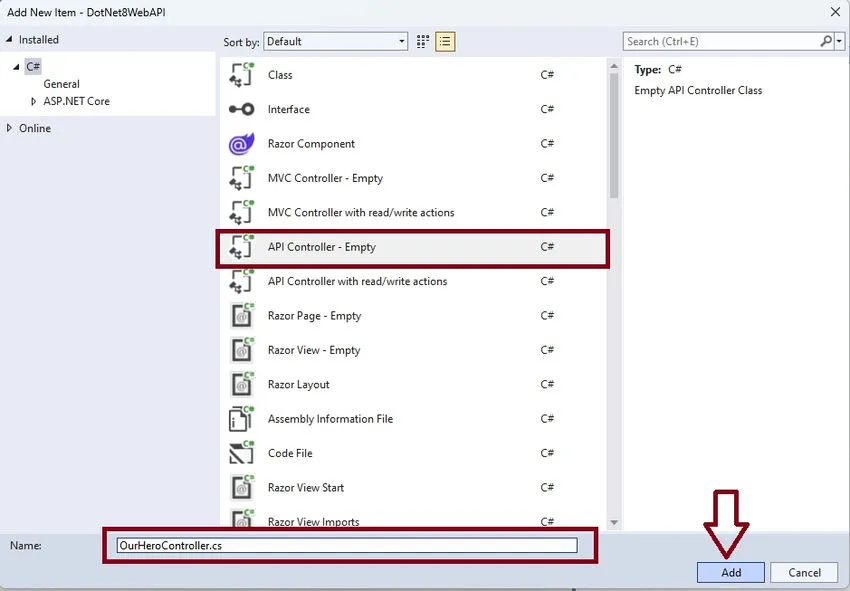
Enter the Controller name and click on the Add button to generate a template for this.
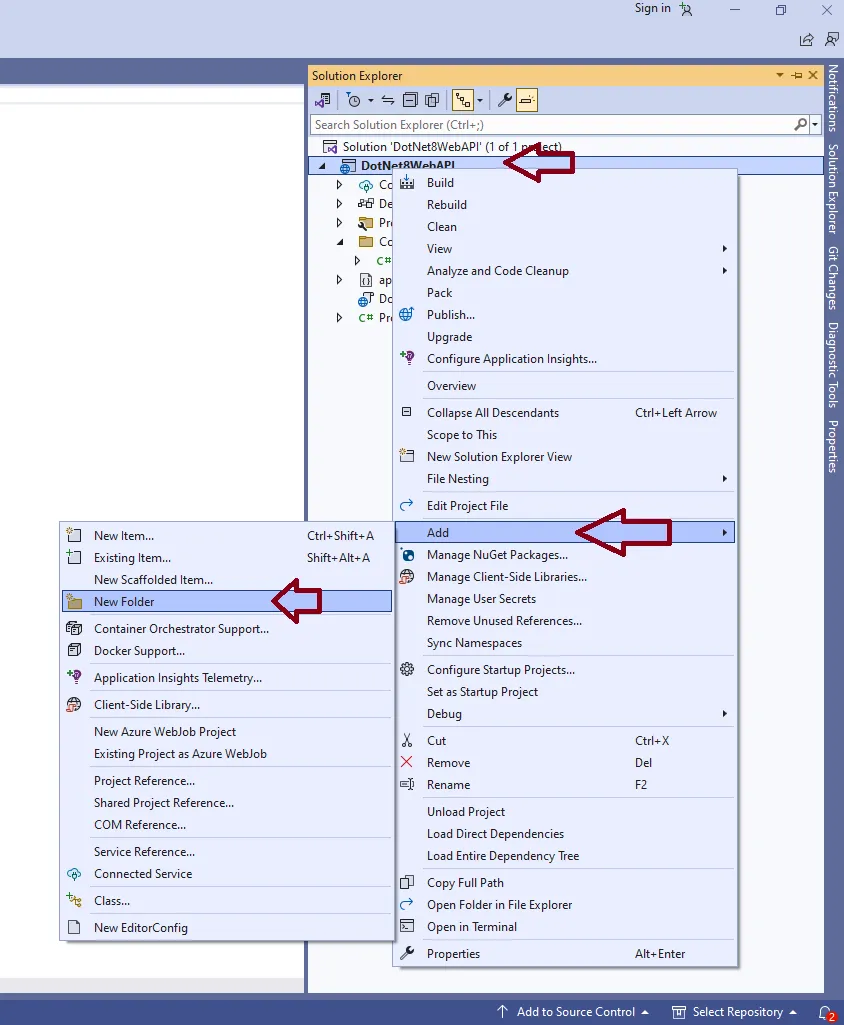
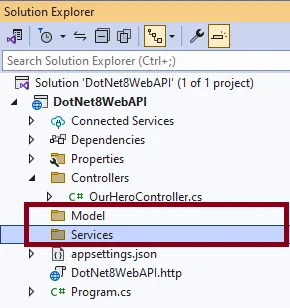
Step 6. Let’s add the below folder to our solution.
Right-click on Solution -> Add -> New Forder
Like this
Step 7. Add OurHero Model in the model folder.
Select a Model folder and press Ctrl +Shift +A to generate a C# class.
or
Right-click on Model folder -> Add -> New Item -> Enter Class(Model Name like OurHero.cs) Name and press the Add button.
// OurHero.cs


namespace DotNet8WebAPI.Model

{

    public class OurHero

    {

        public int Id { get; set; }

        public required string FirstName { get; set; }

        public string LastName { get; set; } = string.Empty;

        public bool isActive { get; set; } = true;

    }

}
AddUpdateOurHero.cs model is being used to add or update our hero list.
// AddUpdateOurHero.cs

namespace DotNet8WebAPI.Model

{

    public class AddUpdateOurHero

    {

        public required string FirstName { get; set; }

        public string LastName { get; set; } = string.Empty;

        public bool isActive { get; set; } = true;

    }

}
Step 8. Create Service files.
- IOurHeroService: Interface
- In this file, we are going to define ourHero business logic.
- OurHeroService: Class,
- we are going to implement IOurHeroService methods.
// IOurHeroService.cs


using DotNet8WebAPI.Model;


namespace DotNet8WebAPI.Services

{

    public interface IOurHeroService

    {

        List<OurHero> GetAllHeros(bool? isActive);


        OurHero? GetHerosByID(int id);


        OurHero AddOurHero(AddUpdateOurHero obj);


        OurHero? UpdateOurHero(int id, AddUpdateOurHero obj);


        bool DeleteHerosByID(int id);

    }

}
// OurHeroService.cs


using DotNet8WebAPI.Model;


namespace DotNet8WebAPI.Services

{

    public class OurHeroService : IOurHeroService

    {

        private readonly List<OurHero> _ourHeroesList;

        public OurHeroService()

        {

            _ourHeroesList = new List<OurHero>()

            {

                new OurHero(){

                Id = 1,

                FirstName = "Test",

                LastName = "",

                isActive = true,

                }

            };

        }


        public List<OurHero> GetAllHeros(bool? isActive)

        {

            return isActive == null ? _ourHeroesList : _ourHeroesList.Where(hero => hero.isActive == isActive).ToList();

        }


        public OurHero? GetHerosByID(int id)

        {

            return _ourHeroesList.FirstOrDefault(hero => hero.Id == id);

        }


        public OurHero AddOurHero(AddUpdateOurHero obj)

        {

            var addHero = new OurHero()

            {

                Id = _ourHeroesList.Max(hero => hero.Id) + 1,

                FirstName = obj.FirstName,

                LastName = obj.LastName,

                isActive = obj.isActive,

            };


            _ourHeroesList.Add(addHero);


            return addHero;

        }


        public OurHero? UpdateOurHero(int id, AddUpdateOurHero obj)

        {

            var ourHeroIndex = _ourHeroesList.FindIndex(index => index.Id == id);

            if (ourHeroIndex > 0)

            {

                var hero = _ourHeroesList[ourHeroIndex];


                hero.FirstName = obj.FirstName;

                hero.LastName = obj.LastName;

                hero.isActive = obj.isActive;


                _ourHeroesList[ourHeroIndex] = hero;


                return hero;

            }

            else

            {

                return null;

            }

        }


        public bool DeleteHerosByID(int id)

        {

            var ourHeroIndex = _ourHeroesList.FindIndex(index => index.Id == id);

            if (ourHeroIndex >= 0)

            {

                _ourHeroesList.RemoveAt(ourHeroIndex);

            }

            return ourHeroIndex >= 0;

        }

    }

}
In the service file, we are using the in-memory collection to store all _ourHeroesList data.
private readonly List<OurHero> _ourHeroesList;


public OurHeroService()

{

    _ourHeroesList = new List<OurHero>()

    {

        new OurHero(){

        Id = 1,

        FirstName = "Test",

        LastName = "",

        isActive = true,

        }

    };

}
Step 9. Register OurHeroService service in the Program.cs file as a Singleton.
//*********************** Add services to the container.***********************

builder.Services.AddSingleton<IOurHeroService, OurHeroService>();

//*********************** Add services to the container end.***********************
In .Net 8, we can register our service.
- AddSingleton: a single object present across the application
- AddScoped: One request for one instance (if we are injecting the same service more than once, then it will share the same instance.)
- AddTransient: always create a new instance (if we are injecting the same service more than once, then it will provide a new instance every time).
// Program.cs


using DotNet8WebAPI.Services;


var builder = WebApplication.CreateBuilder(args);


//*********************** Add services to the container.***********************

builder.Services.AddSingleton<IOurHeroService, OurHeroService>();

//*********************** Add services to the container end.***********************


builder.Services.AddControllers();

// Learn more about configuring Swagger/OpenAPI at https://aka.ms/aspnetcore/swashbuckle

builder.Services.AddEndpointsApiExplorer();

builder.Services.AddSwaggerGen();


var app = builder.Build();


// Configure the HTTP request pipeline.

if (app.Environment.IsDevelopment())

{

    app.UseSwagger();

    app.UseSwaggerUI();

}


app.UseHttpsRedirection();


app.UseAuthorization();


app.MapControllers();


app.Run();
Step 10. Inject IOurHeroService in OurHeroController.
- Open OurHeroController file
- Add a Contractor
- inject IOurHeroService in the Contractor
// OurHeroController.cs

using DotNet8WebAPI.Services;

using Microsoft.AspNetCore.Http;

using Microsoft.AspNetCore.Mvc;


namespace DotNet8WebAPI.Controllers

{

    [Route("api/[controller]")]

    [ApiController]

    public class OurHeroController : ControllerBase

    {

        private readonly IOurHeroService _heroService;


        public OurHeroController(IOurHeroService heroService)

        {

            _heroService = heroService;

        }

    }

}
Step 11. Add Get API in OurHeroController.
// OurHeroService.cs


[HttpGet]

public IActionResult Get([FromQuery] bool? isActive = null)

{

    return Ok(_heroService.GetAllHeros(isActive));

}
HttpGet. it makes this method a GET method
- IActionResult: It represents a return type to the action method.
- [FromQuery]: indicate getting this value from API Query String
- _heroService.GetAllHeros(isActive): get all OurHero data from OurHeroService
- Ok(object): sending data with 200 status codes.
Step 12. Add other action method
- Get ID — to fetch OurHero by ID
- Post — Add new OurHero
- Put — Update OurHero
- Delete- delete OurHero by ID
using DotNet8API.Model;

using DotNet8API.services;

using Microsoft.AspNetCore.Mvc;


namespace DotNet8API.Controllers

{

    [Route("api/[controller]")]

    [ApiController]

    public class OurHeroController : ControllerBase

    {

        private readonly IOurHeroService _heroService;


        public OurHeroController(IOurHeroService heroService)

        {

            _heroService = heroService;

        }


        [HttpGet]

        public IActionResult Get([FromQuery] bool? isActive = null)

        {

            return Ok(_heroService.GetAllHeros(isActive));

        }


        [HttpGet]

        [Route("{id}")]

        public IActionResult Get(int id)

        {

            var hero = _heroService.GetHerosByID(id);

            if (hero == null)

            {

                return NotFound();

            }

            return Ok(hero);

        }


        [HttpPost]

        public IActionResult Post(AddUpdateOurHero heroObject)

        {

            var hero = _heroService.AddOurHero(heroObject);


            if (hero == null)

            {

                return BadRequest();

            }


            return Ok(new

            {

                message = "Super Hero Created Successfully!!!",

                id = hero!.Id

            });

        }


        [HttpPut]

        [Route("{id}")]

        public IActionResult Put([FromRoute] int id, [FromBody] AddUpdateOurHero heroObject)

        {

            var hero = _heroService.UpdateOurHero(id, heroObject);

            if (hero == null)

            {

                return NotFound();

            }


            return Ok(new

            {

                message = "Super Hero Updated Successfully!!!",

                id = hero!.Id

            });

        }


        [HttpDelete]

        [Route("{id}")]

        public IActionResult Delete([FromRoute] int id)

        {

            if (!_heroService.DeleteHerosByID(id))

            {

                return NotFound();

            }


            return Ok(new

            {

                message = "Super Hero Deleted Successfully!!!",

                id = id

            });

        }

    }

}
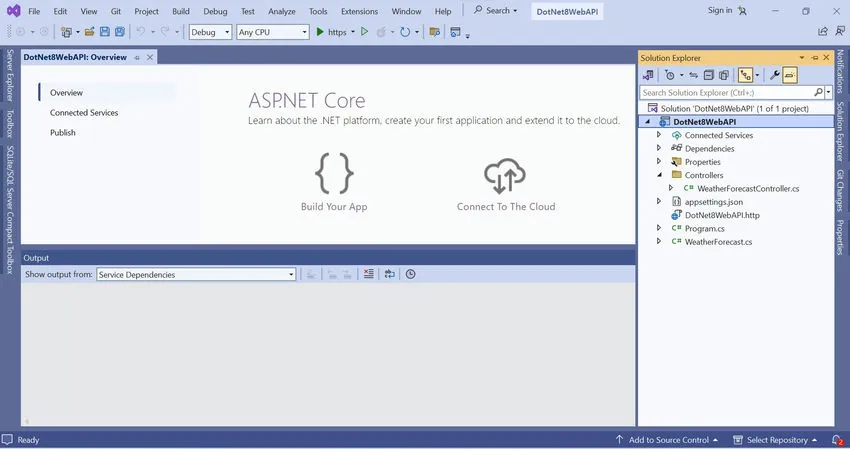
Step 13. Run our API project.
Visual Studio
Press the F5 keyboard shortcut to run our app.
DOT NET CLI cmd
- Open our project in cmd
- Run “dotnet run” cmd to launch our project.
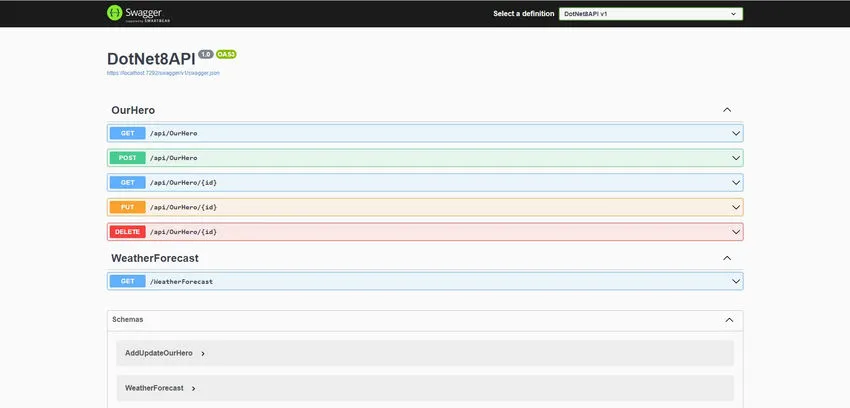
Swagger shows all API lists.
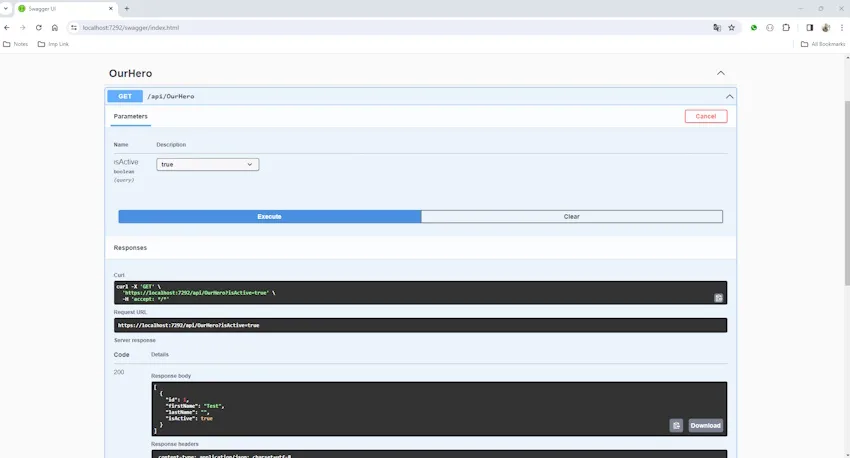
Run get our heros API.
- Open “/api/OurHero”
- Click on “Try it out”
- select isActive if required
- Click on the “Execute” button to send a request.
Summary
That’s it! You’ve created a complete .NET 8 Web API for CRUD operations with an In-memory database. You can now integrate this API into your front-end application.
Thanks for reading.