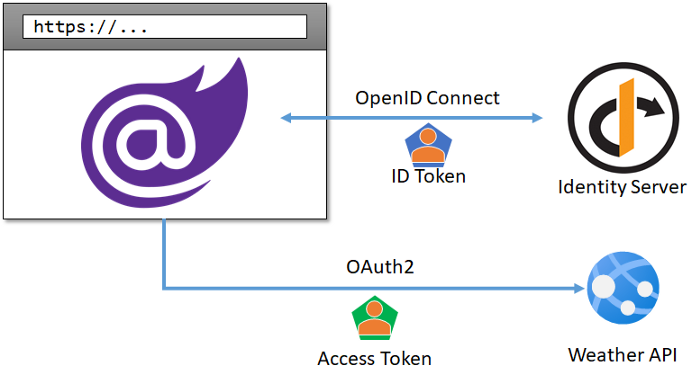
In a previous article we’ve introduced how authentication works in Blazor WebAssembly and we’ve seen a simple example on how to create a Blazor client, implement the login flow via Identity Server 4 and retrieve an access token to call a protected Web API.
However, every real-world application will sooner or later need to deal with user roles, in order to offer different functionalities to its users depending on what they have access to.
In this article, we are going apply some changes to the BlazorSecurityDemo application we’ve introduced before, adding role-based security both on the API side and in the UI. The full source code is available at this repository in GitHub: https://github.com/cradle77/BlazorSecurityDemo
Let’s get started.
Roles in Identity Server 4
A role in Identity Server 4 is just an attribute we assign to a user, which we can optionally return as a claim.
In its default template, Identity Server 4 uses ASP.NET Core Identity as a backend store, which means it already has everything it needs in place to create roles, assign them to users, and retrieve them when needed.
We’re not going in the narrow details on how to implement these functionality and create a user management application, there’s plenty of blog posts out there on the subject, let’s just use a tool such as DB Browser for SQLite to manually add a couple of roles (User and Admin) to the database and assign them to the sample users (Bob and Alice) in our store:
INSERT INTO AspNetRoles (Id, Name, NormalizedName)

VALUES ("User", "User", "User"),

("Admin", "Admin", "Admin")


-- Both exiting users are of role "User"

;INSERT INTO AspNetUserRoles (UserId, RoleId)

SELECT Id, "User" as RoleId

FROM AspNetUsers


-- Bob is also "Admin"

;INSERT INTO AspNetUserRoles (UserId, RoleId)

SELECT Id, "Admin" as RoleId

FROM AspNetUsers

WHERE Username = 'bob'
Believe it or not, Identity Server is already capable of reading these roles when fetching a user profile, without us doing anything. We just can’t see them because they are not exposed in any token just yet, which is going to be our next step.
There are several ways to accomplish this, like creating a custom profile service, using a new scope or modifying one of the default ones. Probably the latter is the most clean and neat solution: more specifically, we are going to customise the Profile scope, which is already used by our client.
If we look at the Config.cs file, it defines a list of IdentityResources a client can request:
public static IEnumerable<IdentityResource> Ids =>

    new IdentityResource[]

    {

        new IdentityResources.OpenId(),

        new IdentityResources.Profile(),

        new IdentityResources.Email()

    };
Each of these objects has two main properties:
- a name, which typically corresponds to a scope requested by the client
- a list of claim types, which the client expects to be included in the token when that scope is requested.
What we are going to do is creating a very simple class, which extends IdentityResources.Profile, so we can include the role claim in the standard Profile scope:
public class ProfileWithRoleIdentityResource : IdentityResources.Profile

{

    public ProfileWithRoleIdentityResource()

    {

        this.UserClaims.Add(JwtClaimTypes.Role);

    }

}
Some internals :) how does Identity Server 4 associate the Role claim type to the actual role we’ve stored in the database? Well, every time a user profile is needed, IS4 internally uses a class from the ASP.NET Core Identity library called UserClaimsPrincipalFactory, which transforms a TUser read from the database in a ClaimsPrincipal. This class will also include a Role claim for each role the user belongs to. At that point, IS4 only needs to cherry pick the claims it needs for the token among those already present in the ClaimsPrincipal!
We now need to replace the default Profile resource with the custom one we just built:
public static IEnumerable<IdentityResource> Ids =>

    new IdentityResource[]

    {

        new IdentityResources.OpenId(),

        // let's include the role claim in the profile

        new ProfileWithRoleIdentityResource(),

        new IdentityResources.Email()

    };
This is all we have to do in Identity Server: we now have everything in place in order to return a role claim in the ID Token. Time to head to our Blazor project and make some changes.
Reading the user roles from Blazor
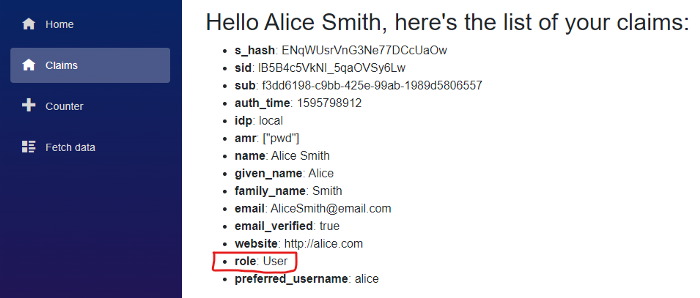
Even without doing absolutely anything, the Blazor client application is already receiving the new claim, as expected. We can easily verify it browsing the Claims page we created during our previous article, and display all the claims of the current user.
However, at the moment this role claim is not going to be used for any authorisation purposes unless we tell the AuthenticationStateProvider that it represents the actual role of the user in program.cs:
builder.Services

    .AddOidcAuthentication(options =>

    {

        builder.Configuration.Bind("oidc", options.ProviderOptions);

        options.UserOptions.RoleClaim = "role";

    })
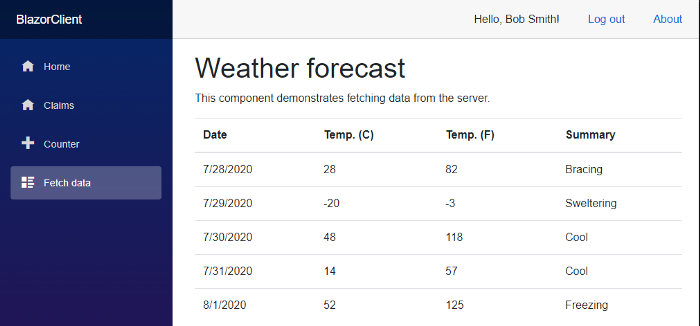
Now, we can use the role to authorise access to the FetchData page only to Admins, for example, via the Authorize attribute:
@page "/fetchdata"

@inject HttpClient Http

@attribute [Authorize(Roles = "Admin")]


<h1>Weather forecast</h1>


<p>This component demonstrates fetching data from the server.</p>


...
We can also hide and display portions of the UI based on the role:
<AuthorizeView Roles="Admin">
    <Authorized>

        <p>Only admins can see this</p>

    </Authorized>
</AuthorizeView>
Before hitting F5 and testing it, let’s just make one last change to the routing in App.razor in order to acknowledge that a user can be authenticated, but still not authorised to visit a specific page:
<CascadingAuthenticationState>

    <Router AppAssembly="@typeof(Program).Assembly">

        <Found Context="routeData">

            <AuthorizeRouteView ... ">

                <NotAuthorized>

                    @if (context.User.Identity.IsAuthenticated)

                    {

                        <p>Sorry you are not authorized</p>

                    }

                    else

                    {

                        <RedirectToLogin />

                    }

                </NotAuthorized>

            </AuthorizeRouteView>

        </Found>

        ...

    </Router>

</CascadingAuthenticationState>
Note: this change is needed because otherwise, if not authorised, we would be stuck in a loop which would endlessly send us back to the Login page.
Now, if we try to access the FetchData page when logged in as Alice, who’s just a normal User, we’ll see the non-authorised message as expected:
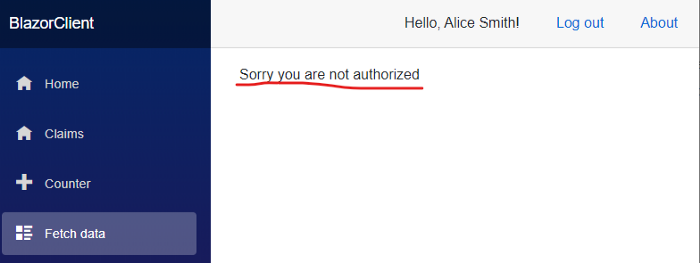
What’s annoying, though, is that we see the same error even when using Bob, despite him actually being an Admin. Why is this happening?
Claims and arrays
This is unfortunately due to an issue Blazor currently has with claims with multiple values, as it’s the case with Bob, who’s both User and Admin. In this case, the Authorize attribute expects to find 2 distinct claims in the current Principal, one per role the user belongs to.
What Blazor does instead — via a class called AccountClaimsPrincipalFactory — is generating one single claim, whose value is a JSON array, which is not interpreted correctly by the rest of the security infrastructure.
I’ve recently opened an issue about this on GitHub, and as the team recommend, the solution is creating our own custom ClaimsPrincipalFactory, and generate the claims in the correct form.
The full code is in GitHub, however the interesting bit is the following:
public class ArrayClaimsPrincipalFactory<TAccount>

{

    ...


    public override ValueTask<ClaimsPrincipal> CreateUserAsync(...)

    {

        ...

        if (value != null &&

            value is JsonElement element &&

            element.ValueKind == JsonValueKind.Array)

        {

            // remove the wrong claim created

            claimsIdentity.RemoveClaim(claimsIdentity.FindFirst(kvp.Key));


            // add an array of claims to the ClaimsIdentity

            var claims = element.EnumerateArray().Select(x => new Claim(kvp.Key, x.ToString()));


            claimsIdentity.AddClaims(claims);

        }

        ...

    }

}
Then we must replace the default factory with our custom one in the program.cs file:
builder.Services

    .AddOidcAuthentication(options =>

    {

        ...

    })
.AddAccountClaimsPrincipalFactory<ArrayClaimsPrincipalFactory<RemoteUserAccount>>();
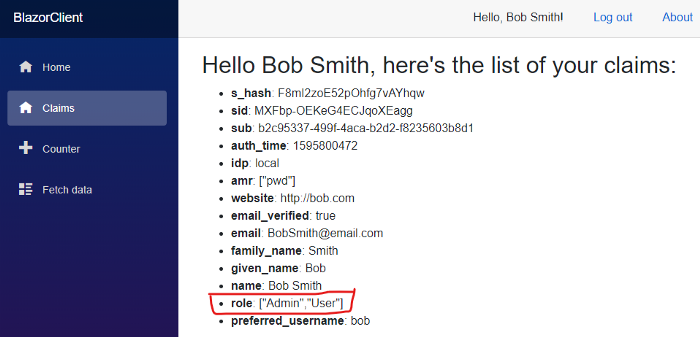
If we now visualise the user claims again, we can see the role claims in their correct form:
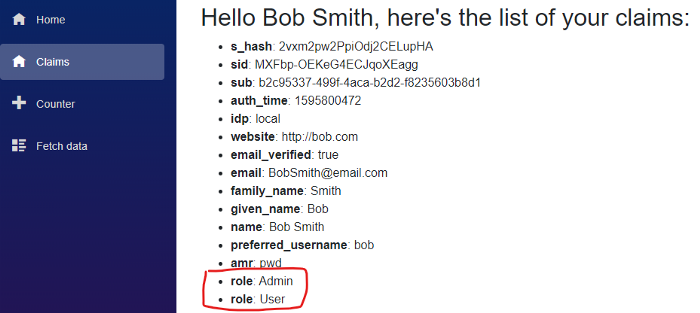
This also means that, since we’re Admins, we can finally navigate to the FetchData page and see the weather forecasts :)
Never trust the client!
All seems to be working fine, however the current solution is definitely not bullet proof: we should never forget the Blazor WebAssembly is a public client, it runs on the user browser, and as such it can be easily tweaked and modified by a malicious user.
We need to implement a similar level of security also on the server side, and restrict access to the Weather API only to Admins:
[Authorize(Roles = "Admin")]

[ApiController]

[Route("[controller]")]

public class WeatherForecastController : ControllerBase

{

    ...

}
This requires a new setting on Identity Server to include the role claims also in the access token. We can do it from the usual Config.cs class:
public static IEnumerable<ApiResource> Apis =>

    new ApiResource[]

    {

        // the api requires the role claim

        new ApiResource(

            "weatherapi",

            "The Weather API",

            claimTypes: new[] { JwtClaimTypes.Role })

    };
Fortunately, ASP.NET Core can handle arrays of claims out of the box, as opposite to Blazor, and therefore we don’t need any other customisation here.
We can now hit F5 and verify that everything keeps working as expected, although now we finally have also server-side security.
Conclusions
In this article we’ve started from our previous working example of authentication in Blazor, and we’ve added the support to roles.
We’ve seen how exposing roles as claims in both ID Tokens and Access Tokens requires limited changes in Identity Server, and how they are immediately available to be used in Blazor — although with a minor tweak to handle arrays.
We then made sure that also the Web API implements the same role-based authorisation; this is a best practice since Blazor WebAssembly is considered a public client, it runs in the user’s browser and cannot be trusted for security.
In a next article, we’ll introduce a more powerful concept on how authorize access: policies, we’ll see how we can implement and share them between the ASP.Net Core and Blazor WebAssembly.
The full source code is available at this repository in GitHub: https://github.com/cradle77/BlazorSecurityDemo