Introduction
In this article, we are going to discuss What Entity Framework is and How we can implement it in the .Net 8 project. This is a continuation of part 1, so if you are new to this article, please check my part 1 before proceeding. In this article, we are going to implement EF8 code first approach.
What is Entity Framework?
- Entity Framework (EF) is an object-relational mapper that enables .NET developers to work with relational data using domain-specific objects.
- It eliminates the need for most of the data-access code that developers usually need to write.
- Its purpose is to abstract the ties to a relational database.
Why Entity Framework?
Entity Framework is an ORM, and ORMs are aimed to increase the developer’s productivity by reducing the redundant task of persisting the data used in our applications.
Features of Entity Framework
- Entity Framework is a lightweight and extensible object-relational mapping (ORM) technology.
- Entity Framework supports multiple platforms like Windows, Linux, and macOS.
- Entity Framework supports both relational and non-relational data sources.
- Entity Framework works efficiently with widely used databases like SQL Server, SQL Server Compact, SQLite, and PostgreSQL.
- Entity Framework makes it easier for programmers to perform create, read, update, and delete (CRUD) operations by supporting databases. It also makes it easier for developers to perform unit testing by keeping in-memory tables.
Entity Framework development approaches
There are three approaches to creating entity frameworks.
Code First approach
The Code First approach enables us to create a model and relation using classes and then create the database from these classes. It enables us to work with the Entity Framework in an object-oriented manner. In this approach, you can use empty databases and add tables too.
Model First approach
In this approach, model classes and their relation are created first using the ORM designer, and the physical database will be generated using this model. The Model First approach means we create a diagram of the entity and relation that will be converted automatically into a code model.
Database First approach
The Database First approach enables us to create an entity model from the existing database. This approach helps us to reduce the amount of code that we need to write. The following procedure will create an entity model using the Database First approach.
Prerequisites
- Visual Studio 2022 (any edition — Community / Professional / Enterprise)
- Microsoft SQL Server 2008 or above.
- .Net Core 8 SDK or later version
Steps to follow to Implement EF8
Step 1. Install Entity Framework Package from NuGet.
Right Click on your project -> Click on ”Manage NuGet Packages” -> Open “Browse” tab -> search below EF8 package
- Microsoft.EntityFrameworkCore
- Microsoft.EntityFrameworkCore.Design
- Microsoft.EntityFrameworkCore.Tools
- Microsoft.EntityFrameworkCore.SqlServer
Step 2. Add OurHeroDbContext file in our project.
- Open a solution
- Right-click and add the “Entity” folder
- add OurHeroDbContext class (select “Entity” folder and press Ctrl + Shift + A to create a class)
- inherit DbContext class
- Add constructor and accept EF option and send to DbContext
// OurHeroDbContext.cs

using Microsoft.EntityFrameworkCore;


namespace DotNet8WebAPI.Entity

{

    public class OurHeroDbContext : DbContext

    {

        public OurHeroDbContext(DbContextOptions<OurHeroDbContext> options) : base(options)

        {

        }

    }

}
Step 3. Registered DB Model in OurHeroDbContext file.
Configured our EF model and loaded pre-defined data(master data).
// OurHeroDbContext.cs

using DotNet8WebAPI.Model;

using Microsoft.EntityFrameworkCore;


namespace DotNet8WebAPI.Entity

{

    public class OurHeroDbContext : DbContext

    {

        public OurHeroDbContext(DbContextOptions<OurHeroDbContext> options) : base(options)

        {

        }

        // Registered DB Model in OurHeroDbContext file

        public DbSet<OurHero> OurHeros { get; set; }


        /*

         OnModelCreating mainly used to configured our EF model

         And insert master data if required

        */

        protected override void OnModelCreating(ModelBuilder modelBuilder)

        {

            // Setting a primary key in OurHero model

            modelBuilder.Entity<OurHero>().HasKey(x => x.Id);


            // Inserting record in OurHero table

            modelBuilder.Entity<OurHero>().HasData(

                new OurHero

                {

                    Id = 1,

                    FirstName = "System",

                    LastName = "",

                    isActive = true,

                }

            );

        }

    }

}
Step 4. Add ConnectionStrings in appSettings.json file
"ConnectionStrings": {

  "OurHeroConnectionString": "Data Source=LAPTOP-4TSM9SDC;Initial Catalog=OurHeroDB; Integrated Security=true;TrustServerCertificate=True;"

}
// appSettings.json

{

  "Logging": {

    "LogLevel": {

      "Default": "Information",

      "Microsoft.AspNetCore": "Warning"

    }

  },

  "ConnectionStrings": {

    "OurHeroConnectionString": "Data Source=LAPTOP-4TSM9SDC;Initial Catalog=OurHeroDB; Integrated Security=true;TrustServerCertificate=True;"

  },

  "AllowedHosts": "*"

}
Step 5. Register DbContext
Select your Database — I’m using an SQL server as a database. That’s why I called the UseSqlServer method.
Provide ConnectionString
//*********************** Register DbContext and provide ConnectionString .***********************

builder.Services.AddDbContext<OurHeroDbContext>(db => db.UseSqlServer(builder.Configuration.GetConnectionString("OurHeroConnectionString")), ServiceLifetime.Singleton);

//*********************** Register DbContext end.***********************
// Program.cs


using DotNet8WebAPI.Entity;

using DotNet8WebAPI.Services;

using Microsoft.EntityFrameworkCore;


var builder = WebApplication.CreateBuilder(args);


//*********************** Add services to the container.***********************

builder.Services.AddTransient<IOurHeroService, OurHeroService>();

//*********************** Add services to the container end.***********************


//*********************** Register DbContext and provide ConnectionString .***********************

builder.Services.AddDbContext<OurHeroDbContext>(db => db.UseSqlServer(builder.Configuration.GetConnectionString("OurHeroConnectionString")), ServiceLifetime.Singleton);

//*********************** Register DbContext end.***********************


builder.Services.AddControllers();

// Learn more about configuring Swagger/OpenAPI at https://aka.ms/aspnetcore/swashbuckle

builder.Services.AddEndpointsApiExplorer();

builder.Services.AddSwaggerGen();


var app = builder.Build();


// Configure the HTTP request pipeline.

if (app.Environment.IsDevelopment())

{

    app.UseSwagger();

    app.UseSwaggerUI();

}


app.UseHttpsRedirection();

app.UseAuthorization();

app.MapControllers();

app.Run();
Step 6. Go to OurHeroService and inject our OurHeroDbContext in the constructor.
// OurHeroService.cs


using DotNet8WebAPI.Entity;

using DotNet8WebAPI.Model;


namespace DotNet8WebAPI.Services

{

    public class OurHeroService : IOurHeroService

    {

        private readonly OurHeroDbContext _db;

        public OurHeroService(OurHeroDbContext db)

        {

            _db = db;

        }

    }

}
Step 7. Now use db context instead of in-memory collection to fetch OurHeros record.
Use async-await to fetch the OurHeros record asynchronously.
instead of returning pain object return as a Task<List<OurHero>>
List<OurHero> → Task<List<OurHero>>
// OurHeroService.cs


using DotNet8WebAPI.Entity;

using DotNet8WebAPI.Model;

using Microsoft.EntityFrameworkCore;


namespace DotNet8WebAPI.Services

{

    public class OurHeroService : IOurHeroService

    {

        private readonly OurHeroDbContext _db;

        public OurHeroService(OurHeroDbContext db)

        {

            _db = db;

        }


        public async Task<List<OurHero>> GetAllHeros(bool? isActive)

        {

            if (isActive == null) { return await _db.OurHeros.ToListAsync(); }


            return await _db.OurHeros.Where(obj => obj.isActive == isActive).ToListAsync();

        }


        public async Task<OurHero?> GetHerosByID(int id)

        {

            return await _db.OurHeros.FirstOrDefaultAsync(hero => hero.Id == id);

        }


        public async Task<OurHero?> AddOurHero(AddUpdateOurHero obj)

        {

            var addHero = new OurHero()

            {

                FirstName = obj.FirstName,

                LastName = obj.LastName,

                isActive = obj.isActive,

            };


            _db.OurHeros.Add(addHero);

            var result = await _db.SaveChangesAsync();

            return result >= 0 ? addHero : null;

        }


        public async Task<OurHero?> UpdateOurHero(int id, AddUpdateOurHero obj)

        {

            var hero = await _db.OurHeros.FirstOrDefaultAsync(index => index.Id == id);

            if (hero != null)

            {

                hero.FirstName = obj.FirstName;

                hero.LastName = obj.LastName;

                hero.isActive = obj.isActive;


                var result = await _db.SaveChangesAsync();

                return result >= 0 ? hero : null;

            }

            return null;

        }


        public async Task<bool> DeleteHerosByID(int id)

        {

            var hero = await _db.OurHeros.FirstOrDefaultAsync(index => index.Id == id);

            if (hero != null)

            {

                _db.OurHeros.Remove(hero);

                var result = await _db.SaveChangesAsync();

                return result >= 0;

            }

            return false;

        }

    }

}
Step 8. In IOurHeroService.
Update method return type.
Return as a Task instead of the normal class model.
Task<List<OurHero>> GetAllHeros(bool? isActive);
// IOurHeroService.cs

using DotNet8WebAPI.Model;


namespace DotNet8WebAPI.Services

{

    public interface IOurHeroService

    {

        Task<List<OurHero>> GetAllHeros(bool? isActive);

        Task<OurHero?> GetHerosByID(int id);

        Task<OurHero?> AddOurHero(AddUpdateOurHero obj);

        Task<OurHero?> UpdateOurHero(int id, AddUpdateOurHero obj);

        Task<bool> DeleteHerosByID(int id);

    }

}
Step 9. Open OurHeroController file.
Implement async-await in all action methods because now our IOurHeroService returns a response asynchronously.
[HttpGet]

public async Task<IActionResult> Get([FromQuery] bool? isActive = null)

{

    var heros = await _heroService.GetAllHeros(isActive);


    return Ok(heros);

}
// OurHeroController.cs

using DotNet8WebAPI.Model;

using DotNet8WebAPI.Services;

using Microsoft.AspNetCore.Mvc;


namespace DotNet8WebAPI.Controllers

{

    [Route("api/[controller]")]

    [ApiController]

    public class OurHeroController : ControllerBase

    {

        private readonly IOurHeroService _heroService;

        public OurHeroController(IOurHeroService heroService)

        {

            _heroService = heroService;

        }


        [HttpGet]

        public async Task<IActionResult> Get([FromQuery] bool? isActive = null)

        {

            var heros = await _heroService.GetAllHeros(isActive);

            return Ok(heros);

        }


        [HttpGet("{id}")]

        //[Route("{id}")] // /api/OurHero/:id

        public async Task<IActionResult> Get(int id)

        {

            var hero = await _heroService.GetHerosByID(id);

            if (hero == null)

            {

                return NotFound();

            }

            return Ok(hero);

        }


        [HttpPost]

        public async Task<IActionResult> Post([FromBody] AddUpdateOurHero heroObject)

        {

            var hero = await _heroService.AddOurHero(heroObject);


            if (hero == null)

            {

                return BadRequest();

            }


            return Ok(new

            {

                message = "Super Hero Created Successfully!!!",

                id = hero!.Id

            });

        }


        [HttpPut]

        [Route("{id}")]

        public async Task<IActionResult> Put([FromRoute] int id, [FromBody] AddUpdateOurHero heroObject)

        {

            var hero = await _heroService.UpdateOurHero(id, heroObject);

            if (hero == null)

            {

                return NotFound();

            }


            return Ok(new

            {

                message = "Super Hero Updated Successfully!!!",

                id = hero!.Id

            });

        }


        [HttpDelete]

        [Route("{id}")]

        public async Task<IActionResult> Delete([FromRoute] int id)

        {

            if (!await _heroService.DeleteHerosByID(id))

            {

                return NotFound();

            }


            return Ok(new

            {

                message = "Super Hero Deleted Successfully!!!",

                id = id

            });

        }

    }

}
Step 10. Now, our Entity Framework integration is almost ready.
Next:
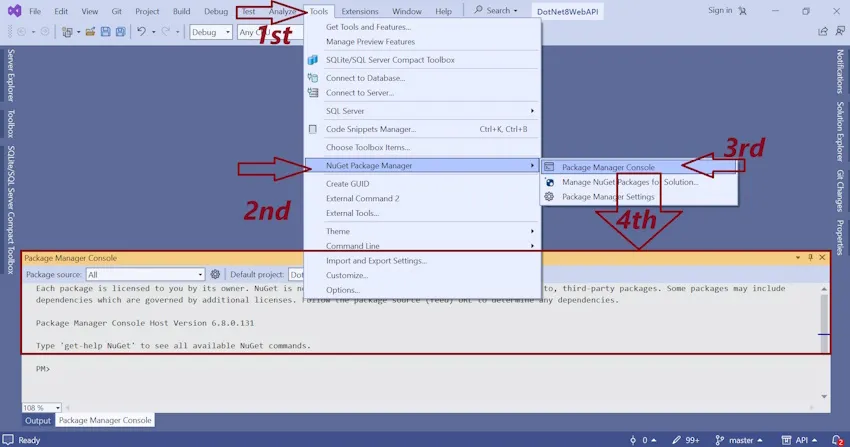
Visual Studio
- Open the Tools menu (available in the Visual Studio toolbar)
- Select NuGet package manager
- Then Select Package Manager Console
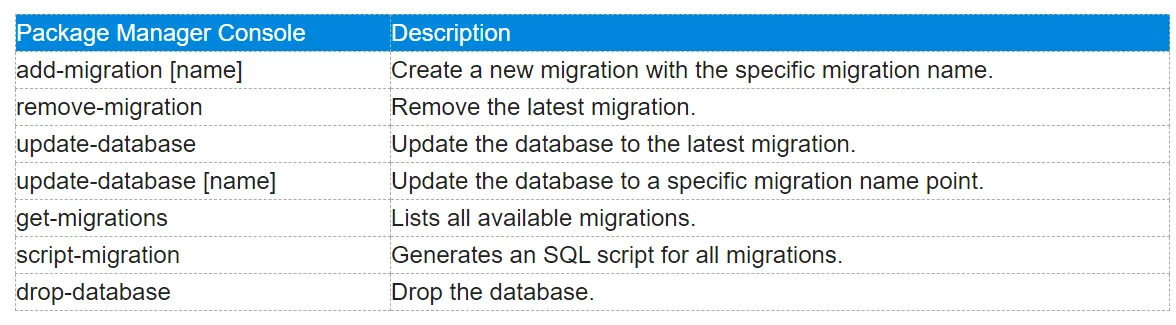
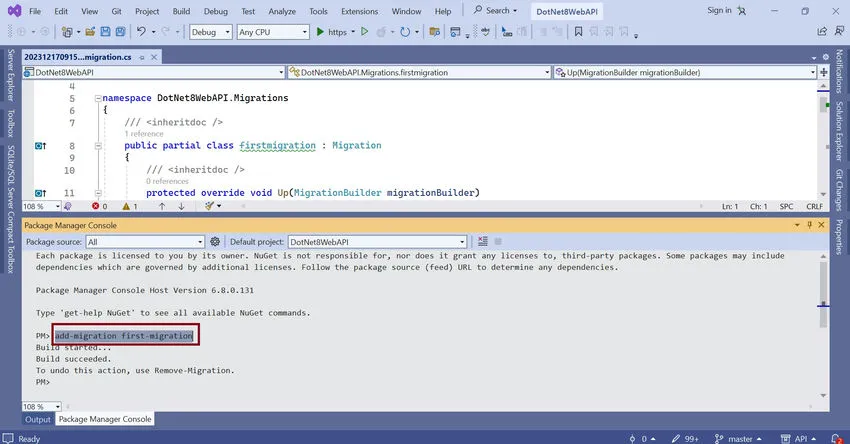
Run the add-migration [name] command to generate a DB migration file.
Once the file is ready:
Then, run the update-database command to reflect the migration change on our database side.

After running the update-database command. If you are also getting the same Error.
Only the invariant culture is supported in the globalization-invariant mode.
Then follow the below stem to fix this issue.
- Open a solution explorer
- Double-click on your project
- It will open the .csproj file
- update the InvariantGlobalization setting from true to false (It’s available in the PropertyGroup section)
- Save .csproj file
- Run the update-database command again
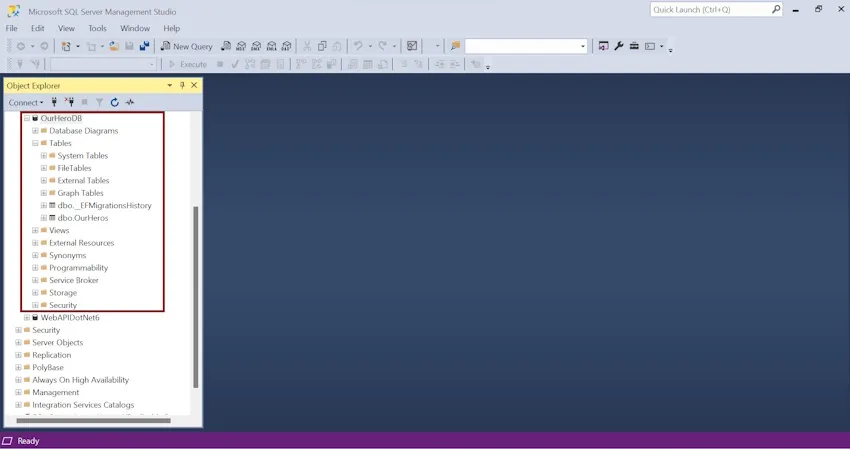
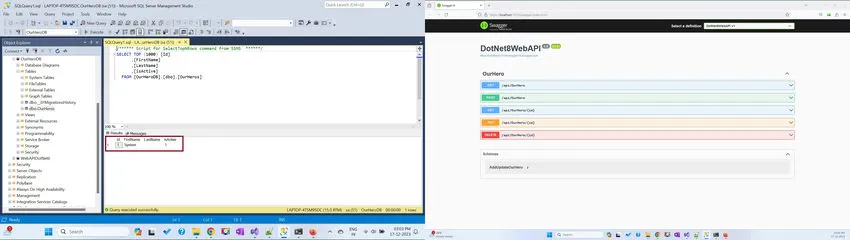
Once the updated database runs successfully, you will verify your Database in the SQL Server like this.
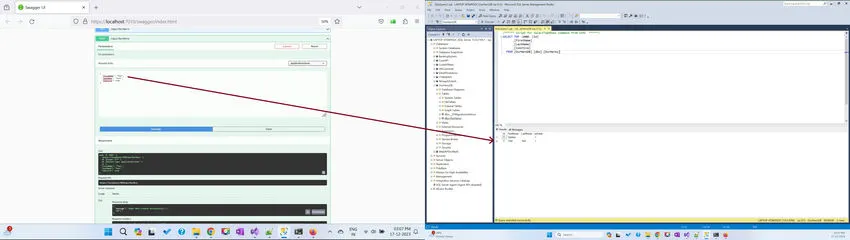
Step 11. Now, our Entity Framework has been implemented successfully.
We can run our application and verify.
Currently, we have one entry because we are inserted using the OnModelCreating method.
Now, I’m going to insert one more entry using post-API (/api/OurHero)
Summary
That’s it! You’ve created a complete .NET 8 Web API for CRUD operations with an SQL Server database. You can now integrate this API into your front-end application.
Thanks for reading.